Administrator Instructions
Administrator Instructions
1. System Overview
1.1. Software System Introduction
Myems energy management system is the use of cloud computing, internet of things, big data, artificial intelligence such as information technology, build a unified, standardized, powerful integrated service platform. Face can use system design, delivery and operations of the whole cycle and energy purchase, consumption, the whole process of resale, using aiot technology provides a beginning to end, quantitative, no dead angle of the energy management solutions. Help the owner fully grasp the situation of energy consumption, effective implementation of security management of expectations, avoid loopholes in management and technical shortcomings, can implement efficient use and product can balance, fulfill social responsibility, and ultimately promote the energy management ability to realize all-round improvement. Built-in data-driven artificial intelligence algorithm platform, operation policy in energy consumption prediction, evaluation, by using the abnormal can run event modeling, diagnosis, etc can offer beyond the capacity of experience. Covering power purchase, consumption, quantitative management, the sales process to achieve energy trading process of reconciliation in an all-round way. Avoid loopholes in management rules, and ensure that the owner in each trading links always occupy the information advantage. For cold station and other key energy-using systems, providing more sophisticated design, adjustment and operation management solutions. To drive the continuous improvement of relevant links with quantifiable high efficiency goals. Sinking to the site of the project operation adjustment to provide services, embedded in the customer management system of company operation consulting services, and data quality management and distribution system of fine research characteristic service, trying to fill the original industry division of blind area, true the solution to solve the problem.
This system can meet the demand of enterprise of energy management system, through to the main energy consumption equipment, energy utilization status quo of energy-using units monitoring analysis, statistical analysis method, method of energy audit and energy balance method, etc on a regular basis to the enterprise energy consumption situation and the analysis cost, help enterprises to determine the index system of energy consumption and energy saving, mining and energy saving potential of energy saving measures.
This system is suitable for general buildings, shopping malls, hotels, commercial complexes, agency units, hospitals, schools, office buildings, stadium, the scenic spot, underground pipe rack, factories, mines, ports, enterprise park, villages and towns, cities and other energy-using units.
This system can strengthen the capacity building of energy consumption and greenhouse gas emission measurement and statistics, and further improve the measurement, statistics, monitoring and verification system of energy conservation and emission reduction and carbon reduction, to ensure that the relevant index data is accutariff and consistent. Can strengthen energy-saving situation analysis of early warning, energy-saving target completion announcement on a regular basis.
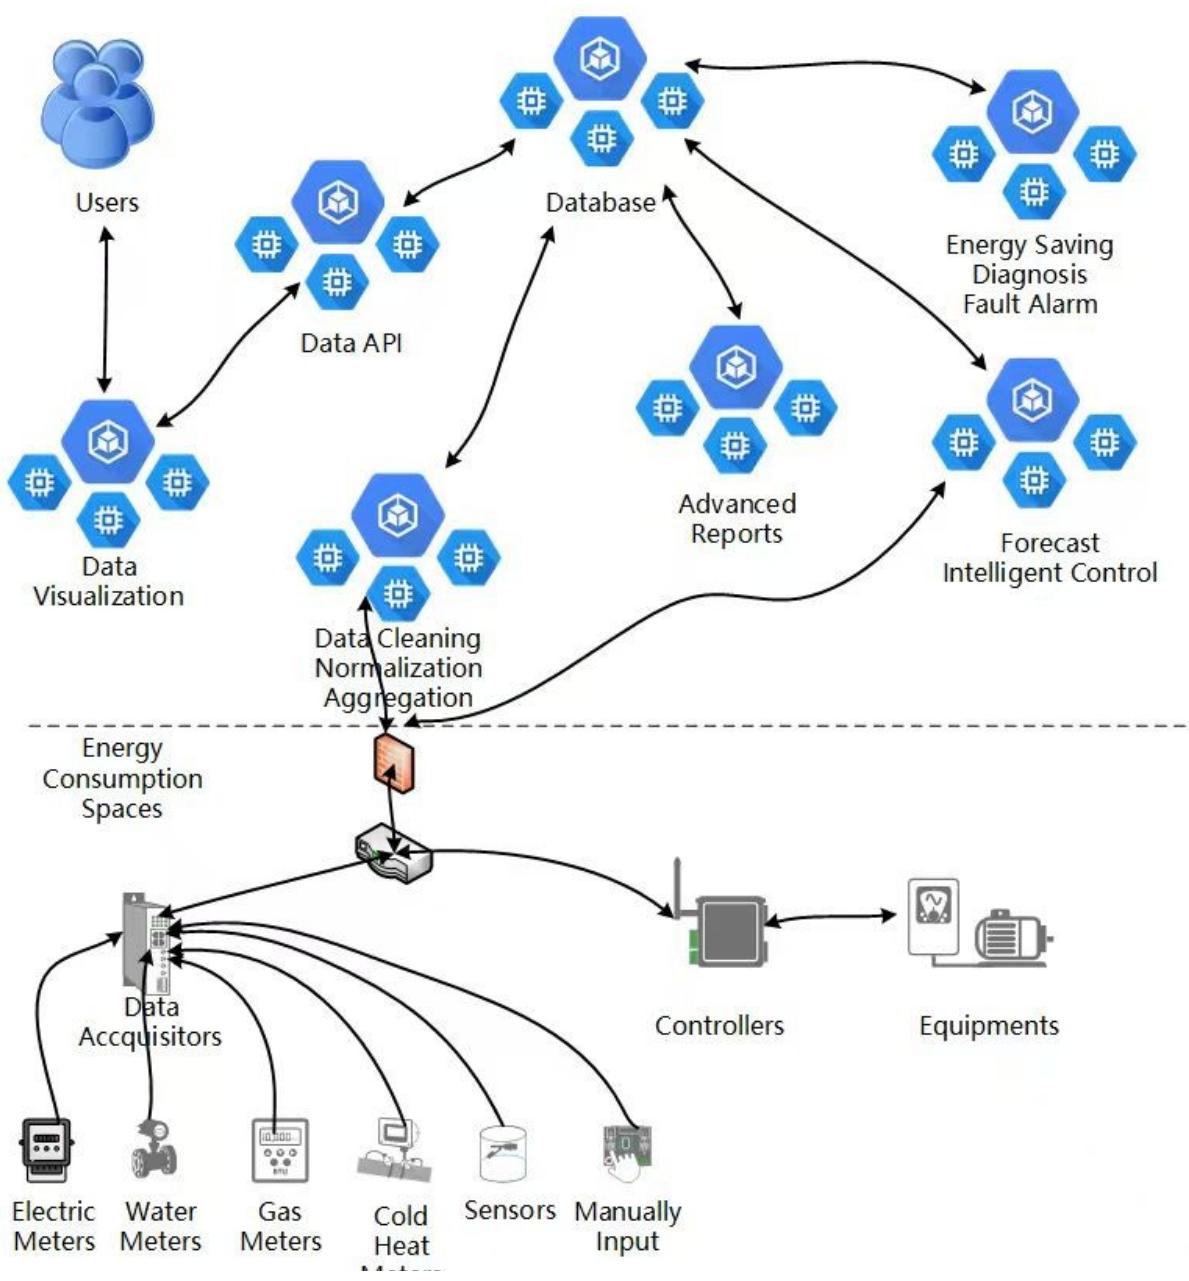
The system builds data space mapping relationships for user. The equipment, applications, services, business data, unified with space dimension build digital twin system. The terminal as a data entry, the space as precipitation data and sharing platform, and in conjunction with al ability to form a space, terminals, data threeterminal data ecological sustainable loop feedback.
System consists of energy consumption data acquisition, data storage, data analysis and data visualization and other parts. Data acquisition module supports a variety of communication protocol; the energy consumption history data and analysis result data were stored in the high-performance main memory database. Energy consumption data through analysis processing through a web-based interface or mobile application for user to query, analysis, and download the report.
User through the web, mobile application or wechat applet viewer energy-using units and energy-using equipment real-time data, the data in a table, curve, the pie Figure, histogram and so on variety shows.
1.2. Software System Architecture
2. Energy Category Management
Energy category classification measurement refers to the separate measurement of various primary energy, secondary energy and energy-carrying working medium and other energy types purchased, stored or used by energy consumption units. Energy grading assessment is to point to by the energy-using units, secondary energy-using units, main energy-using equipment unit was graded measurement, implementing energy consumption evaluation respectively.
2.1.Energy Category
Check Out The Energy Breakdown:
- Click on the menu 'system administration'
- Click on the menu 'energy category management' Category
- Click on the tab 'energy category'
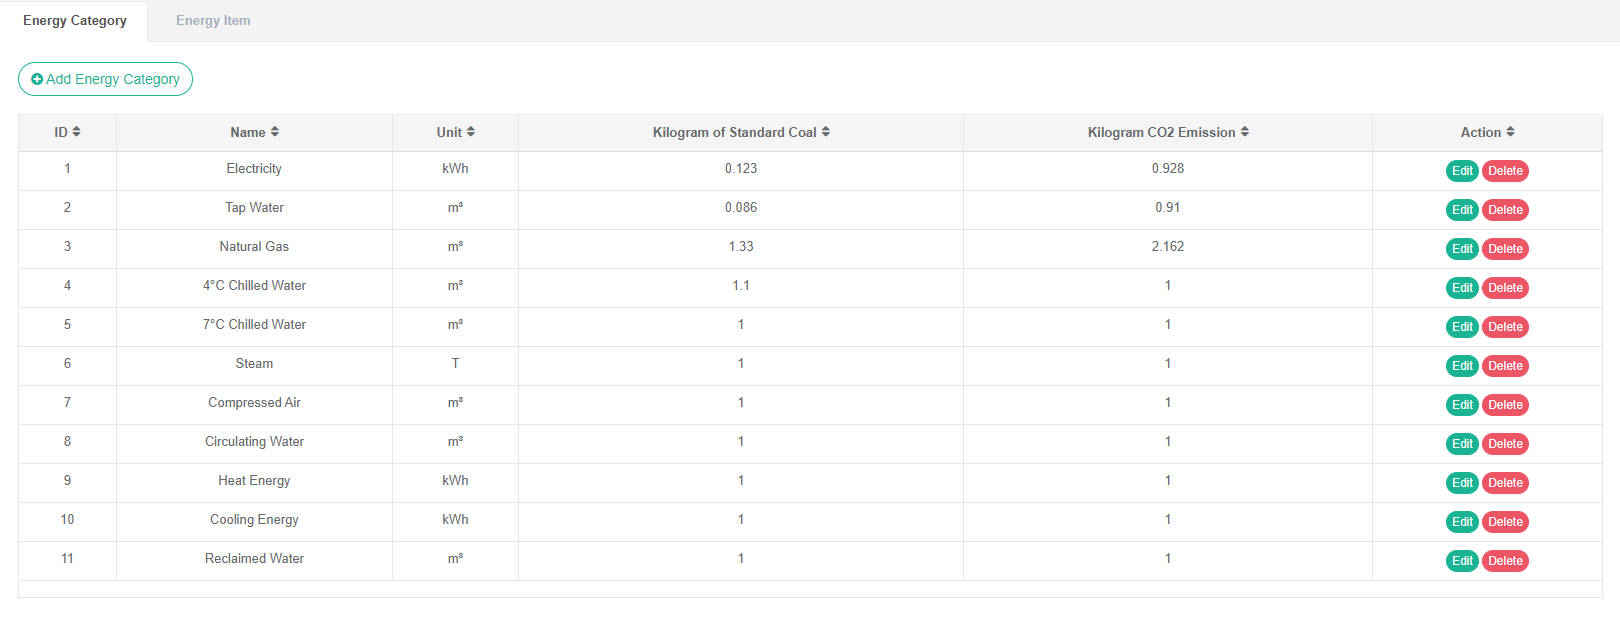
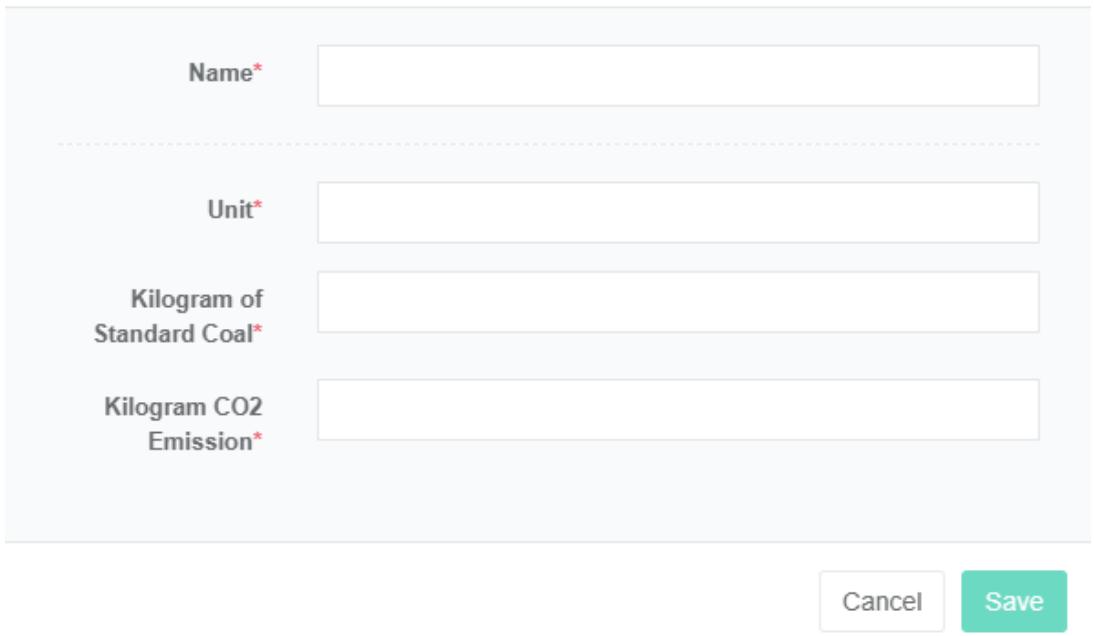
Add Energy Categories:
- Click on the menu 'system administration'
- Click on the menu 'energy category'
- Click on the tab 'energy category'
- Click on the 'add energy category' button
- In the 'add energy category dialog box input "Name", "Unit", "Kg of standard coal' and 'kilograms of carbon dioxide emissions'
- Click the "Save" Button
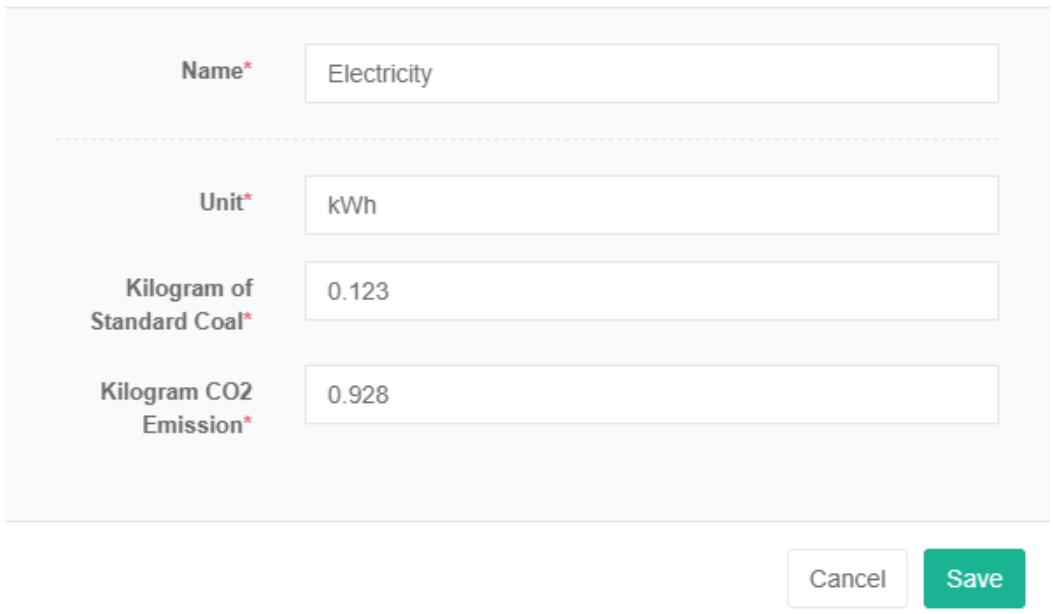
Edit the energy category:
- Click the menu "System management"
- Click on the menu 'energy category management'
- Click on the tab 'energy category'
- Click on the 'modify' button
- In 'edit energy category dialog input "Name", "Unit", "Kg of standard coal' and 'kilograms of carbon dioxide emissions'
- Click the 'save' button
Delete The Energy Category:
- Click on the menu 'system administration'
- Click on the menu 'energy category management'
- Click on the tab 'energy category'
- Click on the 'delete' button
- Click the 'click' confirm delete 'button in the' confirm delete 'dialog box
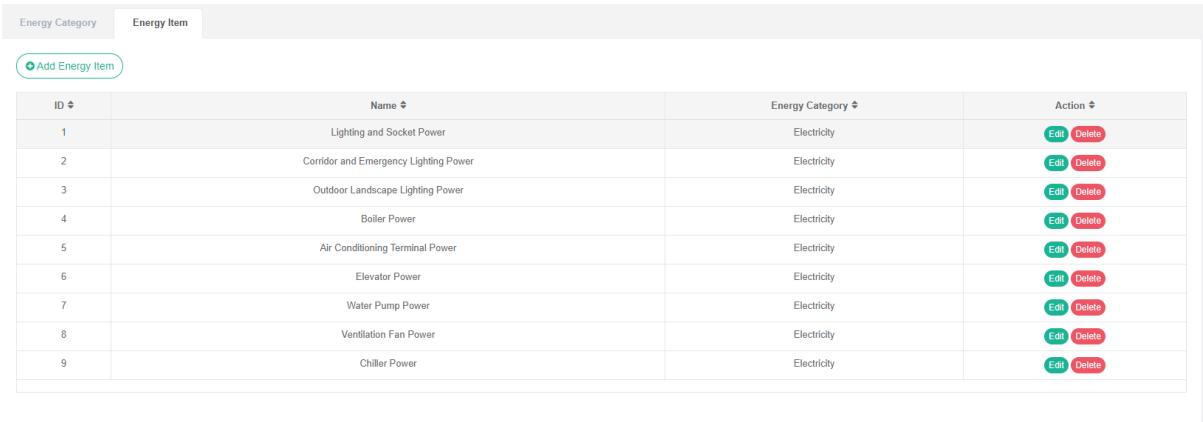
2.2. Energy Item
Energy consumption item refers to according to the division for the main purpose of all kinds of energy collection and sorting of energy consumption data, such as: Air conditioning, power electricity, light, etc.
Check The Energy Consumption Component:
- Click on the menu 'system administration'
- Click on the menu 'energy category management'
- Click on the tab 'energy breakdown'
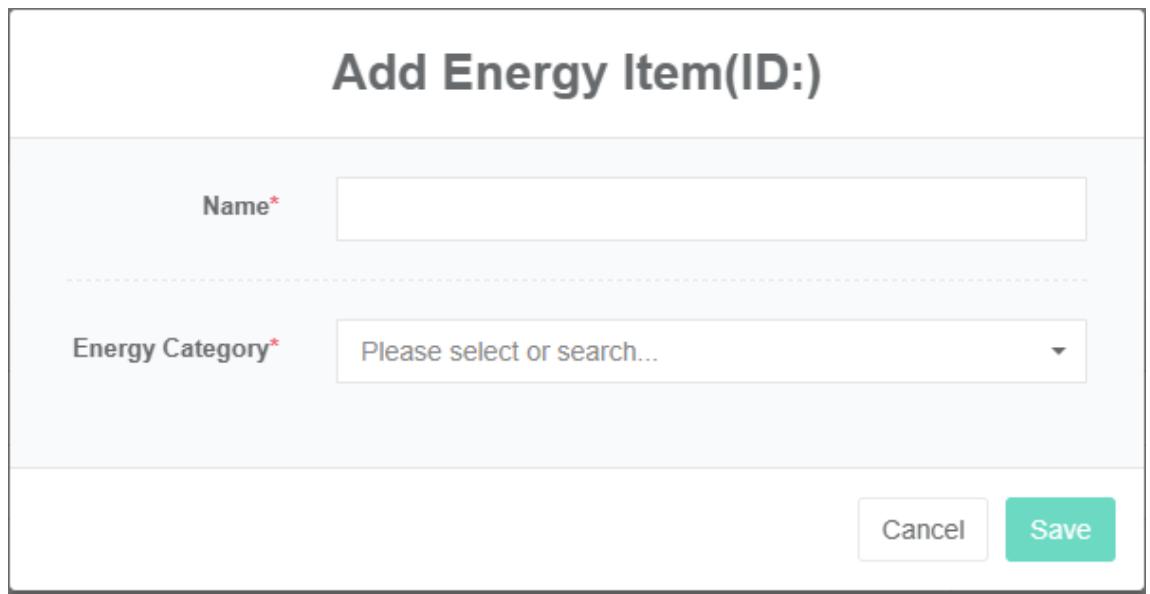
Add a Breakdown Of Energy Consumption:
- Click on the menu 'system administration'
- Click on the menu 'energy category management'
- Click on the tab 'energy consumption item'
- Click the 'add energy breakdown' button
- Enter 'name' in the 'add energy breakdown' dialog box and select 'energy breakdown' from the list below
- Click the 'save' button
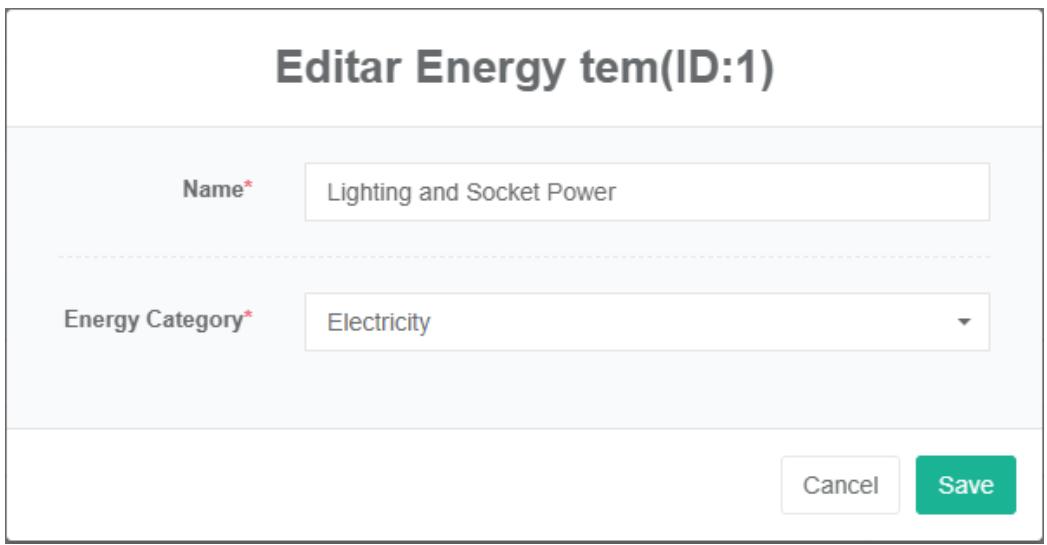
Edit The Energy Consumption Breakdown:
- Click on the menu 'system administration'
- Click on the menu 'energy category management'
- Click on the tab 'energy breakdown'
- Click the 'modify' button
- Enter 'name' in the edit energy breakdown dialog box and select 'energy breakdown' from the energy breakdown drop-down list.
- Click the "Save" Button
Delete The Energy Consumption Sub-Item:
- Click on the menu 'system administration'
- Click on the menu 'energy category management'
- Click on the tab 'energy breakdown'
- Click the 'delete' button
- Click the 'click' confirm delete 'button in the' confirm delete 'dialog box
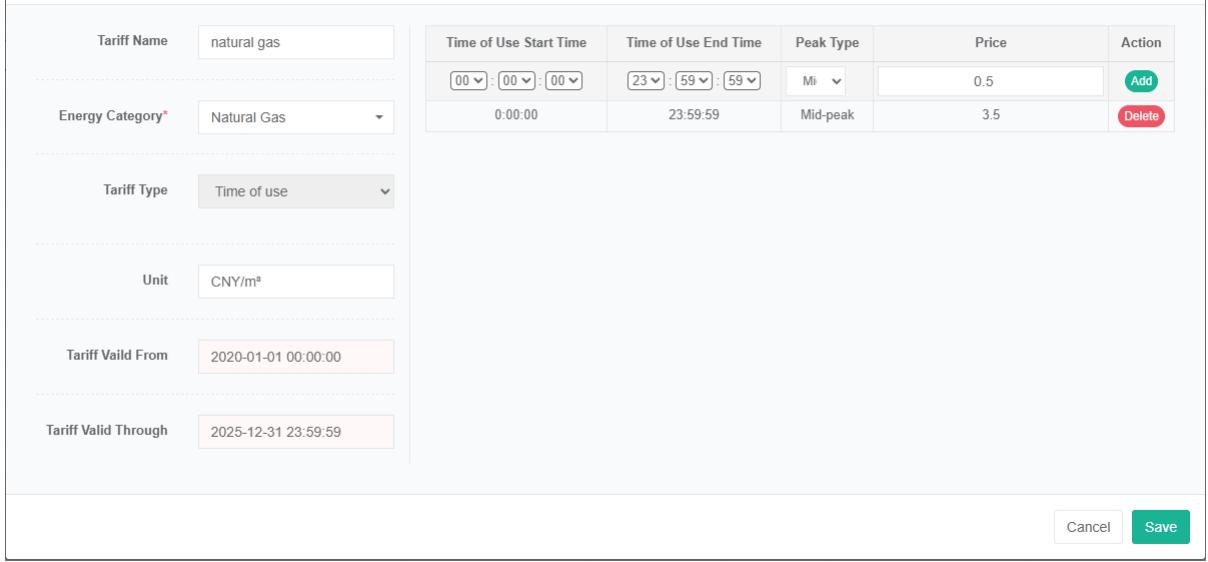
3. Energy Tariffs Management
Energy tariffs are used for calculations related to energy bills.
Check The Energy Tariff:
- Click on the menu 'system administration'
- Click on the menu 'energy tariff management'
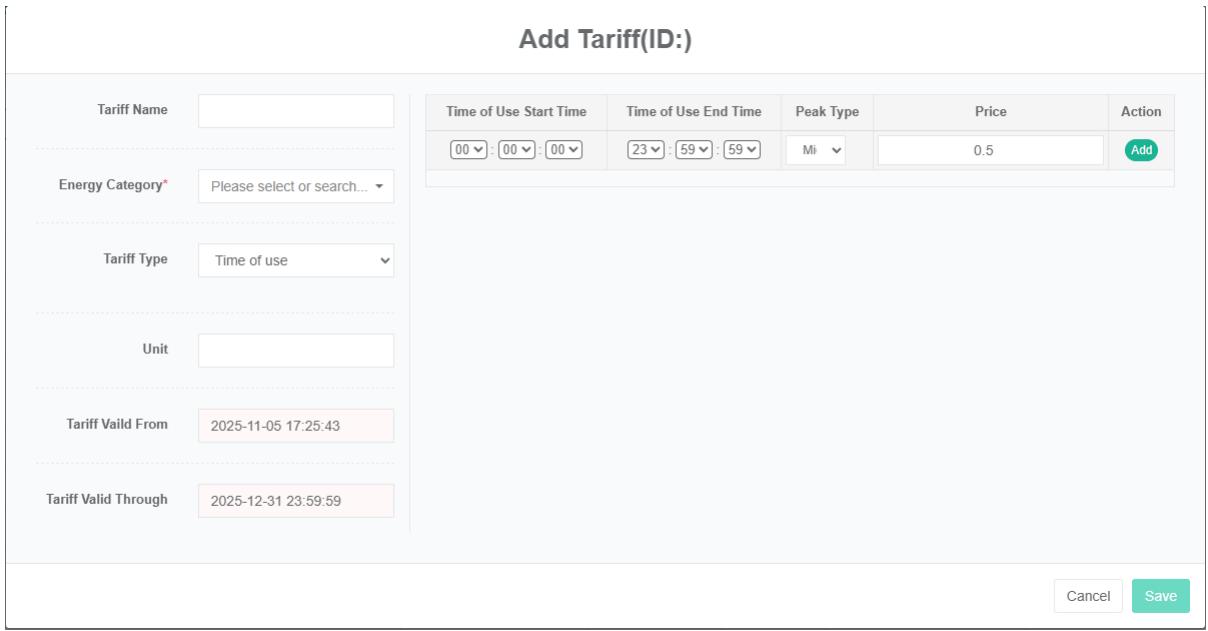
Add Energy Tariff:
- Click on the menu 'system administration'
- Click on the menu 'energy tariff management'
- Click on the 'add tariff' button
- In the 'add tariff dialog box input "Name", "Energy category" And "The tariff type', 'unit', 'tariffs start' and 'tariff validity is over'
- Click the "Save" Button
Note: You can choose between 'step tariff' and 'time-sharing tariff' for the tariff type.
Edit The Energy Tariff:
- Click on the menu 'system administration'
- Click on the menu 'energy tariff management'
- Click on the tab 'energy tariffs'
- Click "Edit" Button
- Enter 'name', 'energy category', 'tariff type', 'unit', 'tariff validity period begins' and 'tariff validity period ends' in the 'edit tariff' dialog box
- Click the "Save" Button
Delete Energy Tariff:
Note 1: Unbind in cost center management before deleting tariffs.
Note 2: Delete the tariff should be in the 'edit tariffs before tariff to delete all entries.
- Click on the menu 'system administration'
- Click on the menu 'energy tariff management'
- Click on the tab 'energy tariffs'
- Click on the 'delete' button
- Click the 'click' confirm delete 'button in the' confirm delete 'dialog box
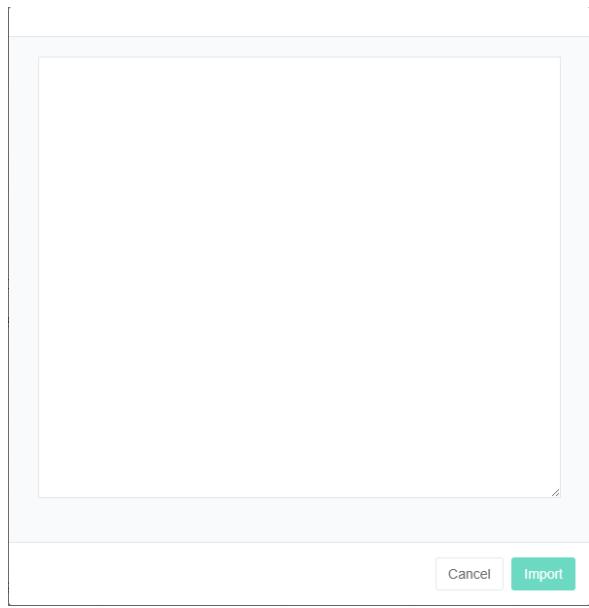
Import Energy Tariff:
- Click on the menu 'system administration'
- Click on the menu 'energy tariff management'
- Click on the tab 'energy tariff'
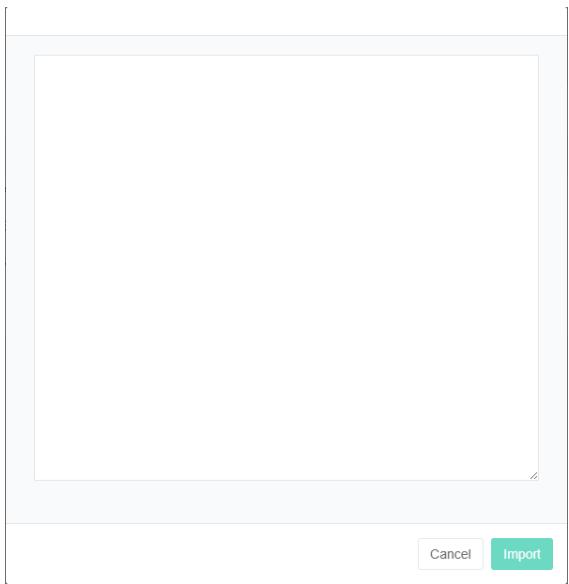
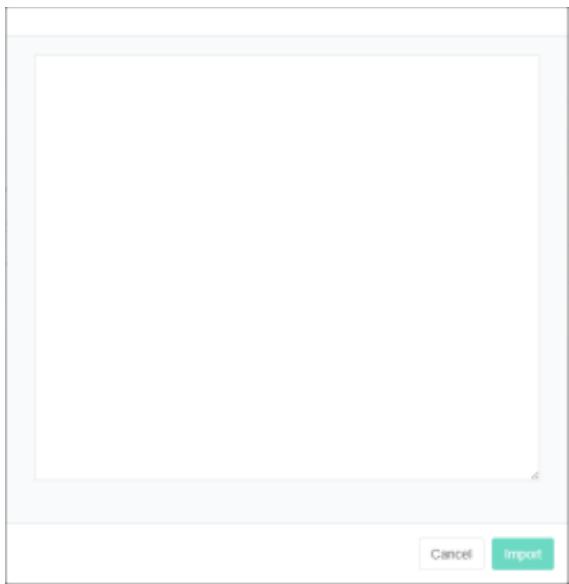
- Click on the 'import' button
- The data input to the dialog box
- Click the 'import' button
Export Energy Tariffs:
- Click on the menu 'system administration'
- Click on the menu 'energy tariff management'
- Click on the tab 'energy tariff'
- Click on the "Export" Button
Clone energy tariffs:
- Click on the menu 'system administration'
- Click on the menu 'energy tariff management'
- Click on the tab 'energy tariff'
- Click on the 'clone' button
4. Cost Center Management
Cost centers are used for calculations related to energy bills.
4.1. Cost Center
Check The Cost Center:
- Click the menu "System management"
- Click on the menu 'cost center management'
- Click on the tab 'cost center'

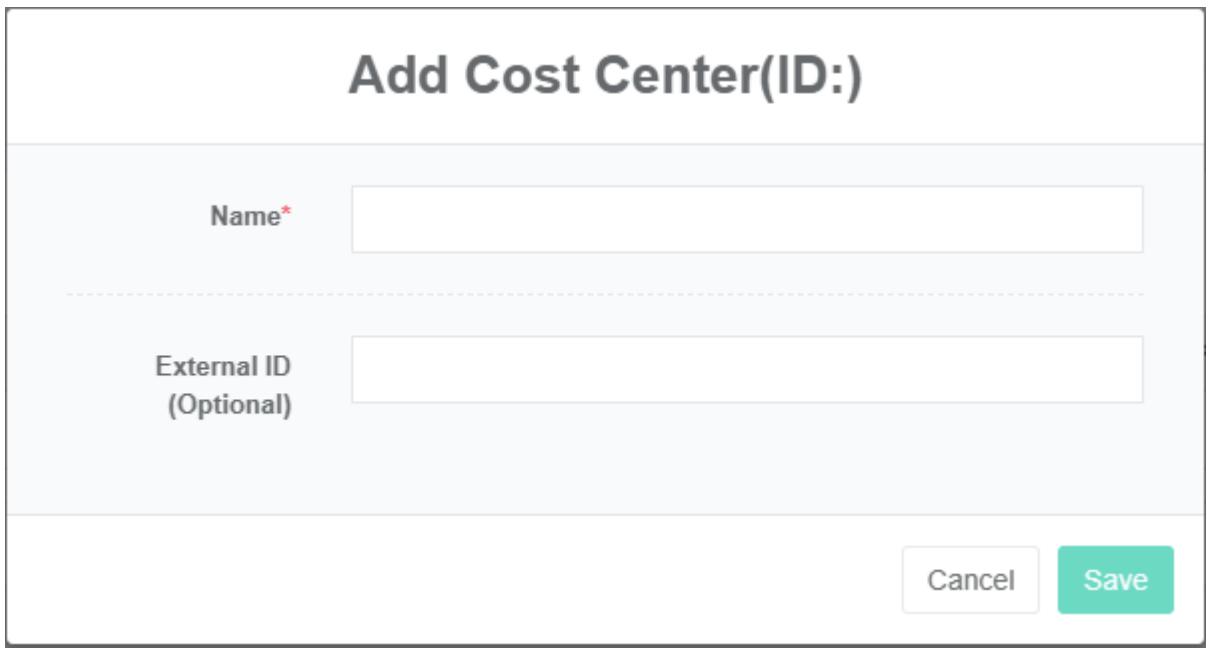
Add a Cost Center:
- Click on the menu 'system administration'
- Click the menu 'success center management'
- Click on the tab 'cost center'
- Click on the 'add cost center' button
- Enter 'name' and 'external id' in the 'add cost center' dialog box
- Click the 'save' button
External id refers to the id of this cost center in the target system when interfacing with the corpotariff financial system, which can be used to develop automated data integration functions.
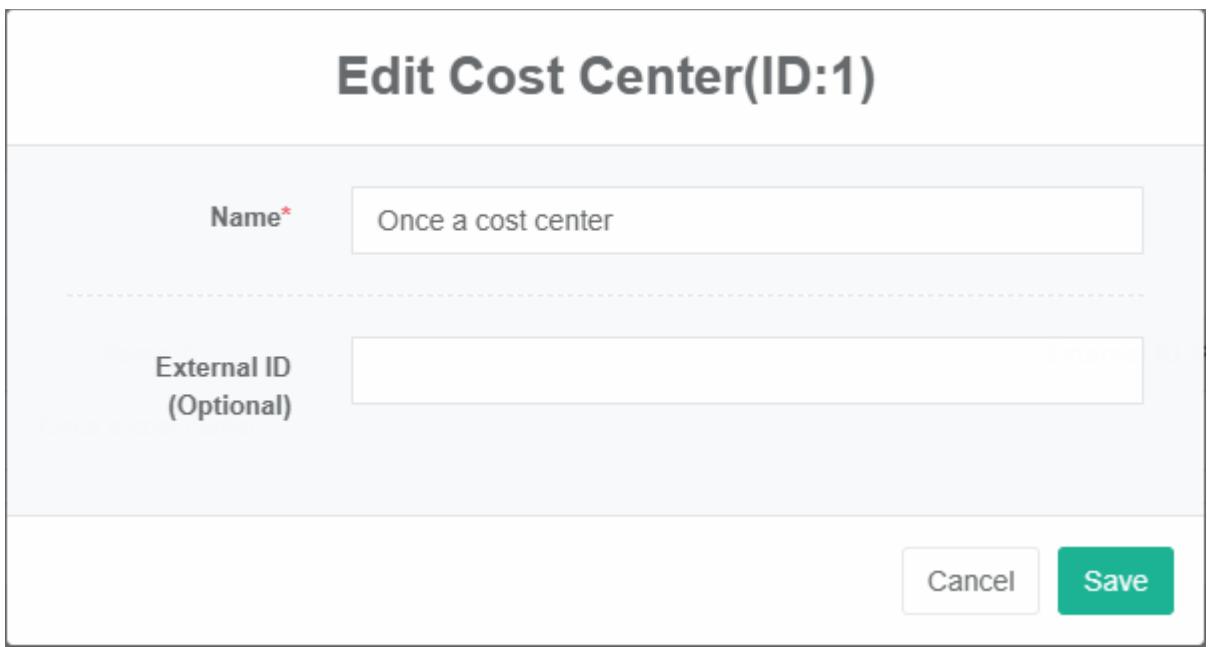
Edit The Cost Center:
- Click on the menu 'system administration'
- Click on the menu 'cost center management'
- Click on the tab 'cost center'
- Click on the 'modify' button
- Type 'name' and 'external id' in the edit cost center dialog box
- Click the 'save' button
Delete Cost Center:
- Click on the menu 'system administration'
- Click on the menu 'cost center management'
- Click on the tab 'cost center'
- Click the 'delete' button
- Click the 'click' confirm delete 'button in the' confirm delete 'dialog box
4.2. Bind Tariff
Check Out The Bind Tariffs:
- Click on the menu 'system administration'
- Click on the menu 'cost center management'
- Click on the tab 'Bind tariffs'
- Select 'cost center'
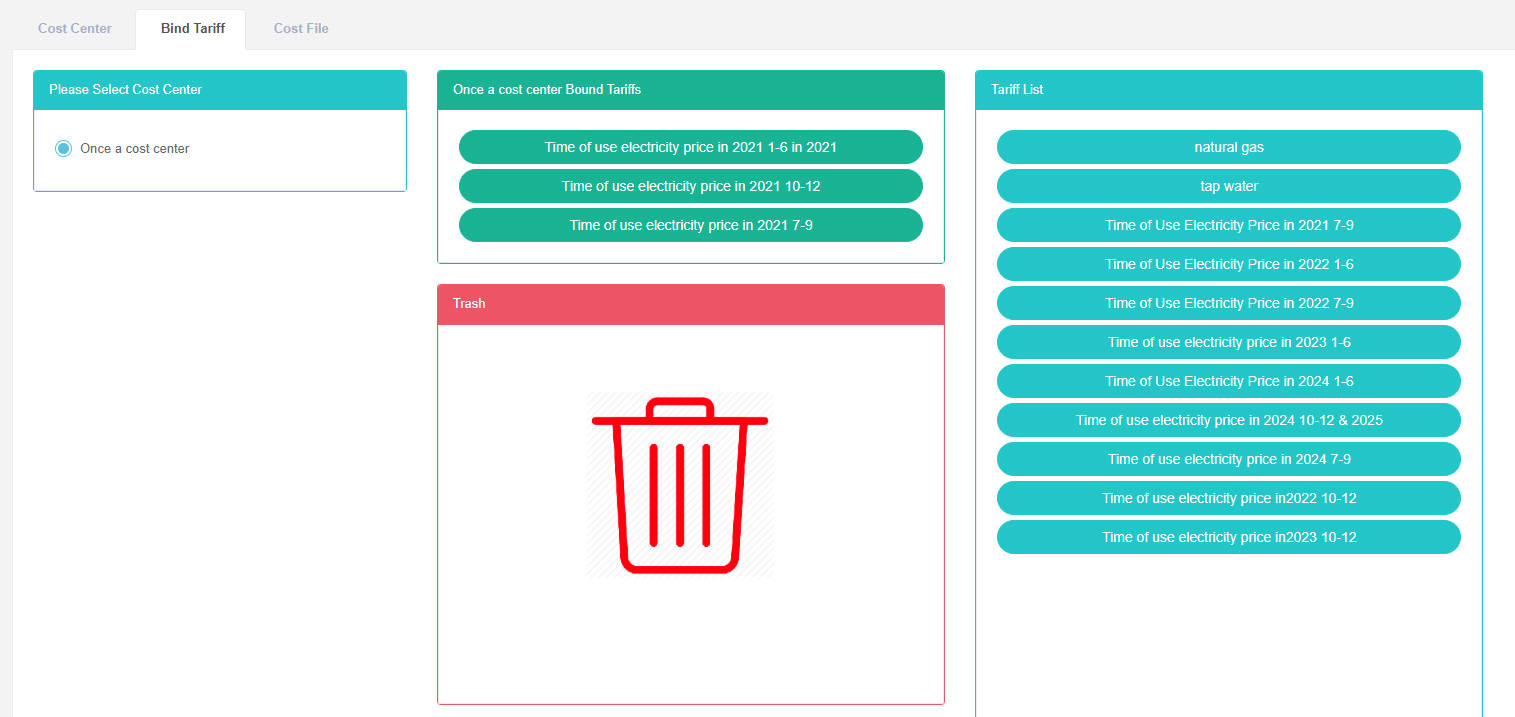
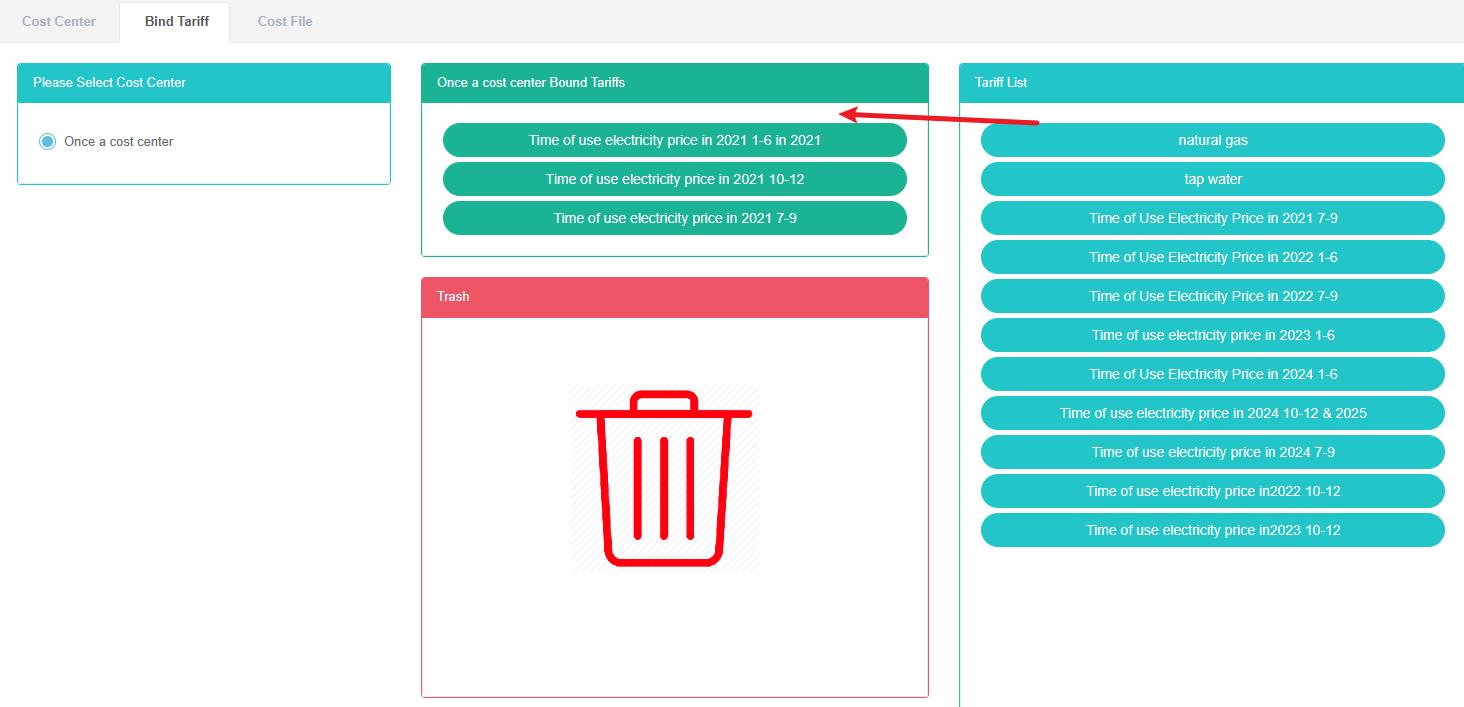
Add The Bind Tariff:
- Click on the menu 'system administration'
- Click on the menu 'cost center management'
- Click on the tab 'Bind tariffs'
- Select 'cost center'
- Drag the 'tariff list' box inside the green box
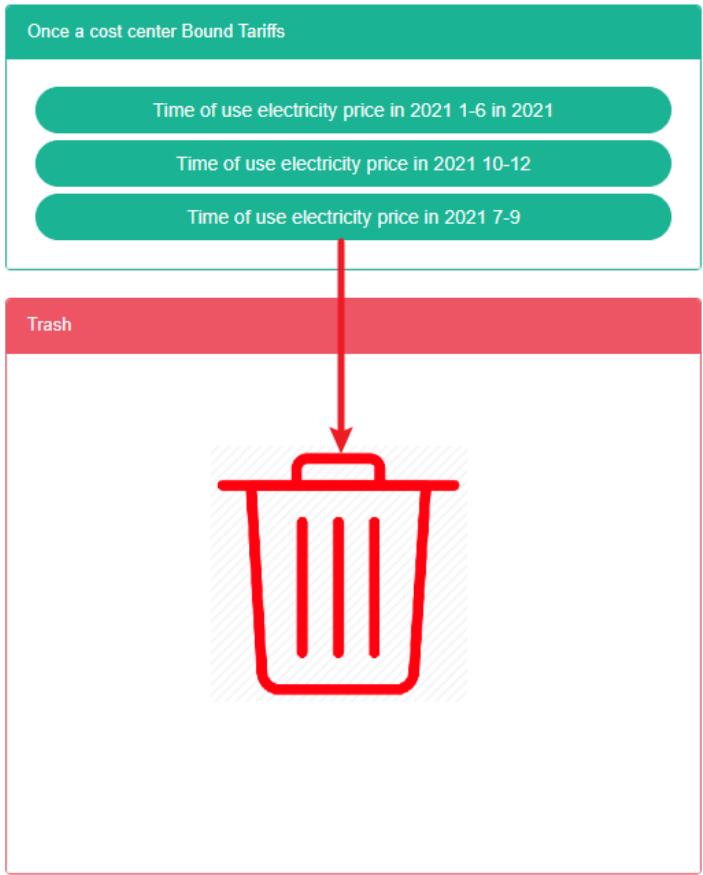
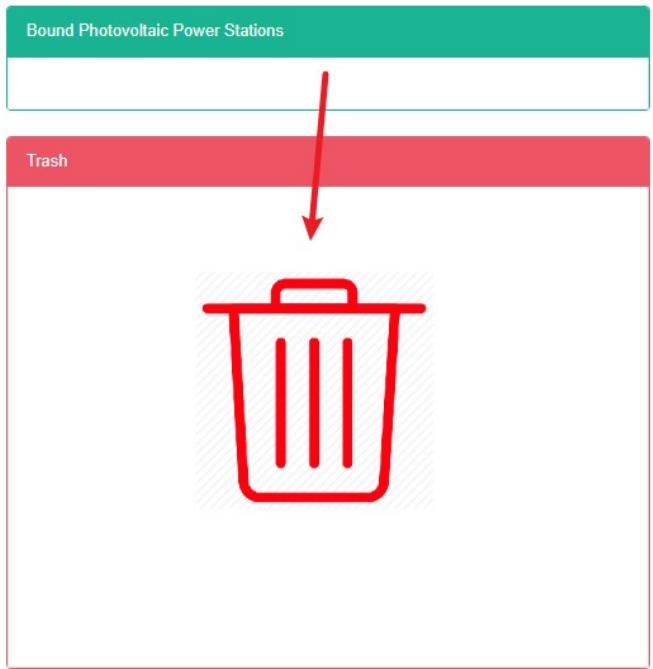
Remove The Bind Tariff:
- Click on the menu 'system administration'
- Click on the menu 'cost center management'
- Click on the tab 'Bind tariffs'
- Select 'cost center'
- Drag the green box tariff to the red 'recycle bucket' below.
4.3. Cost File
View Cost Documents:
- Click the menu "System management"
- Click on the menu 'cost center management'
- Click on the tab 'cost files'

Upload The Cost File:
- Click on the menu 'system administration'
- Click on the menu 'cost center management'
- Click on the tab 'cost files'
- Click on the blue box and select file to upload

Recovery Cost File:
- Click on the menu 'system administration'
- Click on the menu 'cost center management'
- Click on the tab 'cost files'
- Click on the "Restore" Button
Delete The Cost File:
-
Click on the menu 'system administration'
-
Click on the menu 'cost center management'
-
Click on the tab 'cost files'
-
Click on the 'delete' button
-
Click the 'click' confirm delete 'button in the' confirm delete 'dialog box
5. Contact Management
Contacts are used for alarm notifications or other notifications from other modules.
Check The Contacts:
- Click on the menu 'system administration'
- Click on the menu 'contact management'

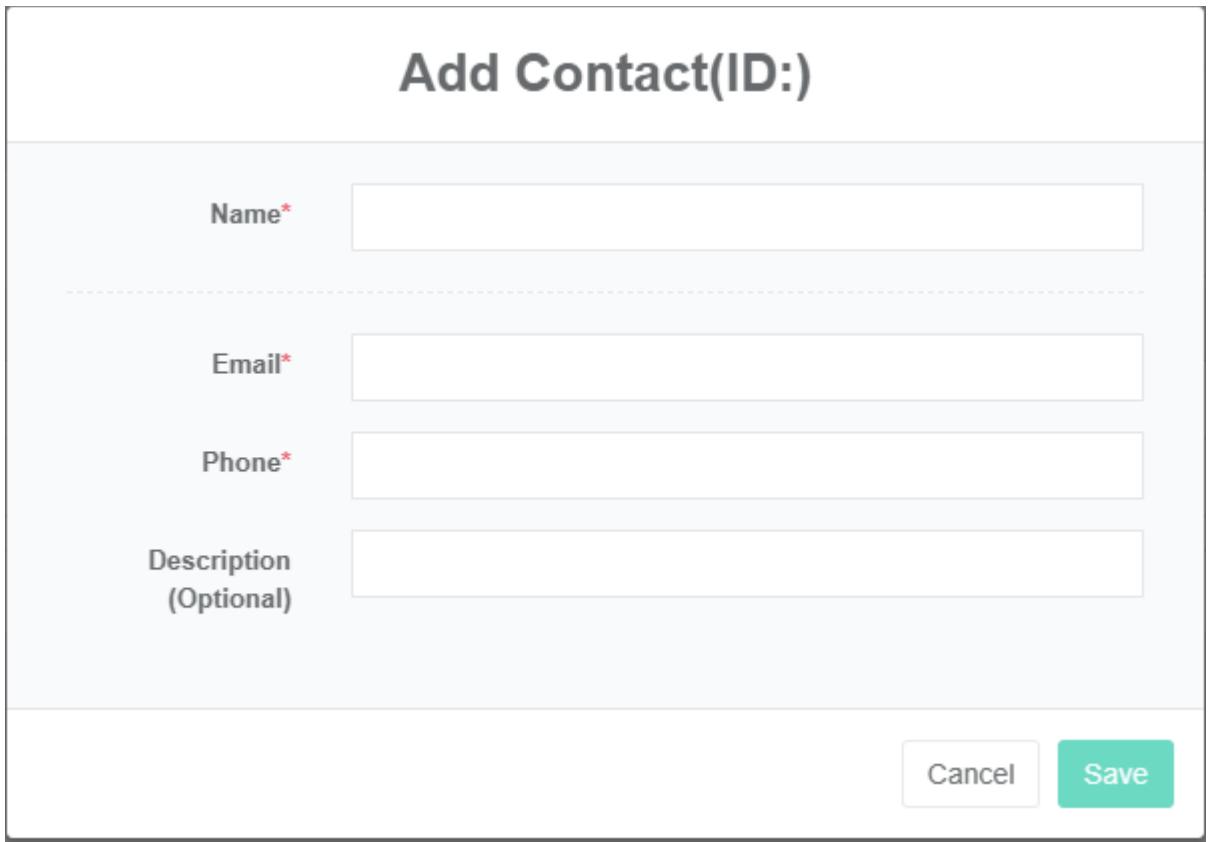
Add a Contact:
- Click on the menu 'system administration'
- Click on the menu 'contact management'
- Click the 'add contacts' button
- Type 'name', 'email', 'phone' and 'description' into the 'add contact' dialog box
- Click the "Save" Button
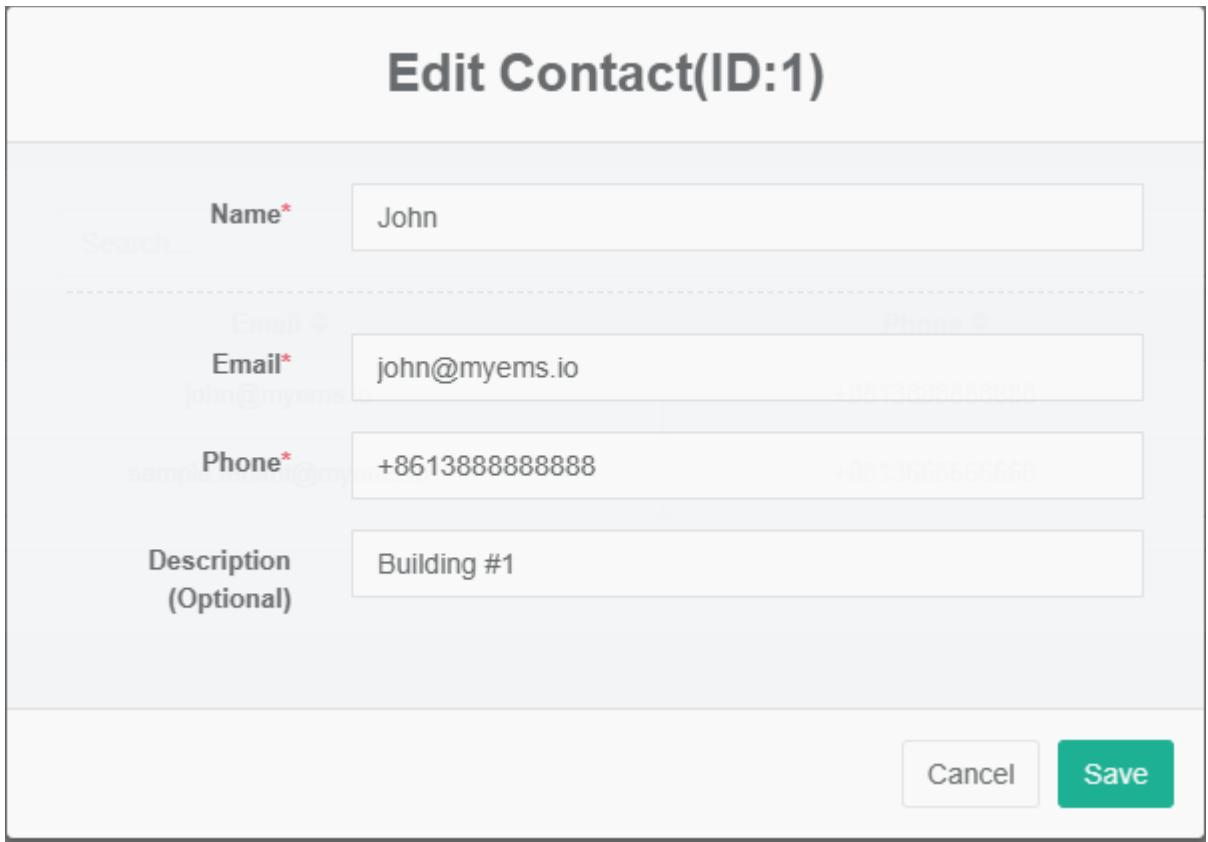
Edit Contact:
- Click on the menu 'system administration'
- Click on the menu 'contact management'
- Click on the tab 'contacts'
- Click "Edit" Button
- Type 'name', 'email', 'phone' and 'description' into the 'edit contact' dialog box
- Click the "Save" Button
Delete The Contact:
- Click on the menu 'system administration'
- Click on the menu 'contact management'
- Click on the tab 'contacts'
- Click the 'delete' button
- Click the 'click' confirm delete 'button in the' confirm delete 'dialog box
6. Gateway Management
The gateway is mainly used for bind with data source management in behind.
View Gateway:
- Click on the menu 'system administration'
- Click on the menu 'gateway management'
- Click on the tab 'gateway'

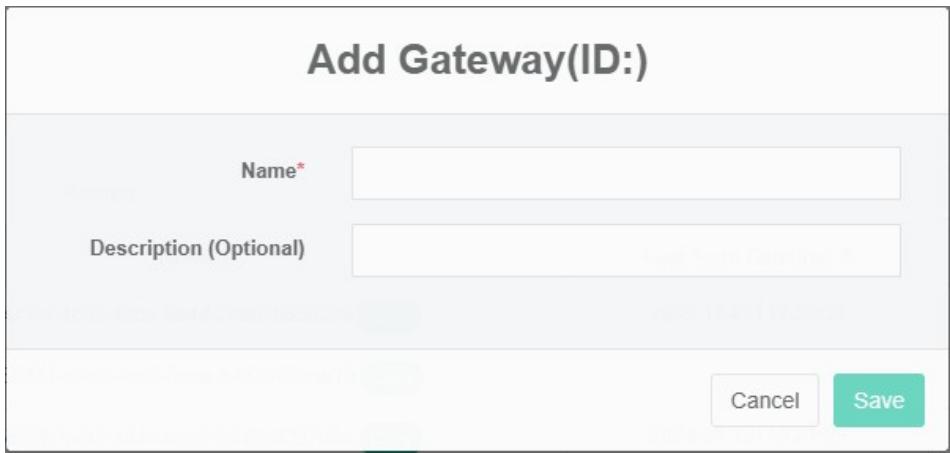
Add The Gateway:
- Click on the menu 'system administration'
- Click on the menu 'gateway management'
- Click on the tab 'gateway'
- Click the 'add gateway' button
- Adding in the 'gateway' dialog input 'name' and 'description'
- Click the 'save' button
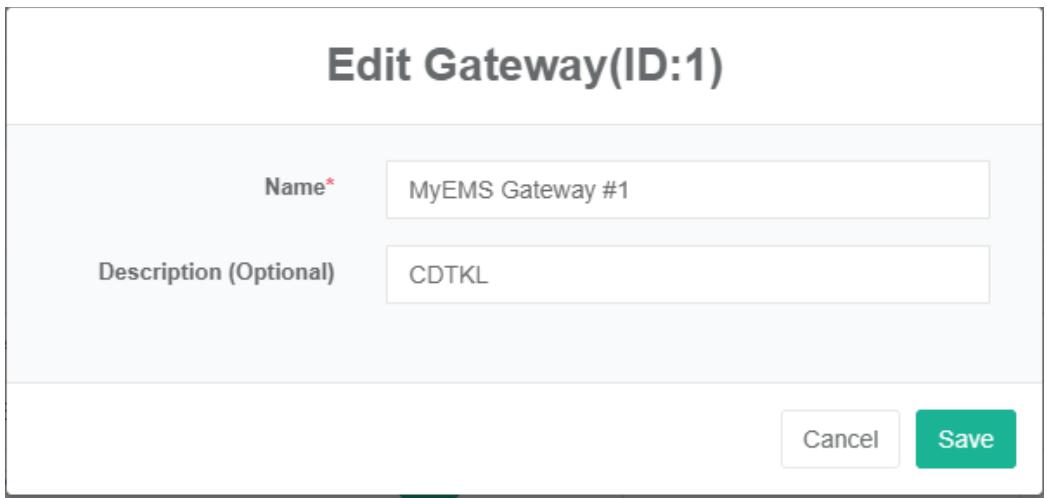
Edit The Gateway:
- Click on the menu 'system administration'
- Click on the menu 'gateway management'
- Click on the tab 'gateway'
- Click on the 'modify' button
- Type 'name' and 'description' in the edit gateway dialog box
- Click the 'save' button
Delete The Gateway:
- Click on the menu 'system administration'
- Click on the menu 'gateway management'
- Click on the tab 'gateway'
- Click the 'delete' button
- Click the 'click' confirm delete 'button in the' confirm delete 'dialog box
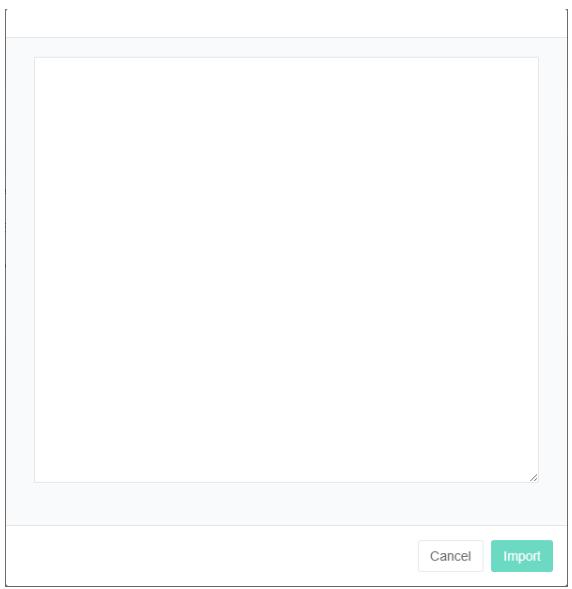
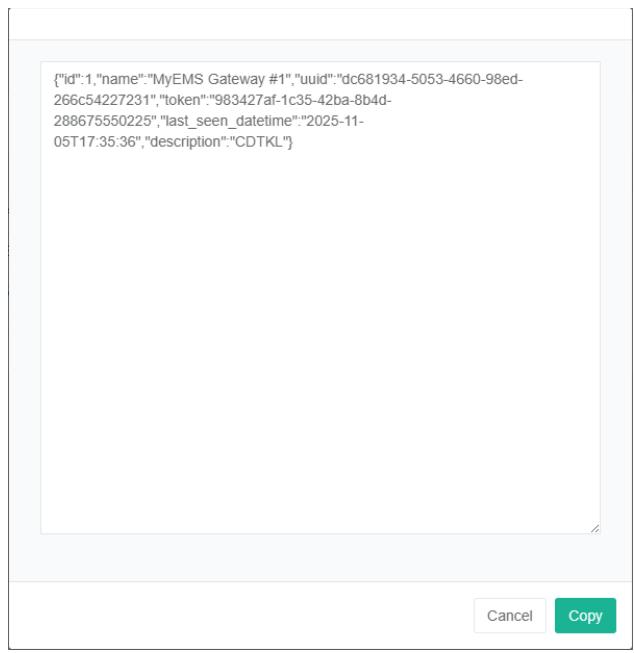
Import The Gateway:
- Click on the menu 'system administration'
- Click on the menu 'gateway management'
- Click on the tab 'gateway'
- Click on the 'import' button
- Enter the data into the dialog box
- Click on the "Import" Button
ExportThe Gateway:
- Click on the menu 'system administration'
- Click on the menu 'gateway management'
- Click on the tab 'gateway'
- Click the 'export' button
Clone The Gateway:
- Click on the menu 'system administration'
- Click on the menu 'gateway management'
- Click on the tab 'gateway'
- Click on the 'clone' button

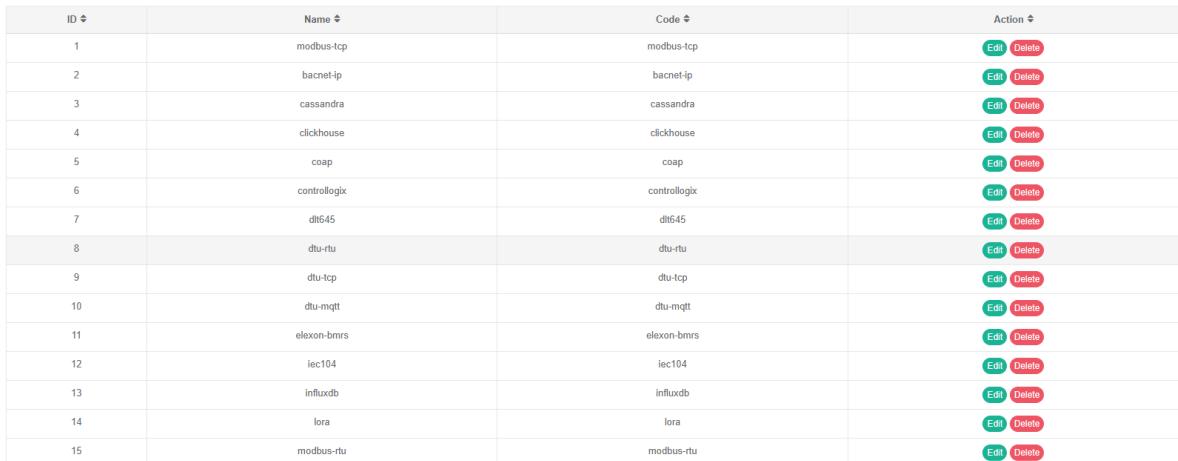
7. Protocol
Mainly used to show the use of a protocol
Check The Protocol:
- Click on the menu 'system administration'
- Click on the menu 'protocol management'
- Click on the tab 'protocol'
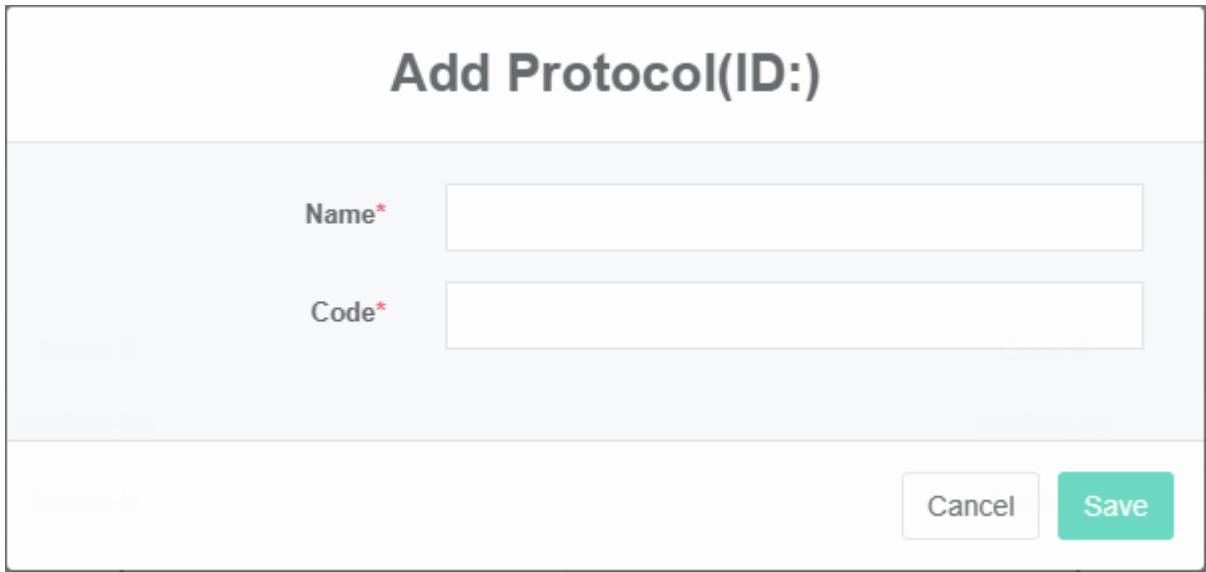
Add Protocols:
- Click the menu "System management"
- Click on the menu 'protocol management'
- Click on the tab 'protocol'
- Click on the 'add agreement' button
- Enter name and code in the add protocol dialog box
- Click the 'save' button
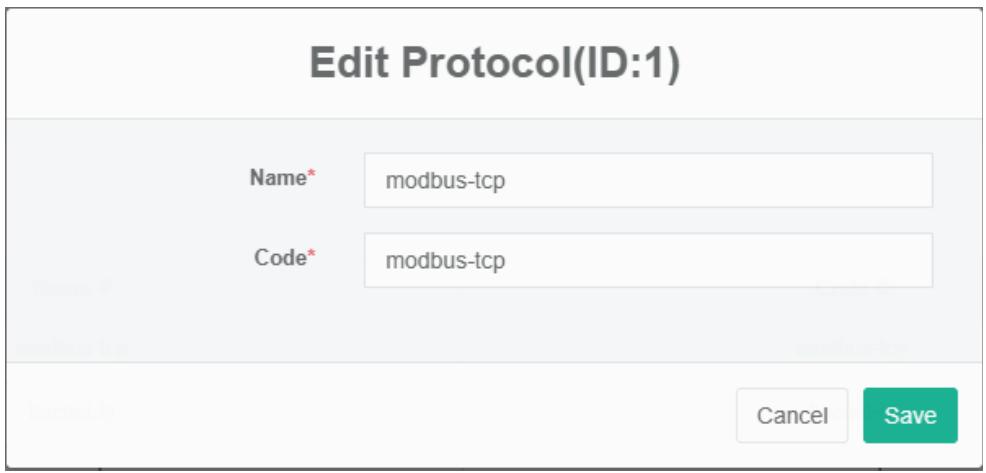
Edit The Protocol
- Click on the menu 'system administration'
- Click on the menu 'protocol management'
- Click on the tab 'protocol'
- Click "Edit" Button
- Type 'name' and 'code' in the 'edit protocol' dialog box
- Click the 'save' button
Delete The Protocol:
- Click on the menu 'system administration'
- Click on the menu 'protocol management'
- Click on the tab 'protocol'
- Click "Delete" Button
- Click the 'click' button in the 'confirm delete' dialog box
Import Protocol:
- Click on the menu 'system administration'
- Click on the menu 'protocol management'
- Click on the tab 'protocol'
- Click on the 'import' button
- Enter the data into the dialog box
- Click on the "Import" Button
8. Data Source Management
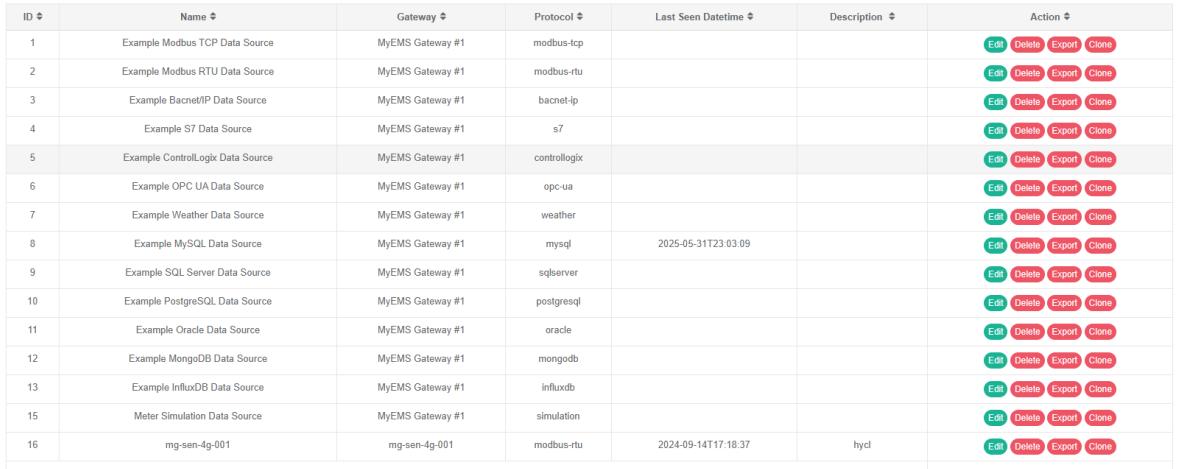
The data source is used to display the name, protocol, ip, and bind relationship of the data source to the gateway.
8.1.Data Source
View The Data Source:
- Click on the menu 'system administration'
- Click on the menu 'data source management'
- Click on the tab 'data source'
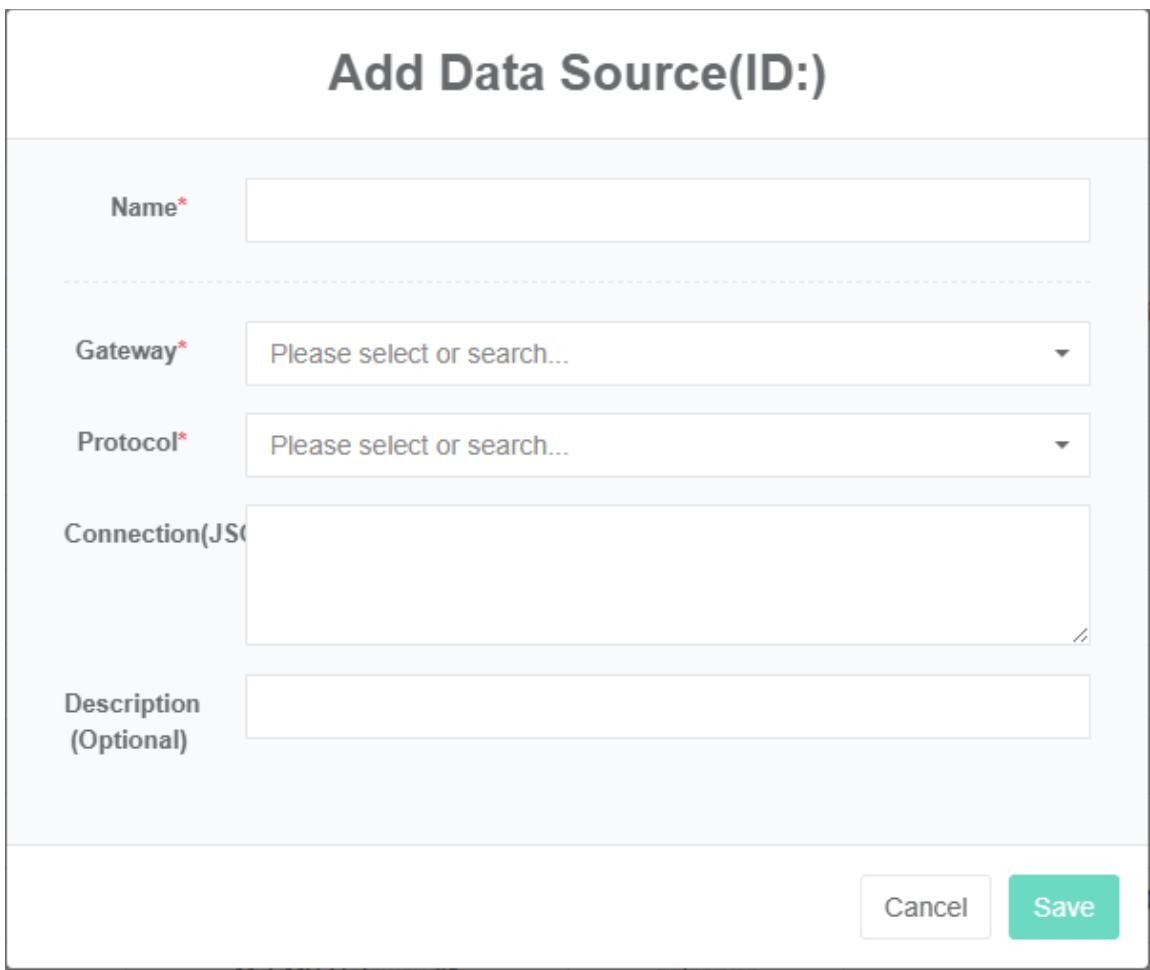
Add Data Source
- Click on the menu 'system administration'
- Click on the menu 'data source management'
- Click on the tab 'data sources'
- Click the 'add data source' button
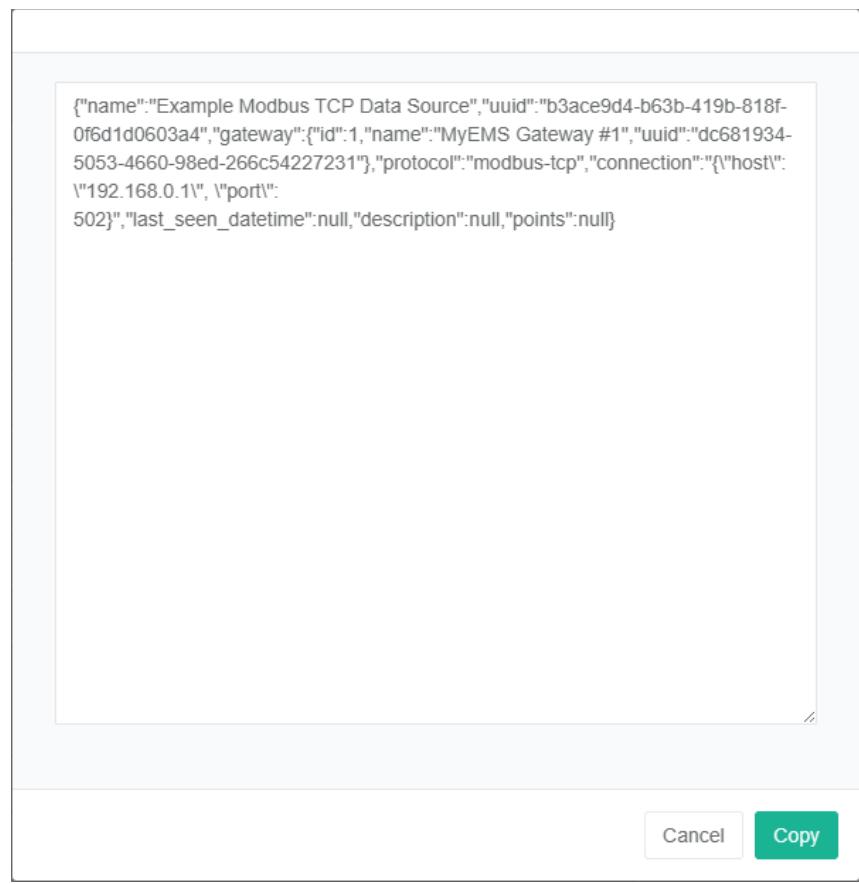
- In the "Add data source dialog box input" Name ", "Gateway", "Agreement", "Connection" And "Description"
- Click the "Save" Button
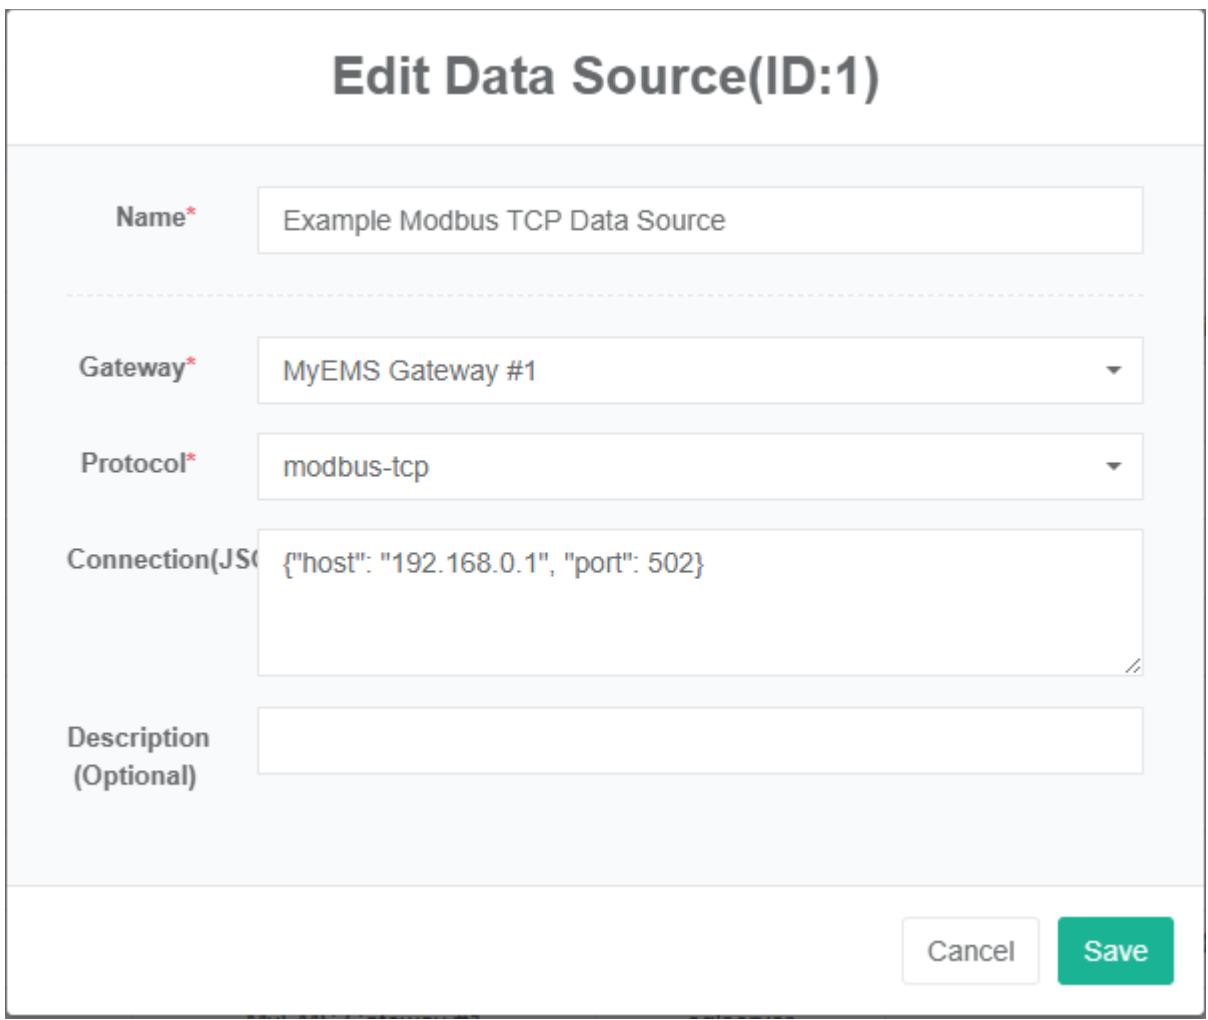
Edit Data Source:
- Click the menu "System management"
- Click on the menu 'data source management'
- Click on the tab 'data sources'
- Click on the 'modify' button
- In the 'edit data source dialog box input "Name", "Gateway", "Agreement", "Connection" And "Description"
- Click the 'save' button
Delete Data Source:
- Click on the menu 'system administration'
- Click on the menu 'data source management'
- Click on the tab 'data sources'
- Click "Delete" Button
- Click the 'click' button in the 'confirm delete' dialog box
Import Data Source:
- Click on the menu 'system administration'
- Click on the menu 'data source management'
- Click on the tab 'data sources'
- Click on the "Import" Button
- Enter the data into the dialog box
- Click on the "Import" Button

ExportData Source:
- Click the menu "System management"
- Click on the menu 'data source management'
- Click on the tab 'data sources'
- Click on the "Export" Button
Clone The Data Source:
- Click the menu "System management"
- Click on the menu 'data source management'
- Click on the tab 'data sources'
- Click on the 'clone' button
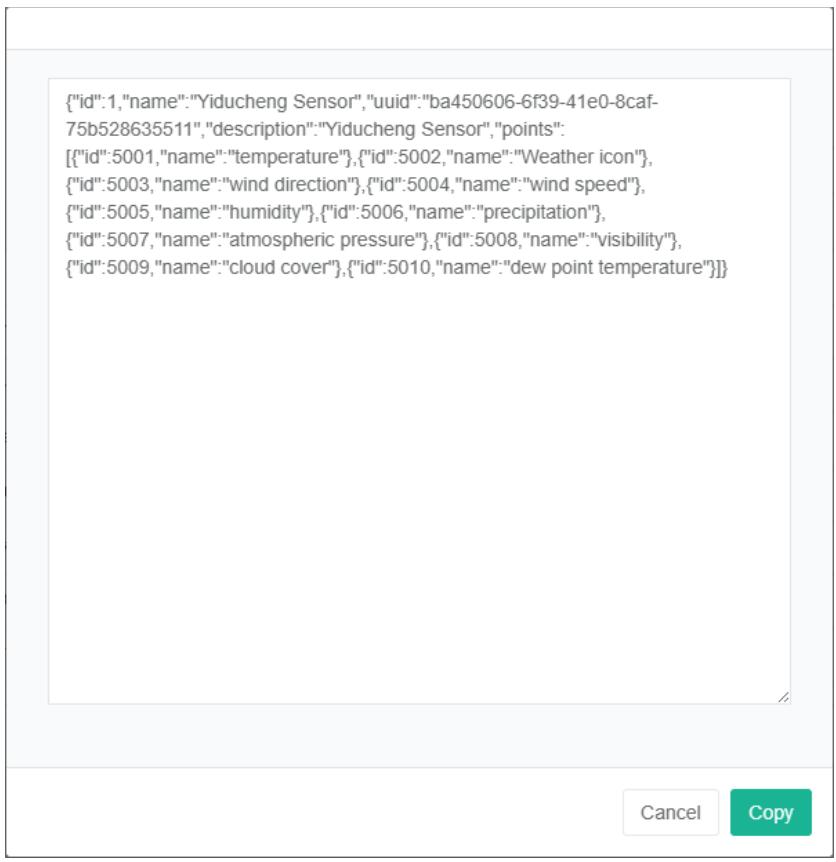
8.2.Data Point
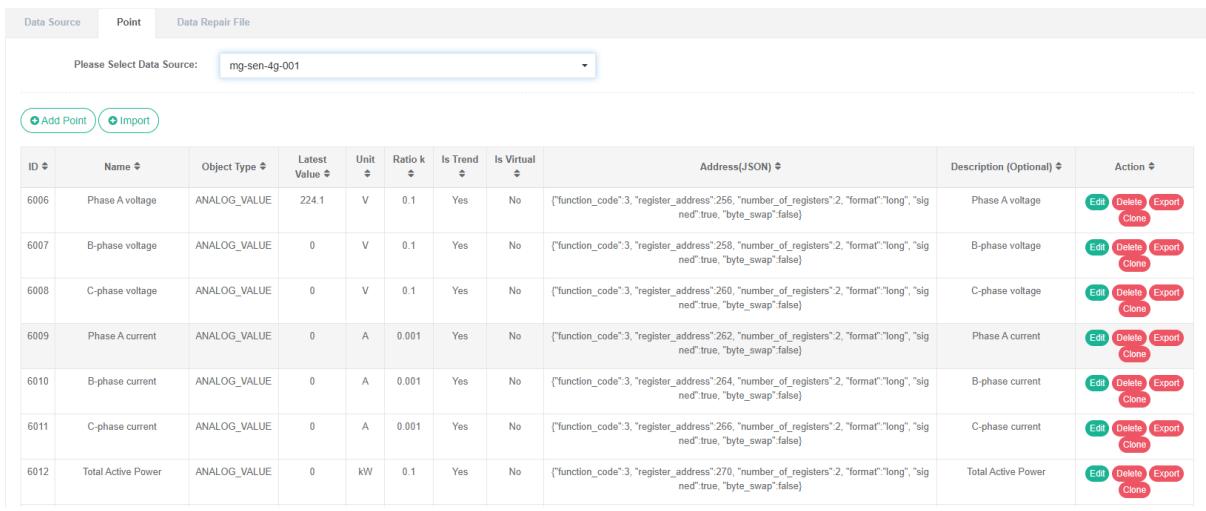
View The Data Point:
- Click on the menu 'system administration'
- Click on the menu 'data source management'
- Click on the tab 'data point'
- Select the data source in the select data source drop-down box
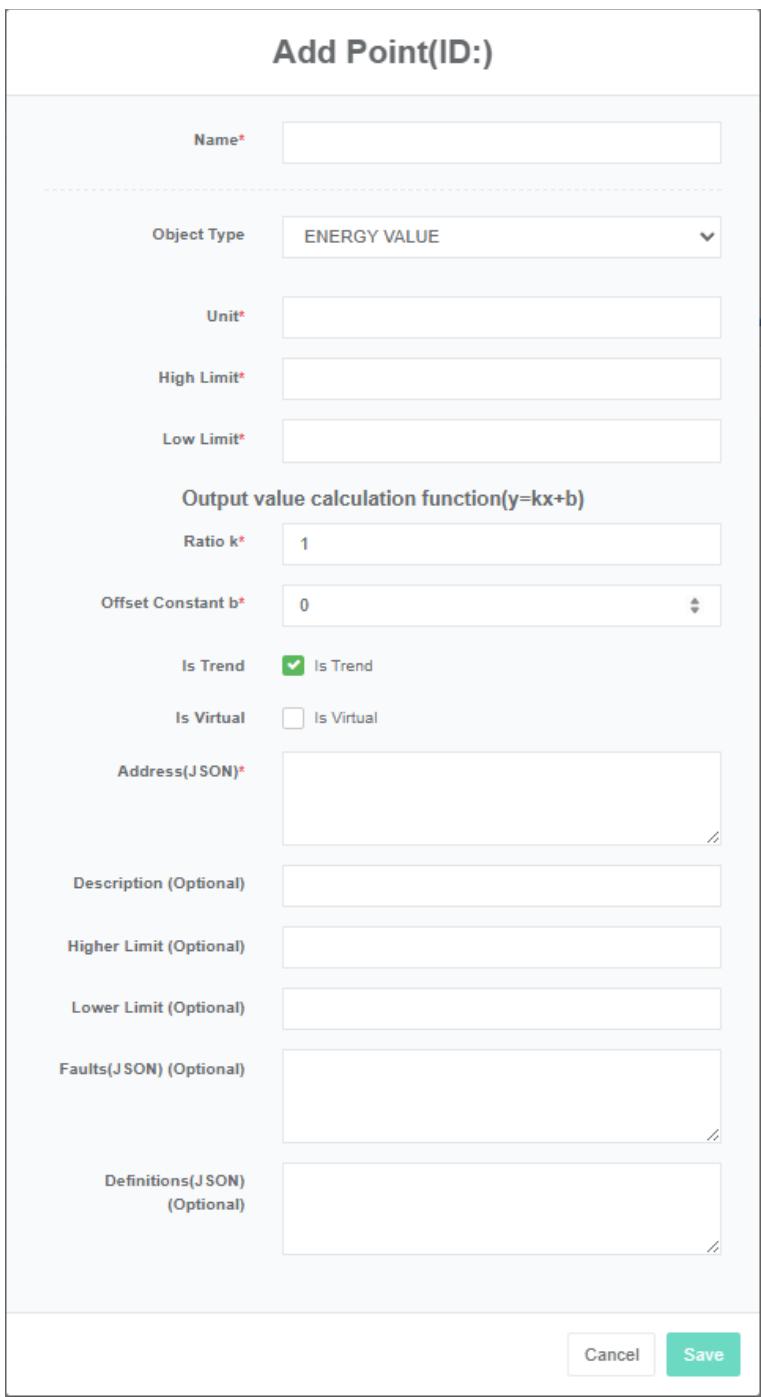
Add The Data Point:
- Click on the menu 'system administration'
- Click on the menu 'data source management'
- Click on the tab 'data point'
- Select the data source in the select data source drop-down box
- Click the 'add data point' button
- In the add data point dialog box, enter name, unit, high limit, low limit, scale factor, address (json), description, upper limit (optional), lower limit (optional), failure (json) (optional). And select the 'object type' and check the 'save the trend,' and 'virtual'
- Click the "Save" Button
Dummy point: For analog point (analog_value) can be set to a dummy point whose value comes from the algebraic expression of other analog points of the same data source. For example, the temperature difference can be represented by the result of the subtraction calculation of two temperature data points.
The algebraic expression is configured in the 'address (json)' text box, e.g
{"Expression": "X1-x2", "Substitutions": {"X1":1,"X2":2}}
The variable name in accordance with the x1, x2, x3... The algebraic expressions are set in expression, and the point_id is set in substitutions.
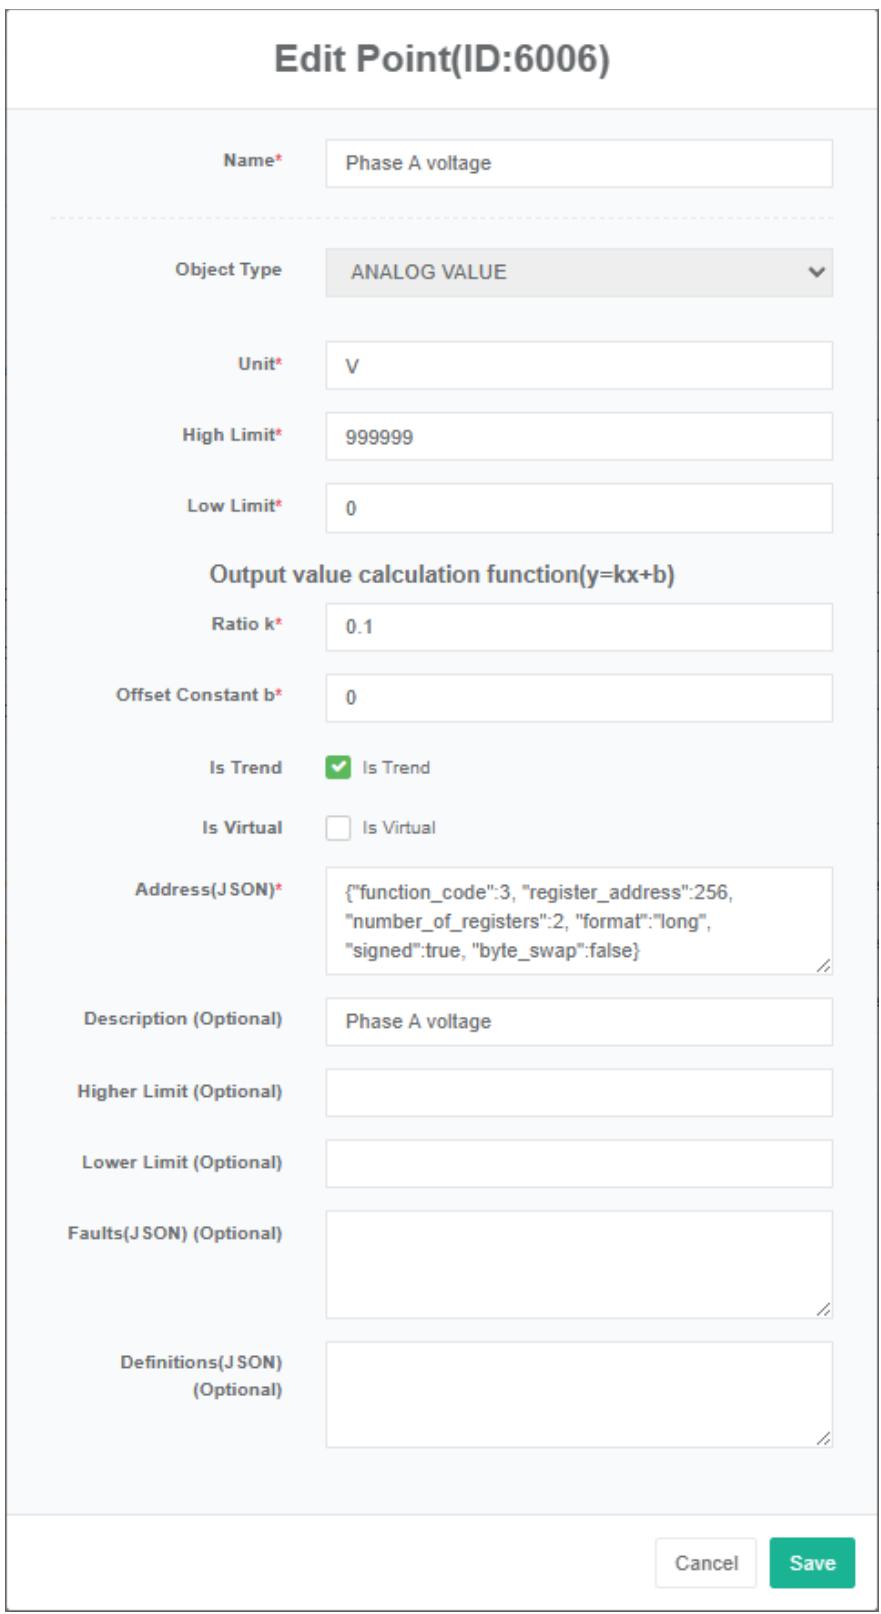
Edit The Data Point:
- Click the menu "System management"
- Click on the menu 'data source management'
- Click on the tab 'data point'
- Select the data source in the select data source drop-down box
- Click "Edit" Button
- Enter 'name', 'unit', 'high limit', 'low limit', 'scale factor', 'address (json)', 'description', upper limit (optional), lower limit (optional), failure (json) (optional) into the 'add data point' dialog box. And select the 'object type' and check the 'save the trend,' and 'virtual'
- Click the "Save" Button
To delete a data point:
- Click on the menu 'system administration'
- Click on the menu 'data source management'
- Click on the tab 'data point'
- Select the data source in the select data source drop-down box
- Click the 'delete' button
- Click the 'click' confirm delete 'button in the' confirm delete 'dialog box
8.3. Data Repair File
View The Data Repair File:
- Click on the menu 'system administration'
- Click on the menu 'data source management'
- Click on the tab 'data repair file'
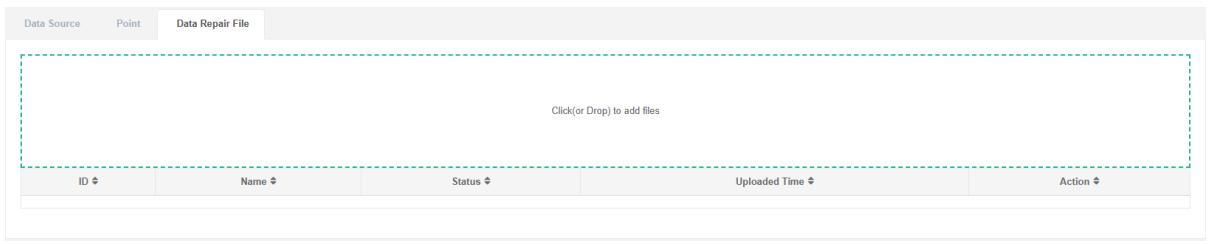
Upload The Cost File:
- Click on the menu 'system administration'
- Click on the menu 'data source management'
- Click on the tab 'data repair file'
- Click on the blue box and select file to upload
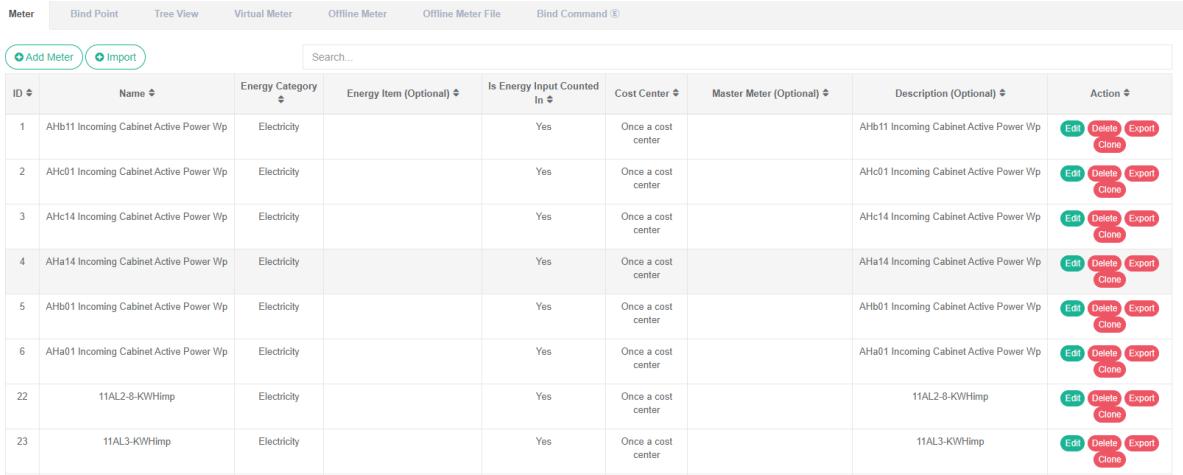
9. Meter Management
Meter is mainly used to display the data, and with the back space, equipment or other units for bind.
9.1.Meter
Check The Meter:
- Click the menu "System management"
- Click on the menu 'meter management'
- Click on the tab 'meter'
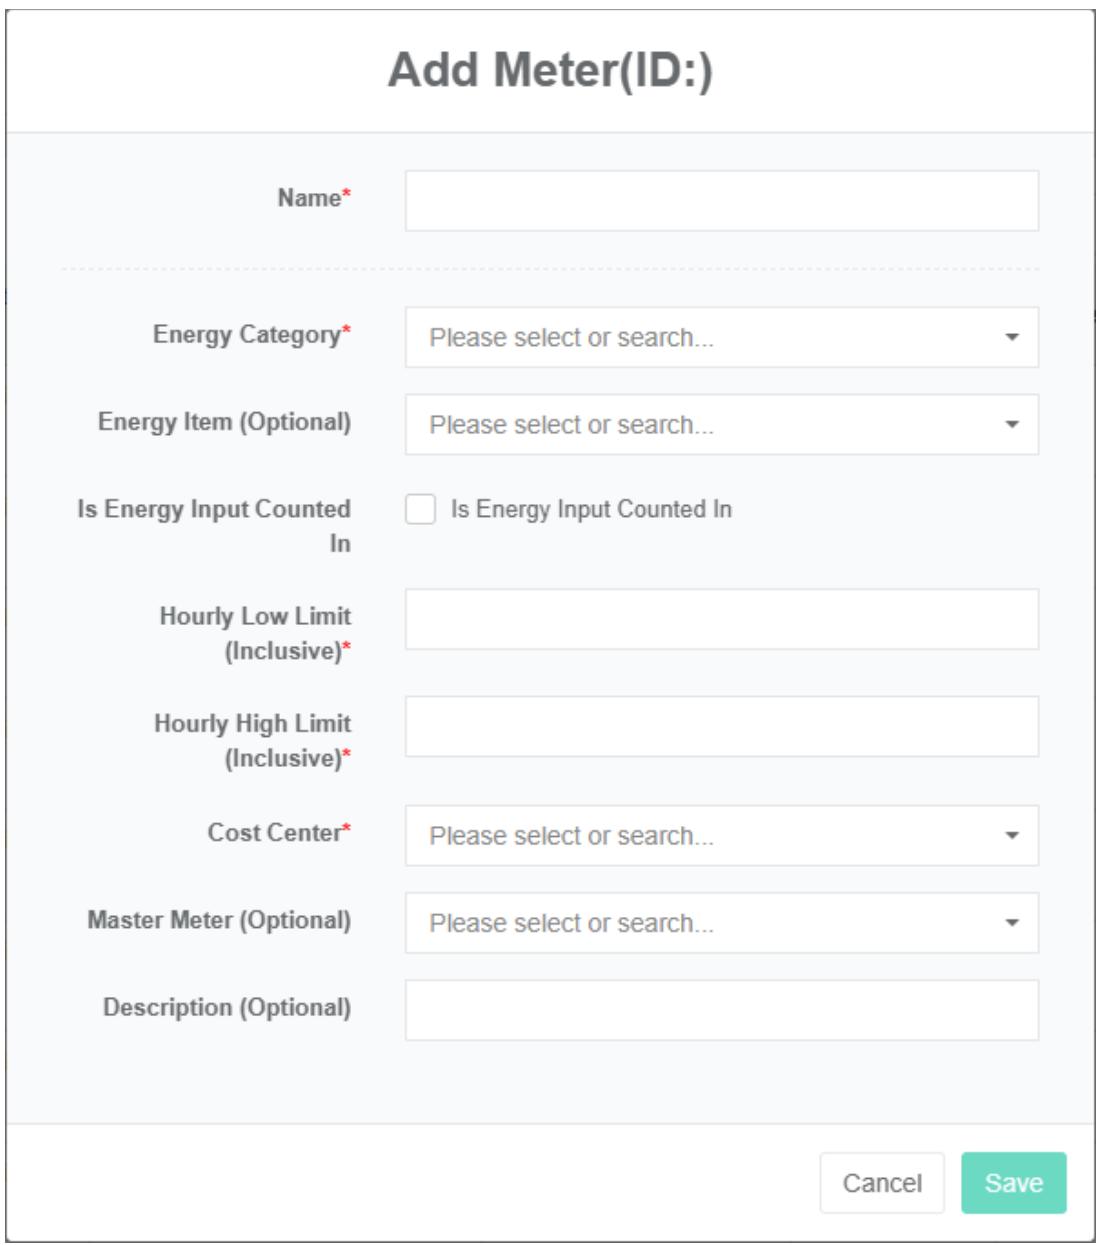
Add The Meter:
- Click the menu "System management"
- Click on the menu 'meter management'
- Click on the tab 'meter'
- Click on the 'add meter' button
- In the 'add meter' dialog box input "Name", "Minimum value", "Maximum per hour per hour' and' description', and select 'energy category' and 'breakdown' energy consumption," Energy consumption in summary ", "Cost center" And "Superior meter"
- Click the "Save" Button
energy category is the collection and collation of energy consumption data for a certain energy source, such as: Electricity, tap water, natural gas, etc.
energy category refers to the energy consumption data collected and sorted according to the main use of various types of energy, such as: Air conditioning electricity, power electricity, lighting electricity, etc.
Energy to participate in the summary refers to the energy meter values are involved in the bind of the consolidated calculation of energy consumption, often should check the energy consumption in the consolidated calculation, the meter failure or communication interrupt, can cancel the check and not participate in the consolidated calculation of energy consumption, make it not affect the bind energy consumption of main body of the summary calculation.
The hourly minimum value refers to the hourly minimum value (including) of the energy consumption of the meter. If the over-calculation result is less than (<) the set minimum value, it is invalid data. Minimum value is often used to filter equipment energy consumption closed meter appears small measuring error, or data anomalies that occur when a negative value.
Refers to the maximum per hour meter per hour maximum of energy, such as a calculation result greater than the maximum value $(>)$ settings, is invalid data. The maximum value can usually be calculated based on meter capacity, water meter pipe diameter, etc.
Cost center configured in the energy tariff, are used to calculate meter energy costs.
The superior measurement table refers to the measurement in the table at the next higher level meter, can see through the tree view. It is also possible to perform 'total score table balance analysis' in webui.
Described is the scope and function of the meter, can be optional.
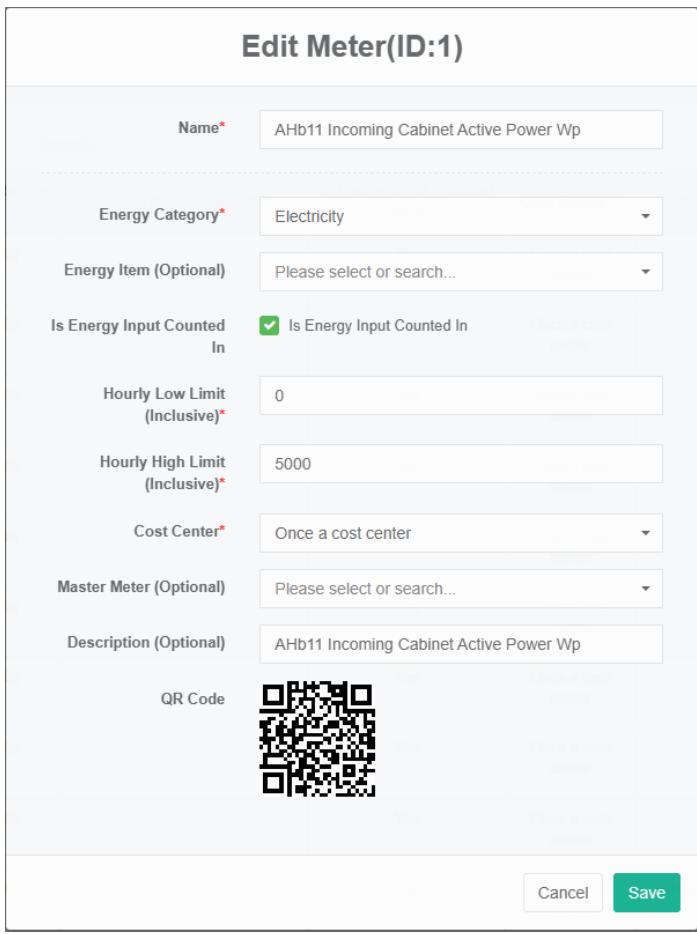
Editor Meter:
-
Click on the menu 'system administration'
-
Click on the menu 'meter management'
-
Click on the tab 'meter'
-
Click "Edit" Button
-
In 'edit meter' dialog input "Name", "Minimum value", "Maximum per hour per hour 'and' description ', and select the" Energy category ", "Energy consumption item ', 'energy consumption in summary," Cost center "And" Superior meter'
-
Click on the 'save' button
Delete The Meter:
-
Click on the menu 'system administration'
-
Click on the menu 'meter management'
-
Click on the tab 'meter'
-
Click "Delete" Button
-
Click the 'confirm delete' button in the 'confirm delete' dialog box
Import The Meter:
- Click on the menu 'system administration'
- Click on the menu 'meter management'
- Click on the tab 'meter'
- Click on the 'import' button
- Enter the data into the dialog box
- Click the 'import' button
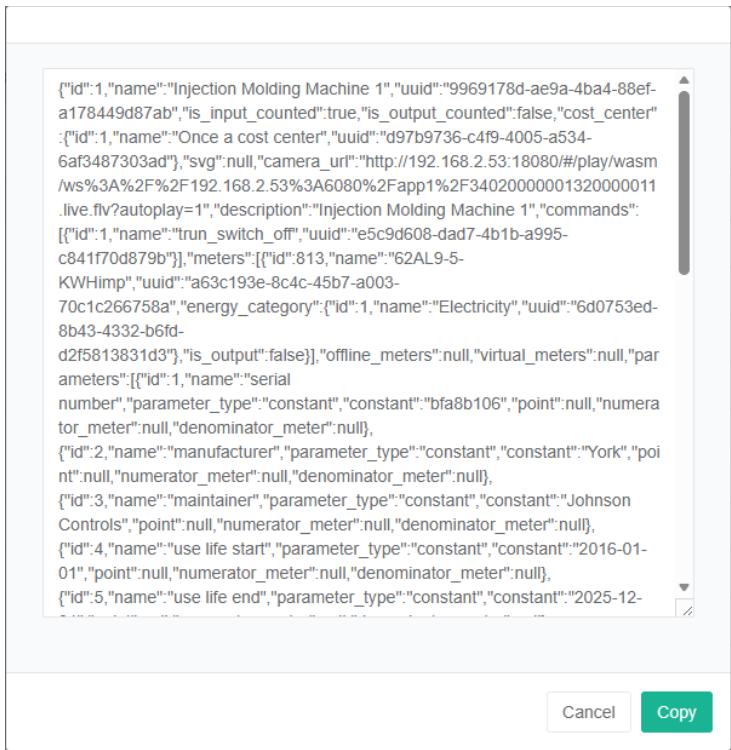
Export The Meter:
- Click on the menu 'system administration'
- Click on the menu 'meter management'
- Click on the tab 'meter'
- Click the 'export' button
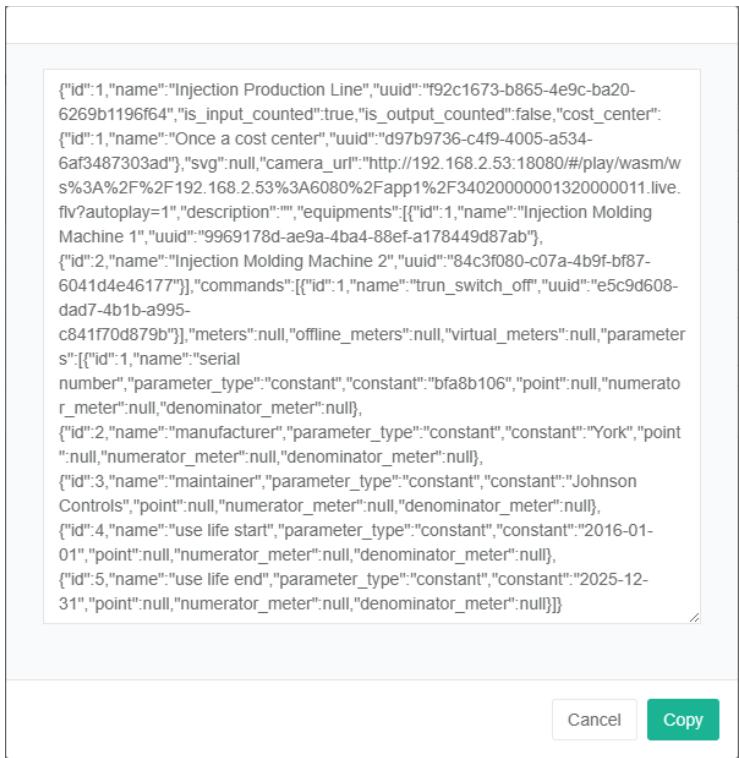
{"name":"AHb11 Incoming Cabinet Active Power Wp","uuid":"4cc81862-a25f-4bef87bb-a46ad515bf41","energy_category": {"id":1,"name":"Electricity","uuid":"6d0753ed-8b43-4322-b6fd-d2f5813831d3","is_counted":true,"hourly_low_limit":0,"hourly_high_limit":5000,"co st_center":"id":1,"name":"Once a cost center","uuid":"d97b9736-c4f9-4005-a534- 6af3487303ad","energy_item":null,"master_meter":null,"description":"AHb11 Incoming Cabinet Active Power Wp","points":"id":13,"name":"Active power of AHb11 incoming cabinet","id":7,"name":"AHb11 incoming cabinet A-phase current","id":20,"name":"AHb11 incoming cabinet active pulse electrical measurement Wp","id":8,"name":"AHb11 incoming cabinet B-phase current", {"id":9,"name":"AHb11 incoming cabinet C-phase current", {"id":15,"name":"AHb11 incoming cabinet frequency", {"id":10,"name":"AHb11 incoming cabinet line voltage UAB", {"id":11,"name":"AHb11 incoming cabinet line voltage UBC", {"id":12,"name":"AHb11 incoming cabinet line voltage UCA", {"id":17,"name":"AHb11 incoming cabinet positive reactive power Wq", {"id":16,"name":"AHb11 incoming cabinet power factor", {"id":14,"name":"AHb11 incoming cabinet reactive pulse electrical measurement Wq", {"id":18,"name":"AHb11 incoming cabinet reverse active Wp", {"id":19,"name":"AHb11 incoming cabinet reverse reactive power Wq", {"id":1,"name":"AHc14 incoming cabinet positive active Wp"}]}
Clone Meter:
- Click on the menu 'system administration'
- Click on the menu 'meter management'
- Click on the tab 'meter'
- Click on 'clone' button
9.2. Bind Data Point
Bind data point is refers to the meter and the corresponding relation of data point.
Check The Meter Bind Data Point:
- Click the menu "System management"
- Click on the menu 'meter management'
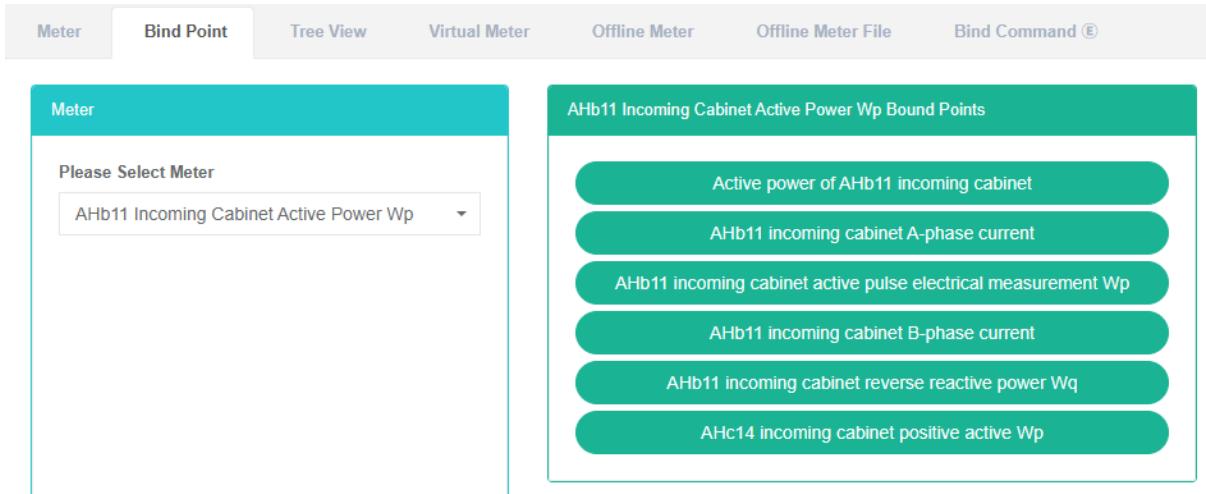
- Click on the 'bind data point' tab
- Select the meter in the 'meter' box
Bind Data Point:
- Click the menu "System management"
- Click on the menu 'meter management'
- Click on the tab 'bind data point'
- Select the meter in the 'meter' box
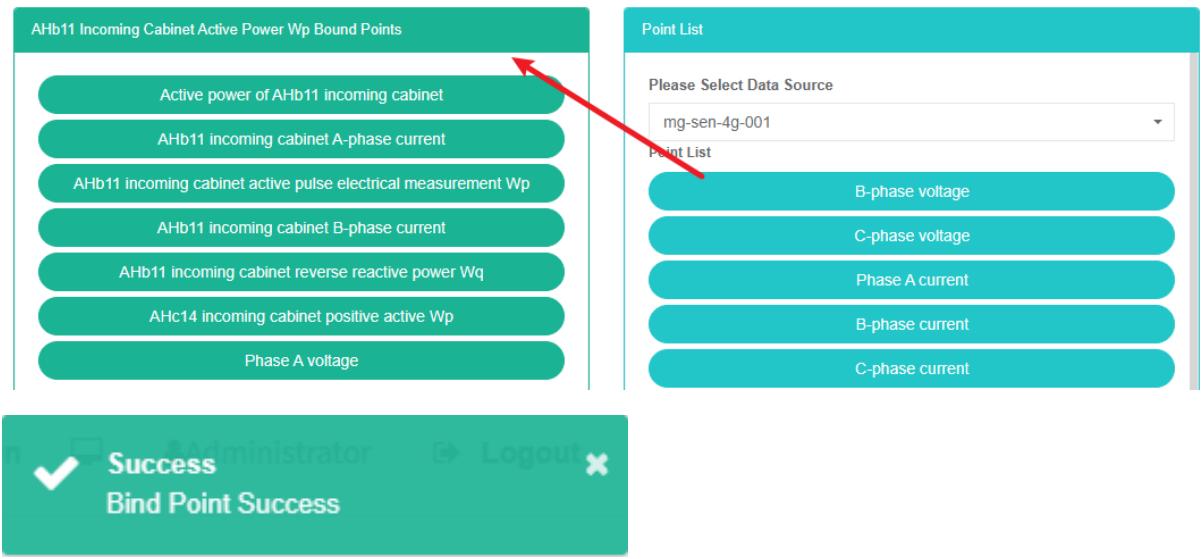
- Select data source in the 'list of data point' box
- Drag to add data point to the green in the box
- Add data point
Delete data point:
- Click on the menu 'system administration'
- Click on the menu 'meter management'
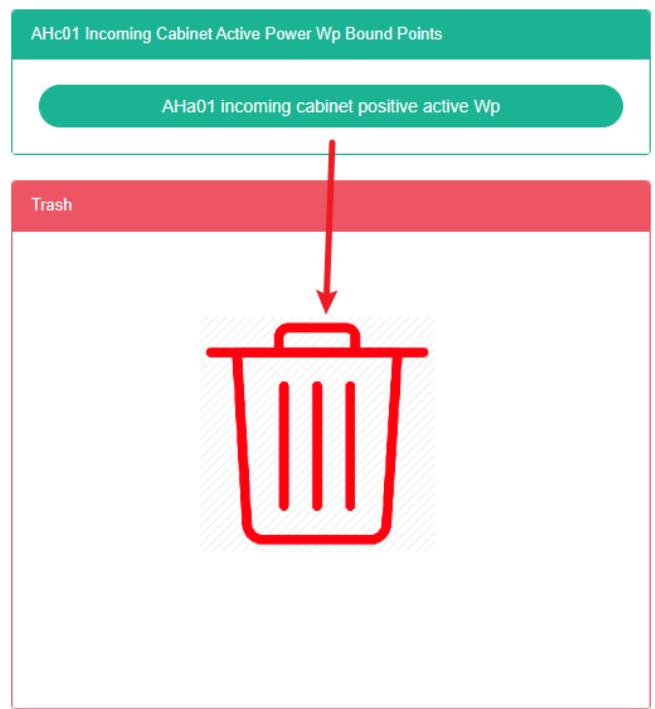
- Click on the tab 'bind data point'
- Select the meter in the meter box
- Drag the data point you want to delete into the red recycling bucket
- Release the mouse and the deletion is complete

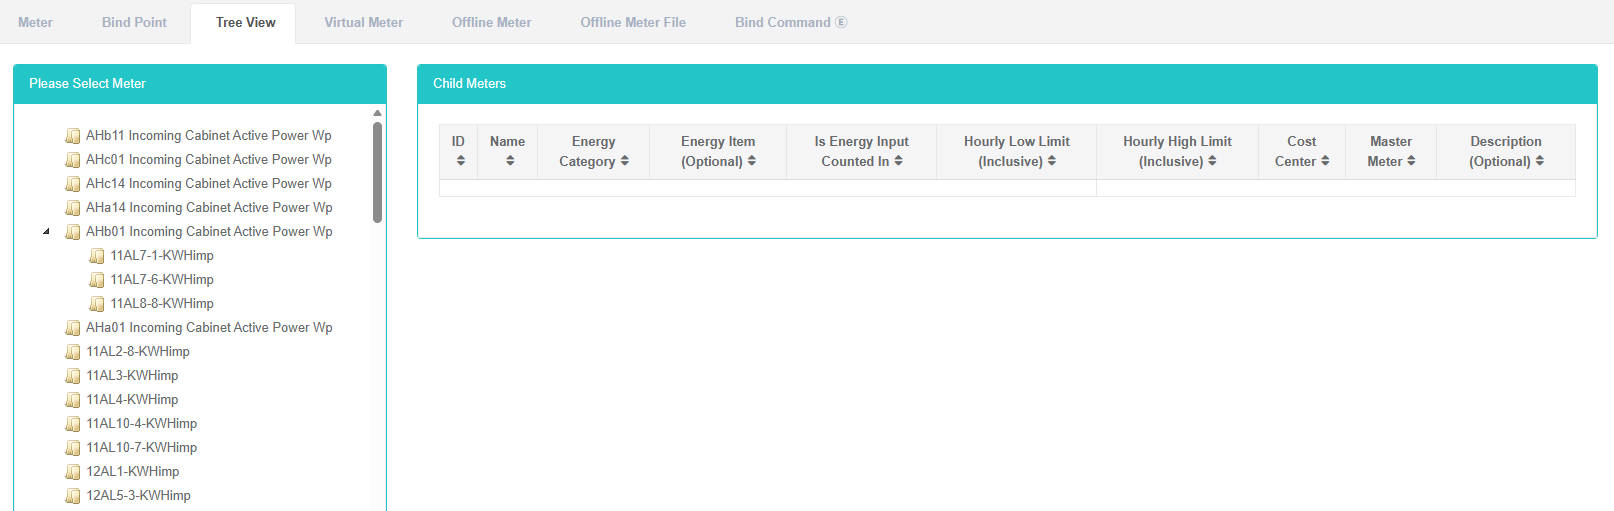
9.3.Tree View
A tree view is a dendrogram view of all the meters.
View The Tree View:
- Click the menu "System management"
- Click on the menu 'meter management'
- Click on the tab 'tree view'
- Select meter in the 'meter' box
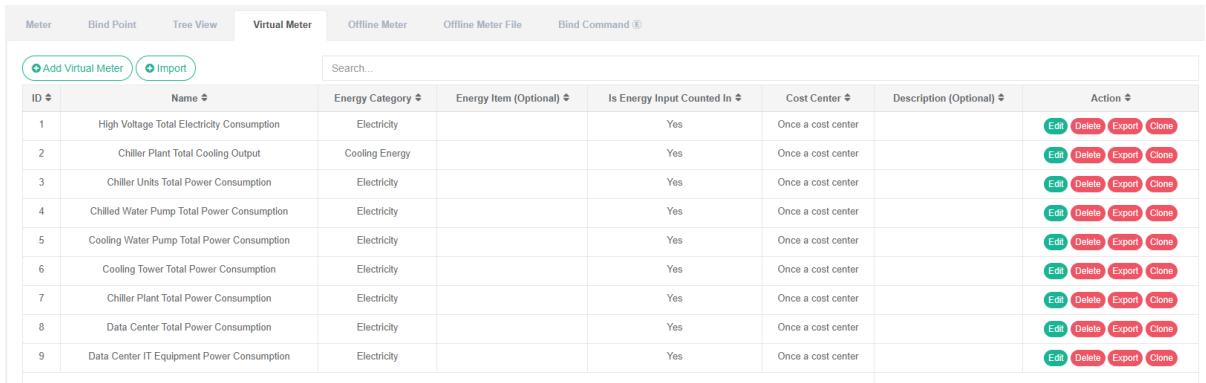
9.4.Virtual Meter
Virtual Meter is calculated by algebraic expressions of energy consumption data measurement table, participate in algebraic expressions calculating variables can be 'meter' and 'offline meter, can also be other' virtual meter 'already exists.
To View The Virtual Meter:
- Click on the menu 'system administration'
- Click on the menu 'meter management'
- Click on the tab 'virtual meter'
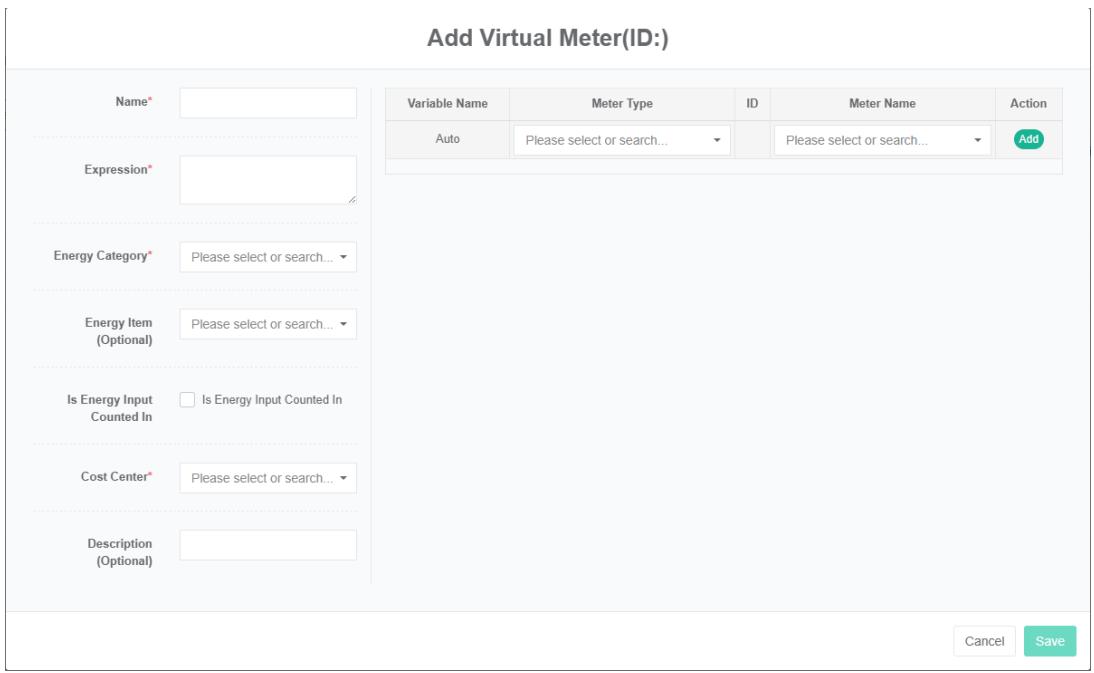
Add The Virtual Meter:
-
Click on the menu 'system administration'
-
Click on the menu 'meter management'
-
Click on the tab 'virtual meter'
-
Click the 'add virtual meter' button
-
Select the meter type and meter name in the right box and click the add button to add variables. Or click the delete button to delete the variable
-
In the 'add virtual meter dialog box input "Name", "Expression" And "Description", and select the "Energy category", "Energy consumption item', 'energy consumption in summary," Cost center"
-
Click the 'save' button
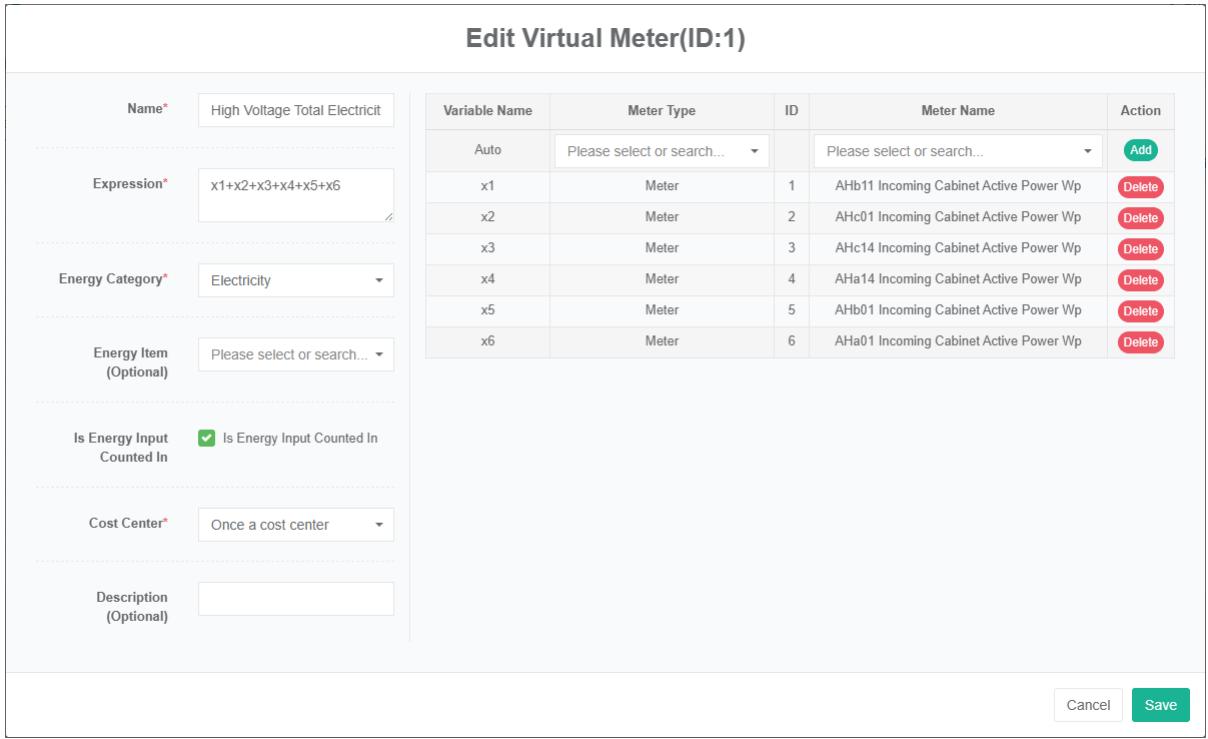
Edit Virtual Meter:
- Click on the menu 'system administration'
- Click on the menu 'meter management'
- Click on the tab 'virtual meter'
- Click on the 'modify' button
- Select meter type and meter name in the right box and click the add button to add variables. Or click the delete button to delete the variable
- In the 'add virtual meter dialog box input "Name", "Expression" And "Description", and select the "Energy category", "Energy consumption item', 'energy consumption in summary," Cost center"
- Click the 'save' button
Delete a Virtual Meter:
- Click on the menu 'system administration'
- Click on the menu 'meter management'
- Click on the tab 'virtual meter'
- Click "Delete" Button
- Click the 'confirm delete' button in the 'confirm delete' dialog box
9.5.Offline Meter
Off-line tables are metering tables that need to be manually transcribed in an excel file and uploaded manually. Applicable to the remote meter.
Check The Offline Meters:
- Click on the menu 'system administration'
- Click on the menu 'meter management'
- Click on the tab 'offline meter'

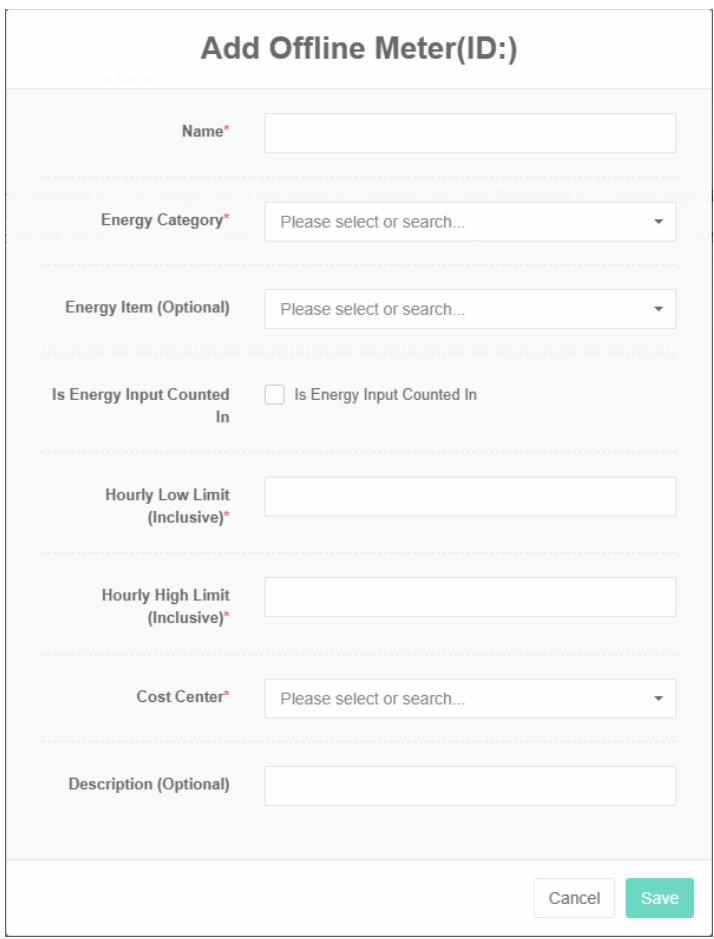
Add The Offline Meters:
- Click on the menu 'system administration'
- Click on the menu 'meter management'
- Click on the tab 'offline meter'
- Click on the 'add offline meter' button
- In the 'add offline meter dialog box input "Name", "Minimum value", "Maximum per hour per hour' and 'description', and select the" Energy category ", "Energy consumption item ', 'energy consumption in summary," Cost center"
- Click the "Save" Button
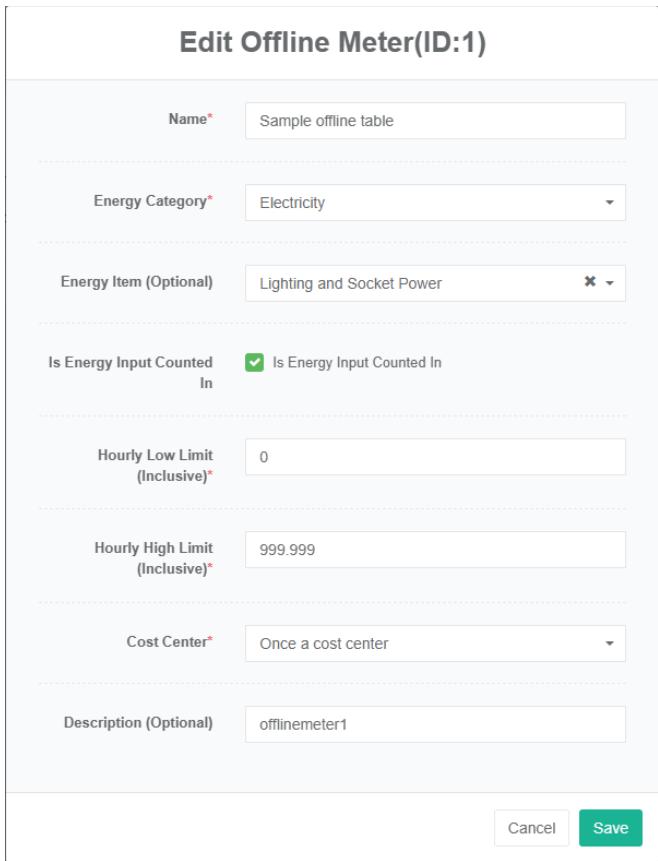
Edit Offline Meter:
- Click on the menu 'system administration'
- Click on the menu 'meter management'
- Click on the tab 'offline meter'
- Click the 'modify' button
- In the 'edit offline meter dialog box input "Name", "Minimum value", "Maximum per hour per hour' and 'description', and select 'energy consumption category' and 'item', 'energy consumption in summary' energy consumption," Cost center"
- Click the "Save" Button
Delete Offline Meter:
- Click on the menu 'system administration'
- Click on the menu 'meter management'
- Click on the tab 'offline meter'
- Click the 'delete' button
- In the "Delete" Dialog box click "Delete" Button
9.6.Offline Meter File
Offline Meter file is refers to the artificial transcribing the excel file, the state has a new (unprocessed) and done (processed), error (error).
View The Offline Meter File:
- Click on the menu 'system administration'
- Click on the menu 'meter management'
- Click on the tab 'offline meter file'

Upload The Offline Meter File:
- Click the menu "System management"
- Click on the menu 'meter management'
- Click on the tab 'offline meter file'
- Click the 'click (or dorp) to add files' box
- Select the off-line table file ending with the '.xlsx' you want to upload in your system
- Click on the "Open" Button
Restore The Offline Meter File:
- Click on the menu 'system administration'
- Click on the menu 'meter management'
- Click on the tab 'offline meter file'
- Click the 'restore' button for the offline meter file records that you want to restore
Delete The Offline Meter File:
-
Click on the menu 'system administration'
-
Click on the menu 'meter management'
-
Click on the tab 'offline meter file'
-
Click the offline meter need to delete the file records' delete 'button
-
In the "Delete" Dialog box click "Delete" Button
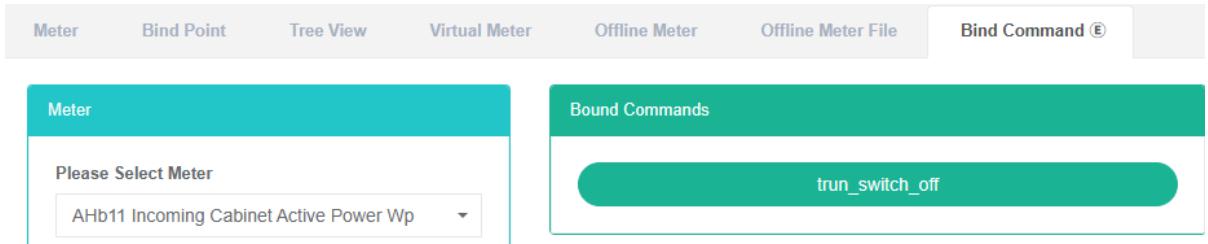
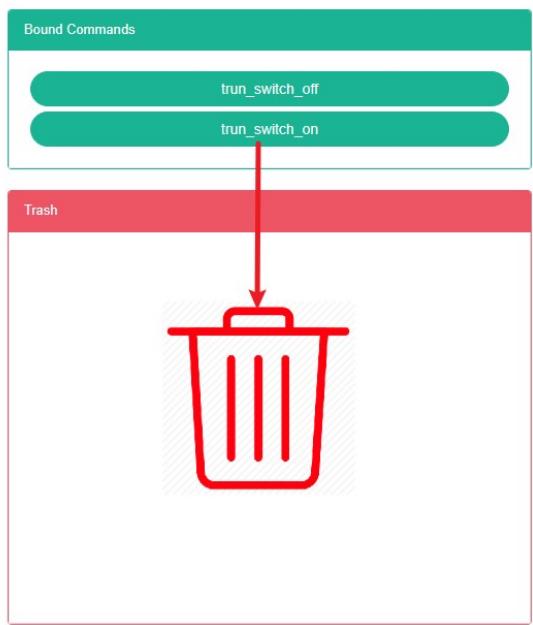
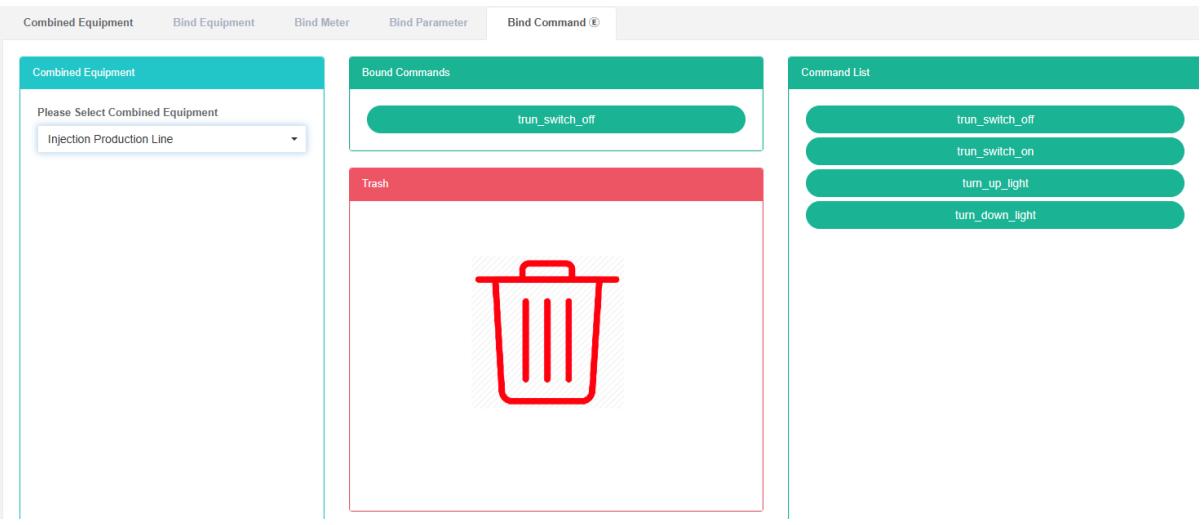
9.7. Bind Command
Bind command is refers to the meter and the corresponding relationship.
Check The Meter Bind Command:
- Click the menu "System management"
- Click on the menu 'meter management'
- Click on the tab 'bind command'
- Select meter in the 'meter' box
Bind Command:
- Click the menu "System management"
- Click on the menu 'meter management'
- Click on the tab 'bind command'
- Select meter in the 'meter' box
- In the 'command list box select command
- Drag the command you want to add into the green box
- Add the command successful

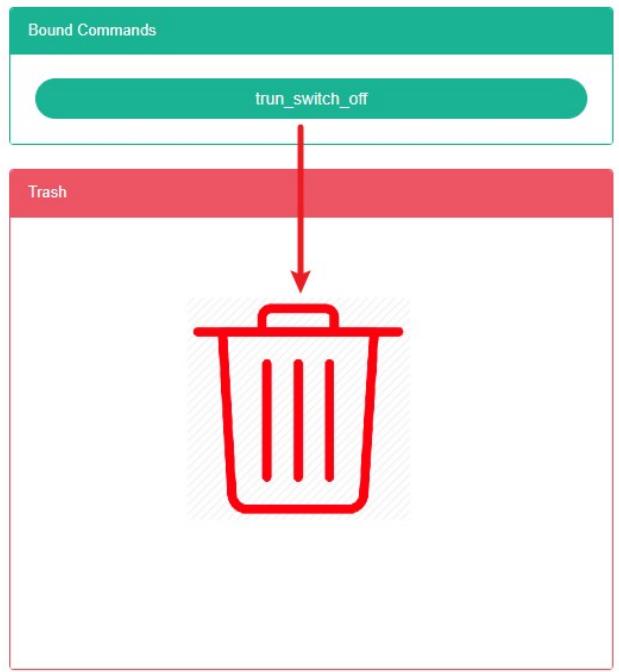
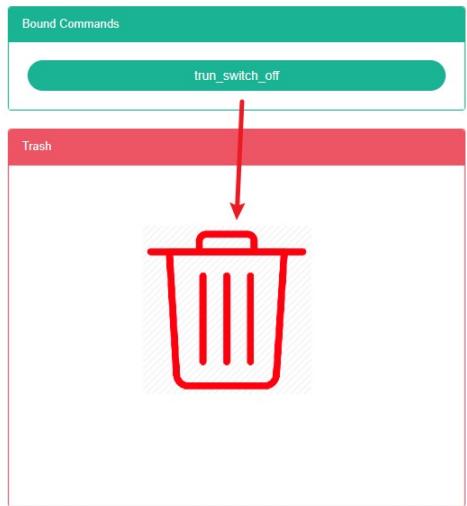
The Delete Command:
- Click the menu "System management"
- Click on the menu 'meter management'
- Click on the tab 'bind command'
- In the 'meter box select meter
- Drag to delete command to red recycling barrels
- Release the mouse, delete completed
10. Sensor Management
This system can meet the needs of enterprises for energy management system. Through monitoring and analyzing the energy utilization status of main energy consumption equipment and energy using units, statistical analysis methods, energy audit methods and energy balance methods are used to analyze the energy consumption status and costs of enterprises regularly, so as to help enterprises
determine energy consumption and energy saving index system, tap the energy saving potential, and take energy-saving measures.
10.1. Sensor
Check Sensor:
- Click on the menu 'system administration'
- Click on the menu 'sensor management'
- Click on the tab 'sensor'
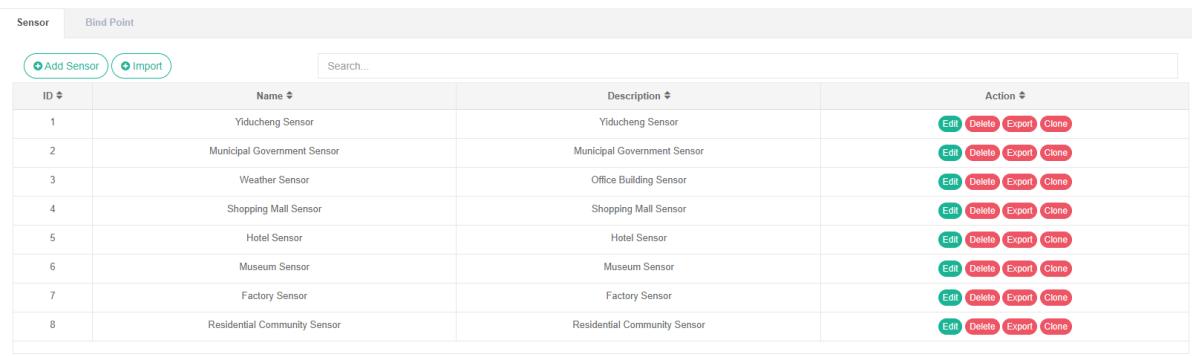
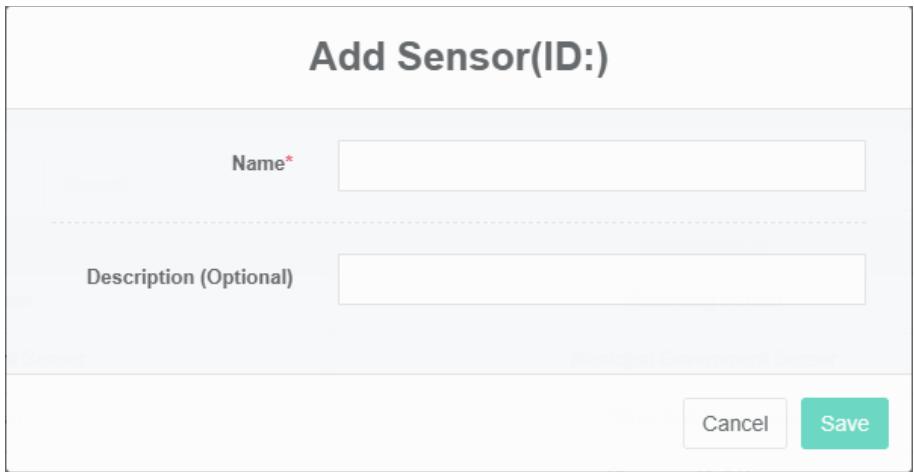
Add The Sensor:
- Click on the menu 'system administration'
- Click on the menu 'sensor management'
- Click on the tab 'sensor'
- Click on the 'add sensor' button
- In the 'add sensor' dialog box input name 'and' description
- Click the "Save" Button
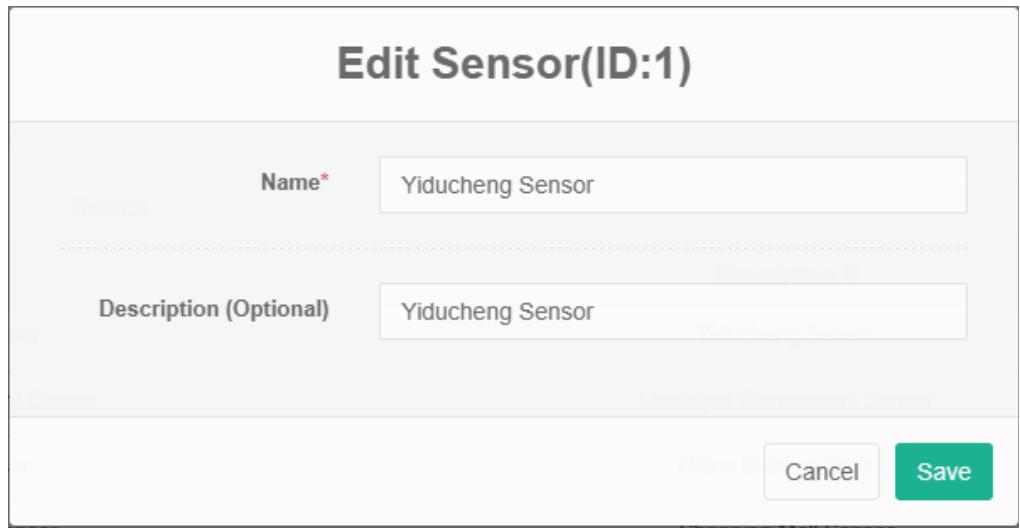
Edit Sensor:
- Click on the menu 'system administration'
- Click on the menu 'sensor management'
- Click on the tab 'sensor'
- Click "Edit" Button
- In 'edit sensor' dialog input name and description
- Click the "Save" Button
Delete The Sensor:
- Click the menu "System management"
- Click on the menu 'sensor management'
- Click on the tab 'sensor'
- Click "Delete" Button
- Click the 'click' confirm delete 'button in the' confirm delete 'dialog box
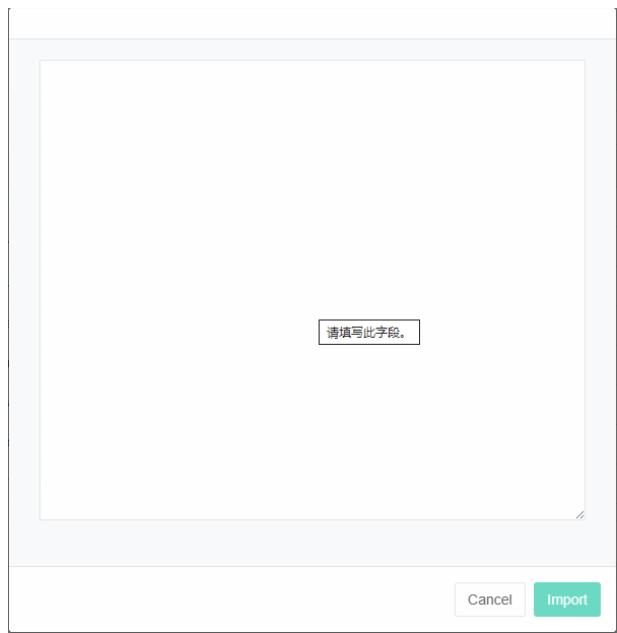
Import The Sensor:
- Click the menu "System management"
- Click on the menu 'sensor management'
- Click on the tab 'sensor'
- Click on the "Import" Button
- Enter the data into the dialog box
- Click the 'import' button
ExportThe Sensor:
- Click the menu "System management"
- Click on the menu 'sensor management'
- Click on the tab 'sensor'
- Click on the "Export" Button
Clone Sensor:
- Click on the menu 'system administration'
- Click on the menu 'sensor management'
- Click on the tab 'sensor'
- Click on 'clone' button

10.2. Bind Data Point
To Check Sensor Bind Data Point:
- Click on the menu 'system administration'
- Click on the menu 'sensor management'
- Click on the tab 'bind data point'
- In the "Sensor" Box select sensor

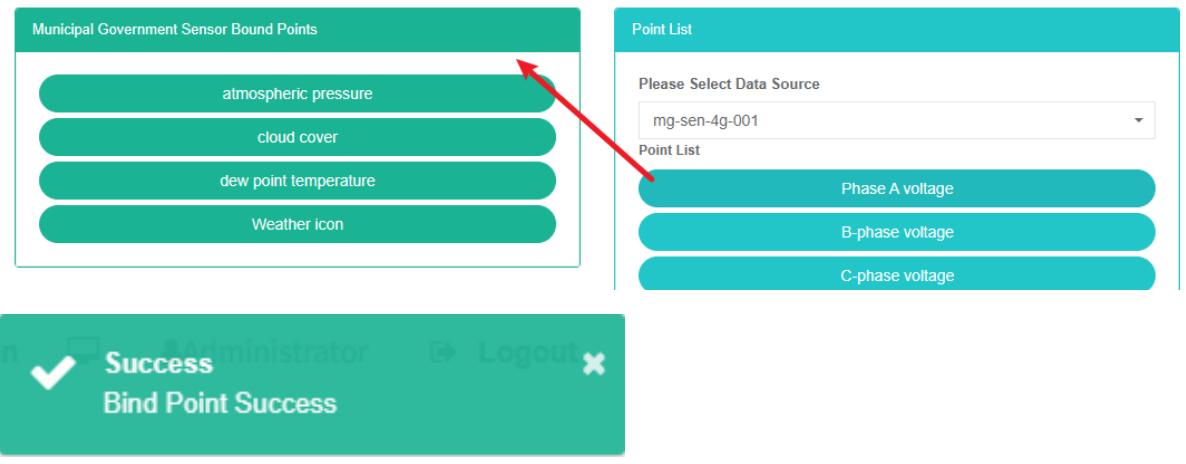
Sensor Bind Data Point:
- Click the menu "System management"
- Click on the menu 'sensor management'
- Click on the tab 'bind data point'
- In the "Sensor" Box select sensor
- Select the data source in the 'data point list box
- Drag to add data point to the green in the box
- Add data point
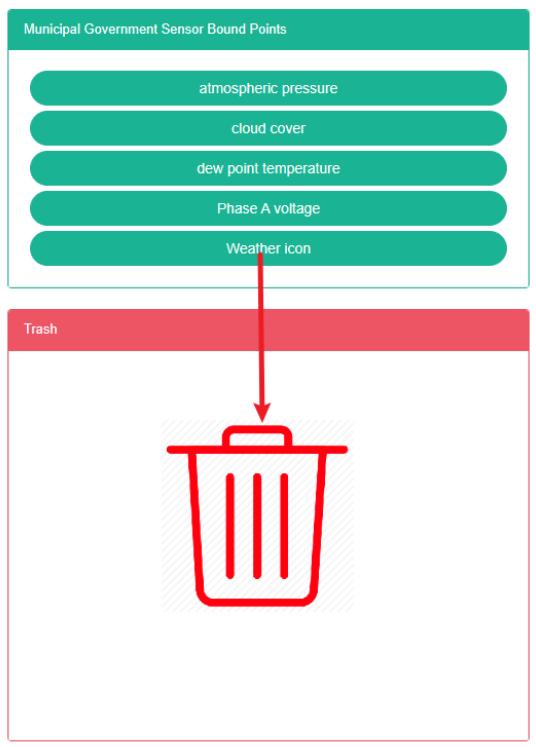
Sensor To Delete Data Point:
- Click the menu "System management"
- Click on the menu 'sensor management'
- Click on the tab 'bind data point'
- In the "Sensor" Box select sensor
- Drag want to delete the data point in the recycling bins to red
- Release the mouse and the deletion is complete

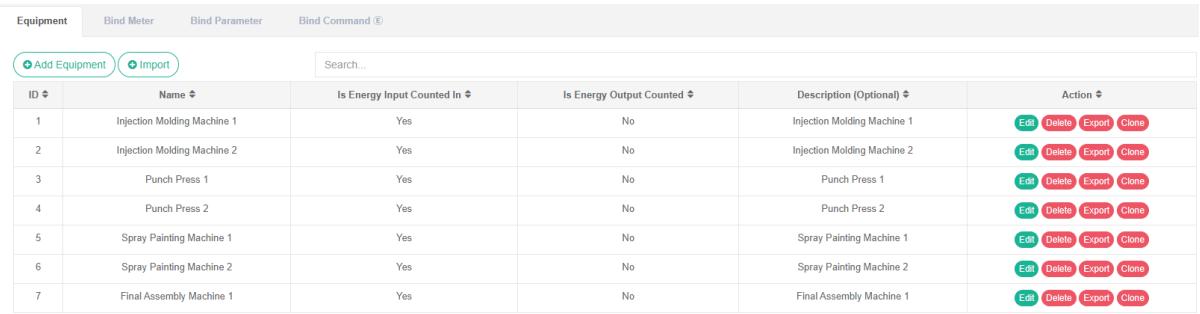
11. Equipment Management
Equipment is mainly used to display information, and meter and parameter bind relationship.
11.1. Equipment
Check Equipment:
- Click on the menu 'system administration'
- Click the menu "Equipment management"
- Click on the tab "Equipment"
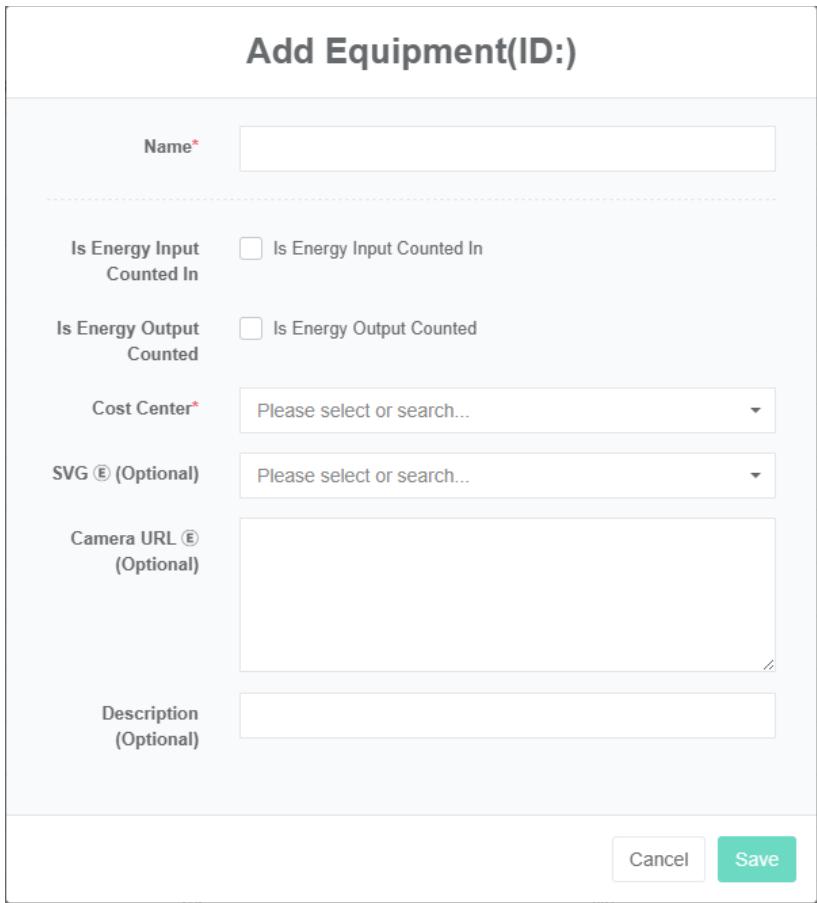
Add Equipment:
- Click the menu "System management"
- Click the menu "Equipment management"
- Click on the tab "Equipment"
- Click on the "Add equipment" Button
- In the "Add equipment" Dialog box input 'name', 'energy consumption in summary, the output energy consumption to participate in the summary, "Cost centre" And described, SVG $\text{®}$ , $\text{®}$ camera address
- Click the "Save" Button
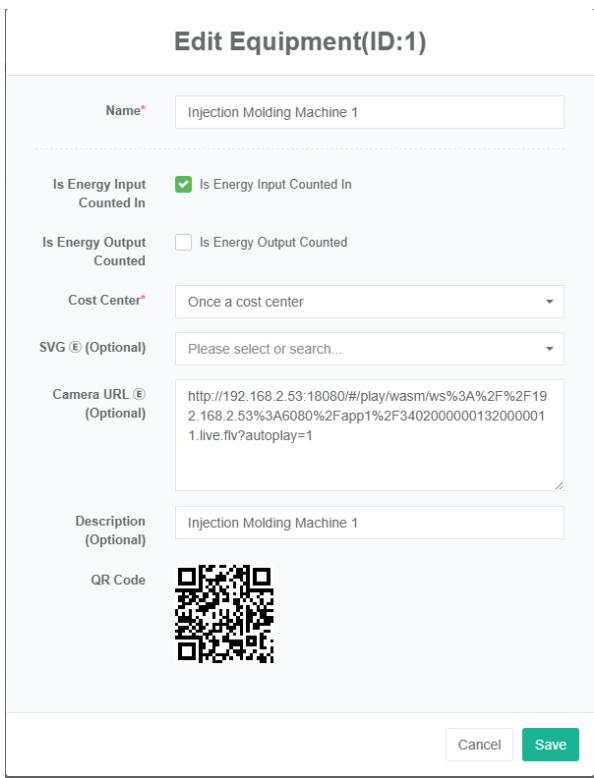
Edit Equipment:
- Click the menu "System management"
- Click the menu "Equipment management"
- Click on the tab "Equipment"
- Click "Edit" Button
- In 'edit equipment dialog input' name', 'energy consumption in summary, energy output to participate in the summary, "Cost centre" And described, SVG $Ⓔ$ , $⑧$ camera address
- Click the "Save" Button
Delete The Equipment:
- Click the menu "System management"
- Click the menu "Equipment management"
- Click on the tab "Equipment"
- Click "Delete" Button
- Click the 'click' confirm delete 'button in the' confirm delete 'dialog box
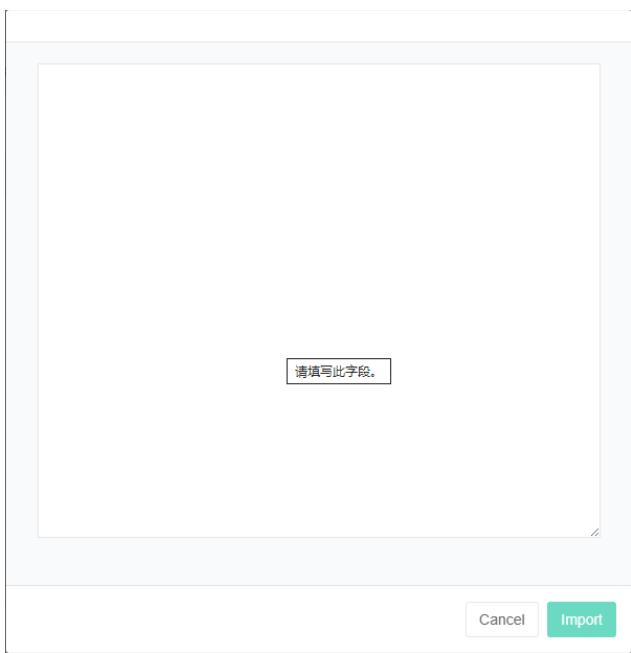
Import Equipment:
-
Click the menu "System management"
-
Click the menu "Equipment management"
-
Click on the tab "Equipment"
-
Click on the "Import" Button
-
Enter the data into the dialog box
-
Click the 'import' button
ExportEquipment:
- Click the menu "System management"
- Click the menu "Equipment management"
- Click on the tab "Equipment"
- Click on the "Export" Button
Clone Equipment:
- Click the menu "System management"
- Click the menu "Equipment management"
- Click on the tab "Equipment"
- Click on 'clone' button

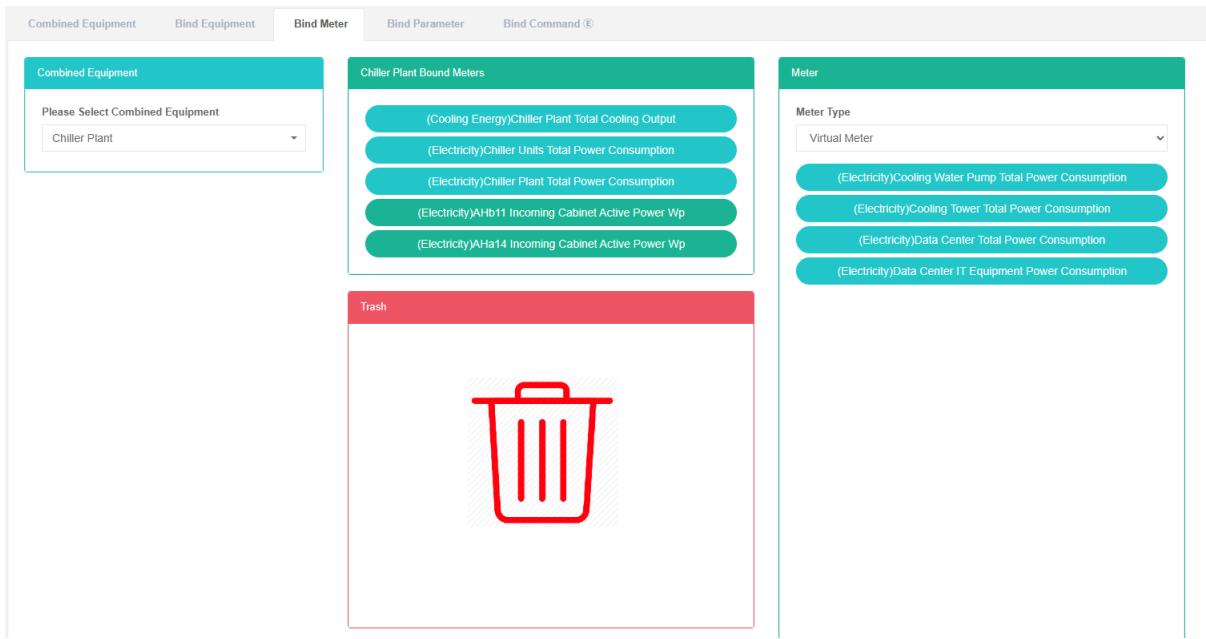
11.2. Bind Meter
View Bind Meter:
-
Click the menu "System management"
-
Click the menu "Equipment management"
-
Click on the tab 'bind meter'
-
Choose equipment '## 5-8 frozen water pump
-
On the right side of the green boxes' ## 5-8 table 'of the frozen water pump bind meter is Bind by the equipment
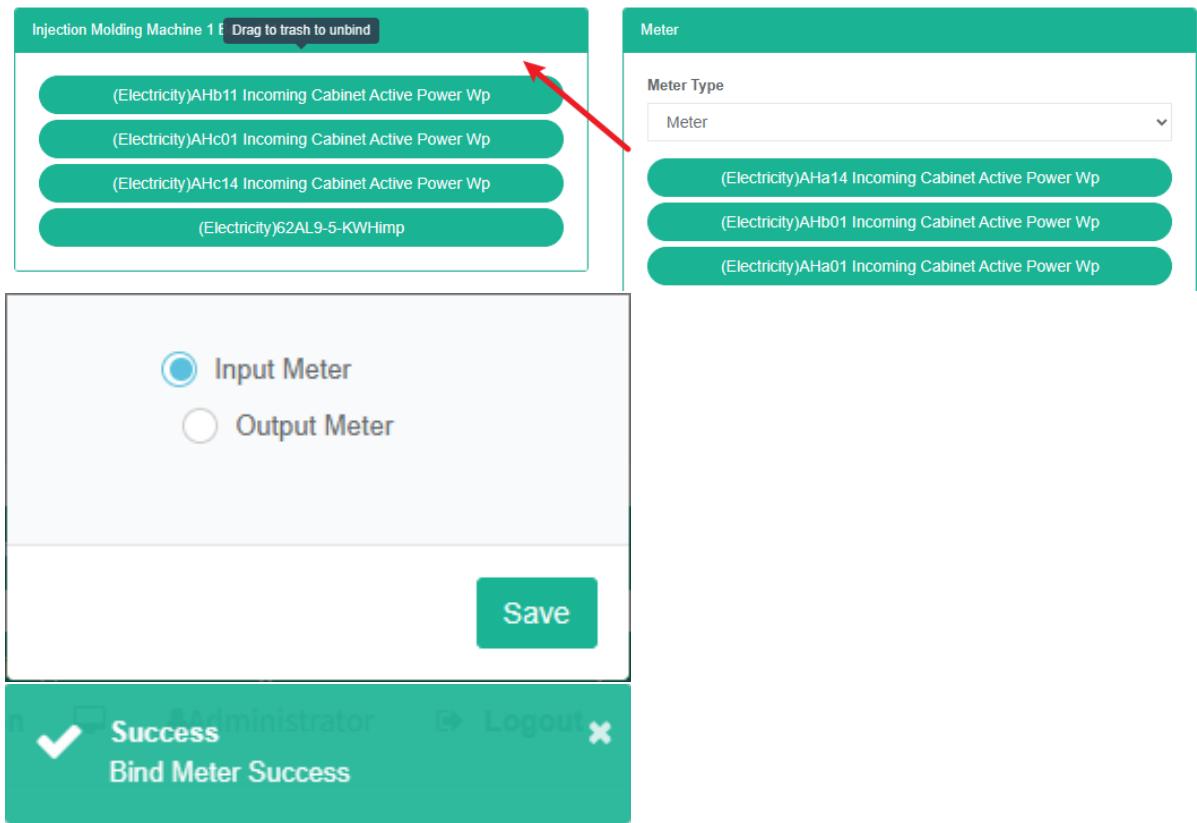
Equipment
Injection Molding Machine 1 Bind Meters
(Electricity)AHb11 Incoming Cabinet Active Power Wp
(Electricity)AHc01 Incoming Cabinet Active Power Wp
(Electricity)62AL9-5-KWHimp
Add The Bind Meter:
- Click the menu "System management"
- Click the menu "Equipment management"
- Click on the tab 'bind meter'
- Choose equipment '## 5-8 frozen water pump
- Drag the meter under the right box 'meter' into the middle green box
- Choose 'input table' or 'output table, click the "Save" Button
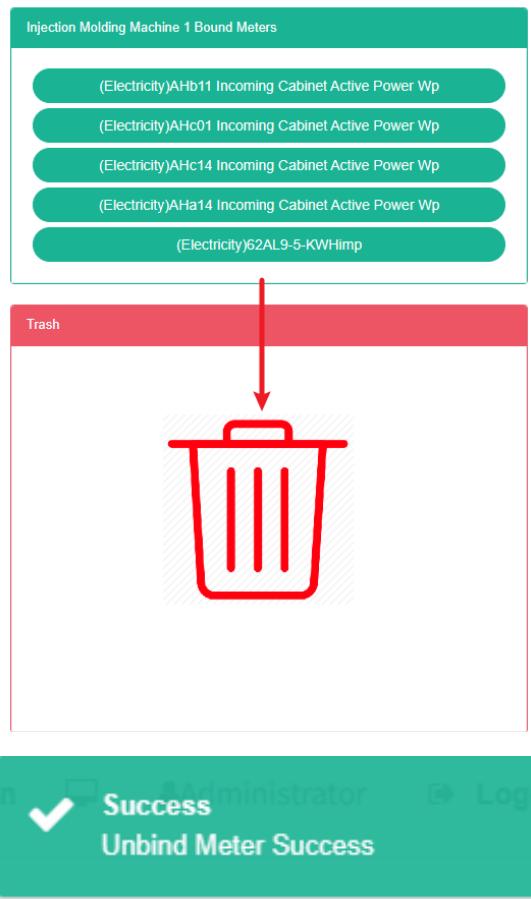
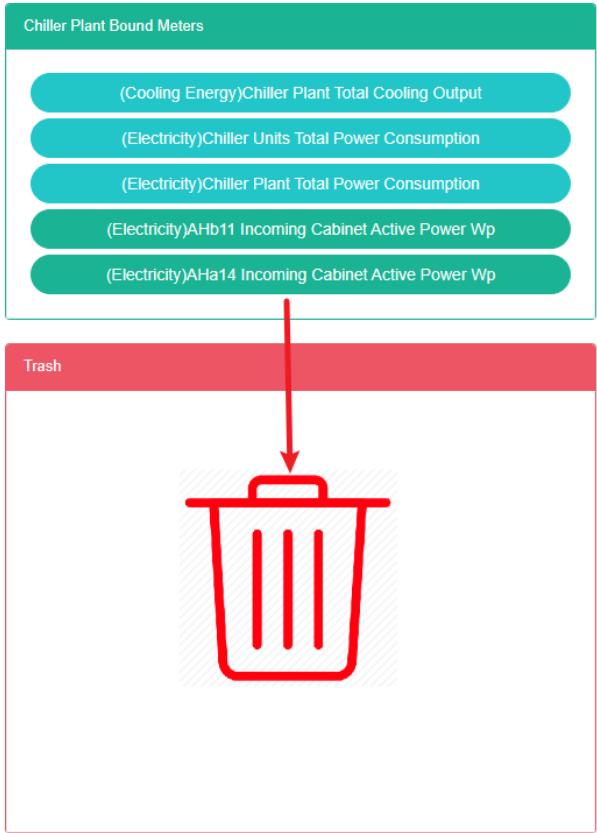
Remove The Bind Meter:
- Click the menu "System management"
- Click the menu "Equipment management"
- Click on the tab 'bind meter'
- Select equipment '5-8## chilled water pump'
- Choose the right side of the green box '## 5-8 frozen water pump bind table' drag and drop a table into 'barrels' red box
- Prompt solutions to success
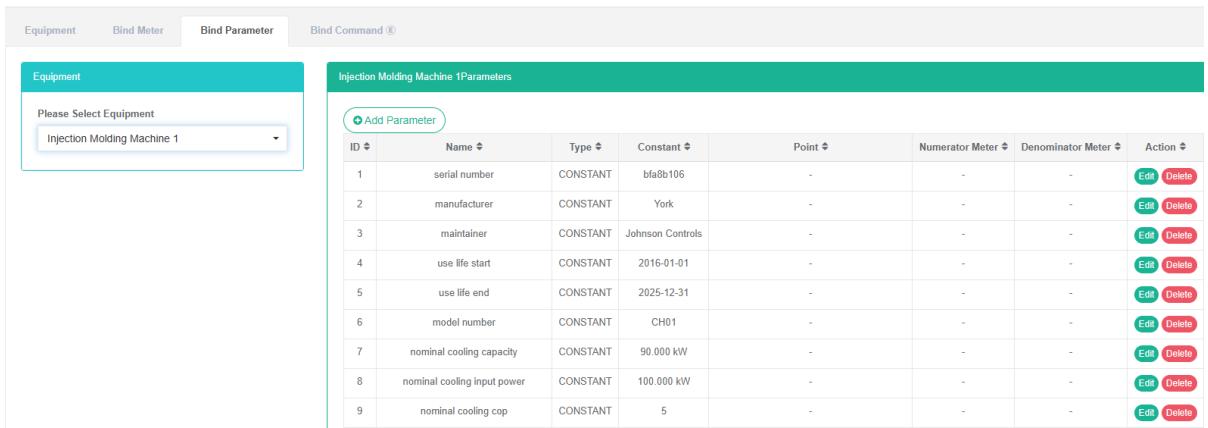
11.3. Bind Parameter
Check The Bind Parameter:
- Click on the menu 'system administration'
- Click on the menu 'equipment management'
- Click on the tab 'bind parameter'
- Choose equipment '## 5-8 frozen water pump
- On the right side is the bind parameter of the equipment list
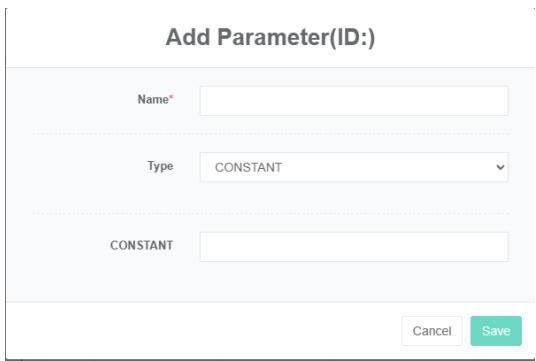
Add The Bind Parameter:
- Click the menu "System management"
- Click the menu "Equipment management"
- Click on the tab 'bind parameter'
- Choose equipment '## 5-8 frozen water pump
- Click on the button 'add parameter'
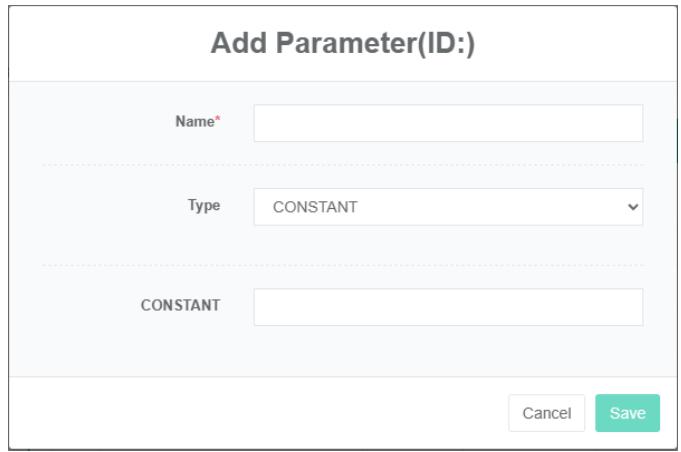
- Enter 'name', 'type' and 'constant value' in the 'add parameter' dialog box
- Click "Save" Button
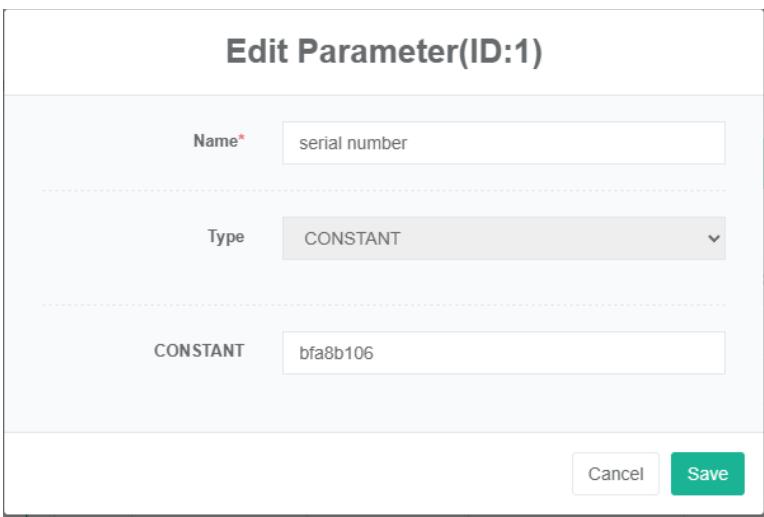
Edit Bind Parameter:
- Click on the menu 'system administration'
- Click the menu "Equipment management"
- Click on the tab 'bind parameter'
- Choose equipment '## 5-8 frozen water pump
- Click the button "Change"
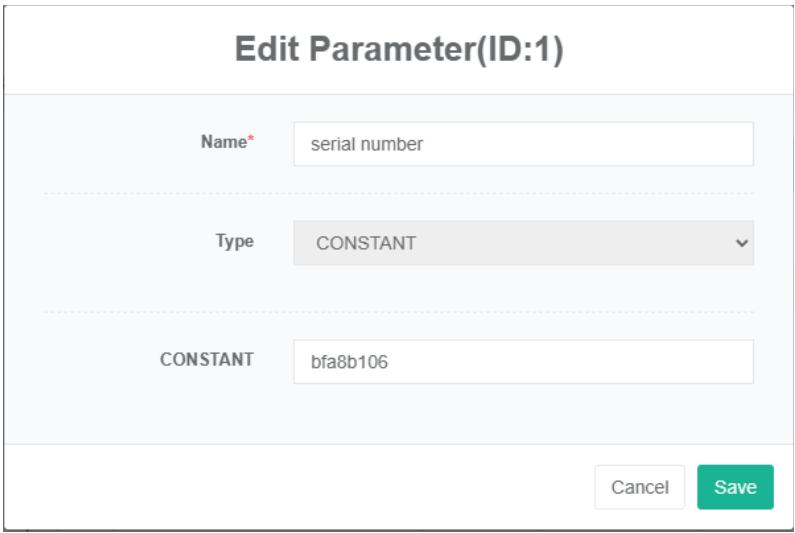
- In 'edit parameter dialog box input "Name", "Type" And "Constant values'
- Click "Save" Button
Remove The Bind Parameter:
- Click the menu "System management"
- Click the menu "Equipment management"
- Click on the tab 'bind parameter'
- Choose equipment '## 5-8 frozen water pump
- Click "Delete" Button
- Click the 'click' confirm delete 'button in the' confirm delete 'dialog box
11.4.Bind CommandE
Bind command refers to equipment and command corresponding relation is established.
Check Out The Command For Equipment Bind:
- Click the menu "System management"
- Click the menu "Equipment management"
- Click on the tab 'bind command'
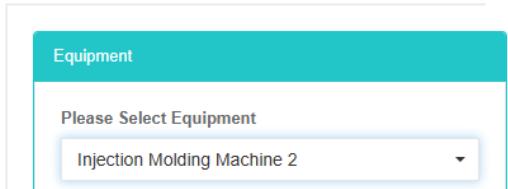
- In the "Equipment" Box choose equipment

Bind Command:
- Click the menu "System management"
- Click the menu "Equipment management"
- Click on the tab 'bind command'
- In the "Equipment" Box choose equipment
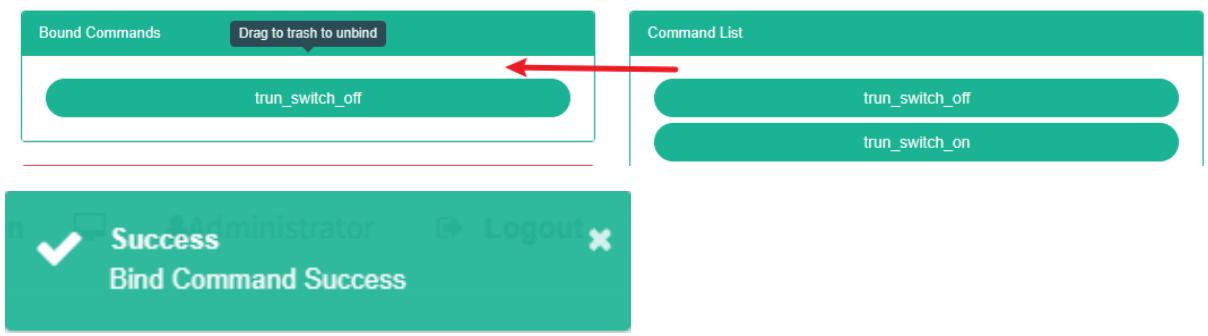
- In the 'command list box select command
- Drag to add command to the green in the box
- Add command successfully
Delete Command:
- Click on the menu 'system administration'
- Click the menu "Equipment management"
- Click on the tab 'bind command'
- In the "Equipment" Box choose equipment
- Drag to delete command to red recycling barrels
- Release the mouse, delete completed

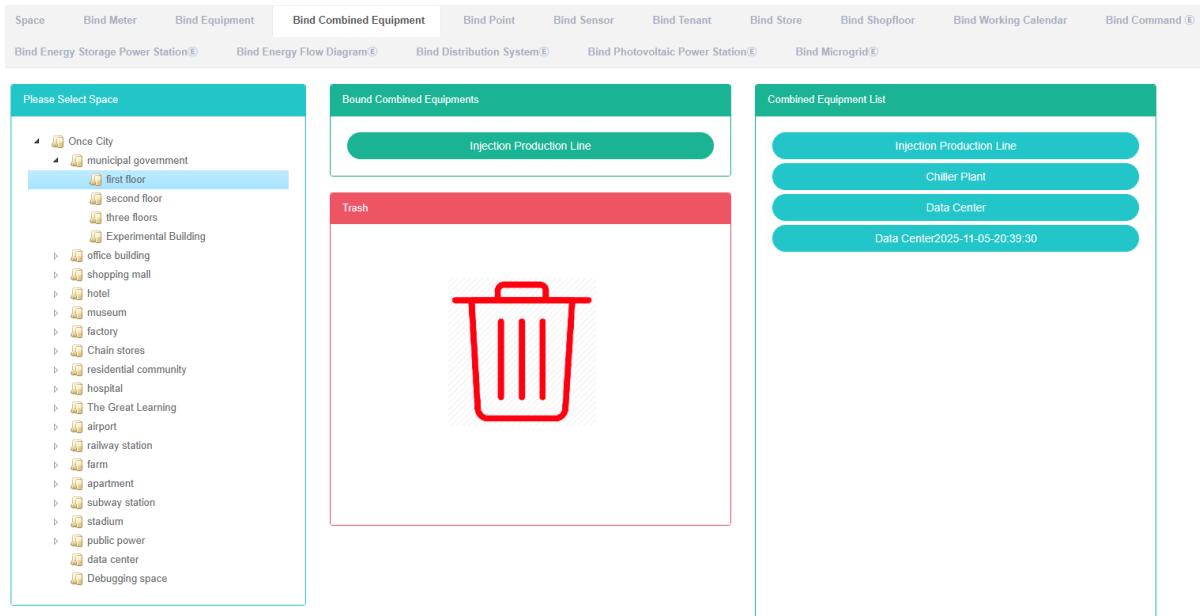
12. Combined Equipment Management
Combination equipment by a combination of other equipment, referred to as composite equipment.
"Equipment" And "Bind meter', 'the bind parameter', 'bind command' operation with the" Equipment management ".Equipment Management
12.1. Combination Equipment
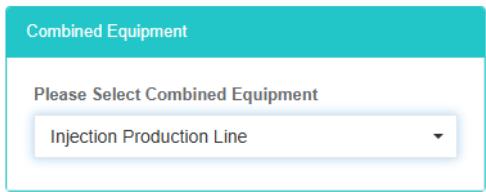
Check The Combination Equipment:
- Click the menu "System management"
- Click on the menu 'combination equipment management'
- Click on the tab 'combination equipment'

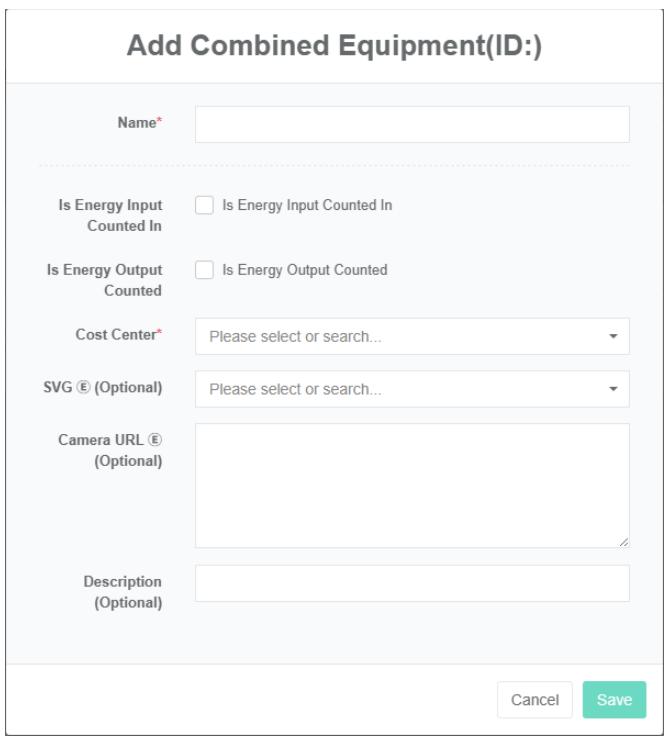
Add The Combination Equipment:
- Click the menu "System management"
- Click on the menu 'combination equipment management'
- Click on the tab 'combination equipment'
- Click on the 'add combination equipment' button
- In the "Add equipment" Dialog box input 'name', 'energy consumption in summary, energy output to participate in the summary, "Cost centre" And described, SVG $\text{©}$ , $\text{©}$ camera address
- Click the "Save" Button
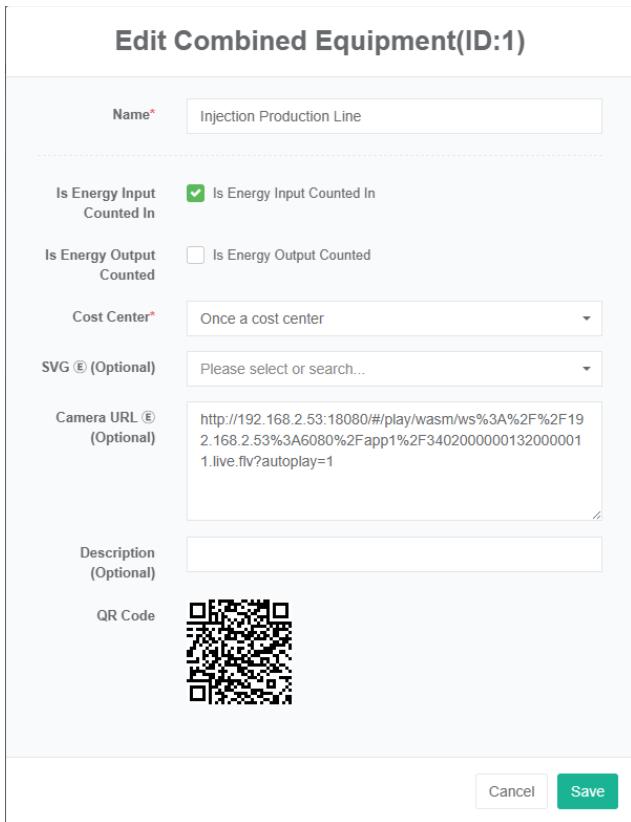
Edit Combination Equipment:
- Click the menu "System management"
- Click on the menu 'combination equipment management'
- Click on the tab 'combine equipment'
- Click "Edit" Button
- Enter 'name', 'energy consumption participation summary', 'energy output participation summary', 'cost center' and description, SVG $\textcircled{6}$ , camera address $\textcircled{6}$ in the 'edit combination equipment' dialog box
- Click the "Save" Button
Remove The Combined Equipment:
- Click the menu "System management"
- Click on the menu 'combined equipment management'
- Click on the tab 'combine equipment'
- Click "Delete" Button
- Click the 'click' confirm delete 'button in the' confirm delete 'dialog box
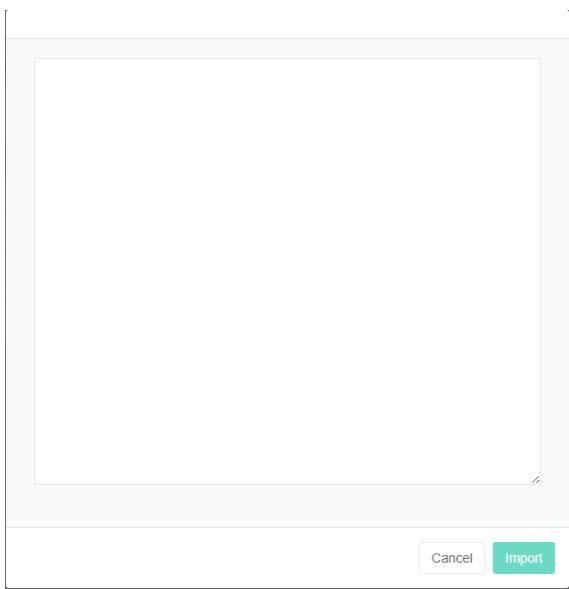
Import The Combination Equipment:
-
Click the menu "System management"
-
Click on the menu 'combination equipment management'
-
Click on the tab 'combination equipment'
-
Click on the "Import" Button
-
Enter the data into the dialog box
-
Click the 'import' button
ExportThe Combination Equipment:
- Click the menu "System management"
- Click on the menu 'combination equipment management'
- Click on the tab 'combination equipment'
- Click on the "Export" Button
Clone Combination Equipment:
- Click the menu "System management"
- Click on the menu 'combined equipment management'
- Click on the tab 'combination equipment'
- Click on 'clone' button

12.2. Bind Equipment
Bind equipment refers to the equipment with the combination of corresponding relation is established.
Check The Combination Equipment Bind Equipment:
- Click on the menu 'system administration'
- Click on the menu 'combination equipment management'
- Click on the tab 'bind equipment'
- In the 'combination equipment box select combination equipment

Bind Equipment:
- Click on the menu 'system administration'
- Click on the menu 'combination equipment management'
- Click on the tab 'bind equipment'
- In the 'combination equipment box select combination equipment
- Select the equipment in the 'equipment list' box
- Drag to add equipment to the green in the box
- Added equipment successfully

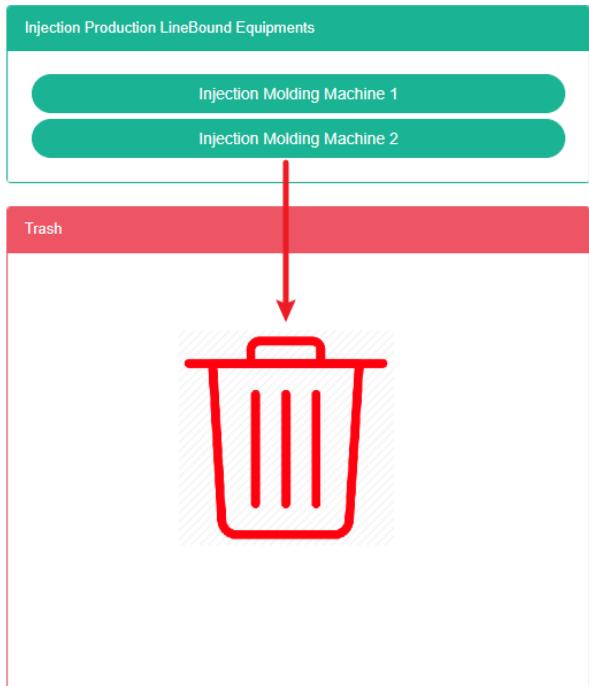
Delete The Equipment:
-
Click the menu "System management"
-
Click on the menu 'combined equipment management'
-
Click on the tab 'bind equipment'
-
Select the combined equipment in the combined equipment box
-
Drag the equipment you want to delete into the red recycling bucket
-
Release the mouse and the deletion is complete
12.3. Bind The Meter
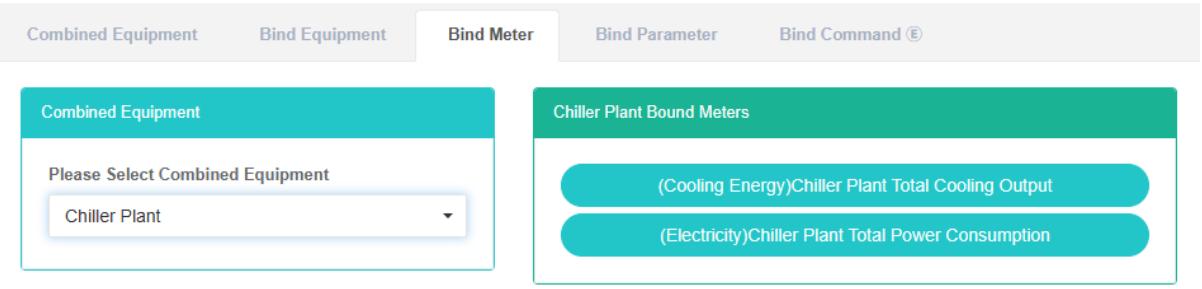
To View The Bind Meter:
- Click on the menu 'system administration'
- Click on the menu 'combined equipment management'
- Click on the tab 'bind meter'
- Select the combination equipment '5-8## chilled water pump'
- On the right side of the green boxes' ## 5-8 table 'of the frozen water pump bind meter is Bind by the equipment
Add a Bind Meter:
- Click the menu "System management"
- Click on the menu 'combined equipment management'
- Click on the tab 'bind meter'
- Select the combination equipment '5-8## chilled water pump'
- Drag and drop the right side of the box 'meter' under the table in the middle of the green box
- Choose 'input table' or 'output table, click the "Save" Button

Remove Bind Meter:
- Click on the menu 'system administration'
- Click the menu "Equipment management"
- Click on the tab 'bind meter'
- Select equipment '5-8## chilled water pump'
- Choose the right side of the green box '## 5-8 frozen water pump bind table' drag and drop a table into 'barrels' red box
- Prompt solutions to success
Bind equipment refers to the equipment with the combination of corresponding relation is established.
Check The Combination Equipment Bind Equipment:
- Click on the menu 'system administration'
- Click on the menu 'combined equipment management'
- Click on the tab 'bind equipment'
- In the 'combination equipment box select combination equipment
12.4. Bind Parameter
Check The Bind Parameter:
- Click on the menu 'system administration'
- Click on the menu 'combined equipment management'
- Click on the tab 'bind parameter'
- Select the combination equipment '5-8## chilled water pump'
- On the right side is the bind parameter of the equipment list

Add The Bind Parameter:
- Click on the menu 'system administration'
- Click on the menu 'combined equipment management'
- Click on the tab 'bind parameter'
- Select combination equipment '## 5-8 frozen water pump
- Click on the button 'add parameter'
- Enter 'name', 'type' and 'constant value' in the 'add parameter' dialog box
- Click "Save" Button
Edit Bind Parameter:
- Click on the menu 'system administration'
- Click the menu "Equipment management"
- Click on the tab 'bind parameter'
- Choose equipment '## 5-8 frozen water pump
- Click the button "Change"
- Type 'name', 'type' and 'constant value' in the 'edit parameter' dialog box
- Click "Save" Button
Remove The Bind Parameter:
- Click the menu "System management"
- Click on the menu 'combination equipment management'
- Click on the tab 'bind parameter'
- Select combination equipment '## 5-8 frozen water pump
- Click "Delete" Button
- Click the 'click' confirm delete 'button in the' confirm delete 'dialog box
12.5. Bind Command
Bind command refers to equipment and command corresponding relation is established.
Check Equipment Bind Command:
- Click the menu "System management"
- Click on the menu 'combined equipment management'
- Click on the tab 'bind command'
- In the 'combination equipment box to choose equipment
Bind Command:
- Click the menu "System management"
- Click the menu "Equipment management"
- Click on the tab 'bind command'
- In the "Equipment" Box choose equipment
- In the 'command list box select command
- Drag the command you want to add into the green box
- Add command successfully

The Delete Command:
-
Click the menu "System management"
-
Click the menu "Equipment management"
-
Click on the tab 'bind command'
-
In the "Equipment" Box choose equipment
-
Drag to delete command to red recycling barrels
-
Release the mouse, delete completed
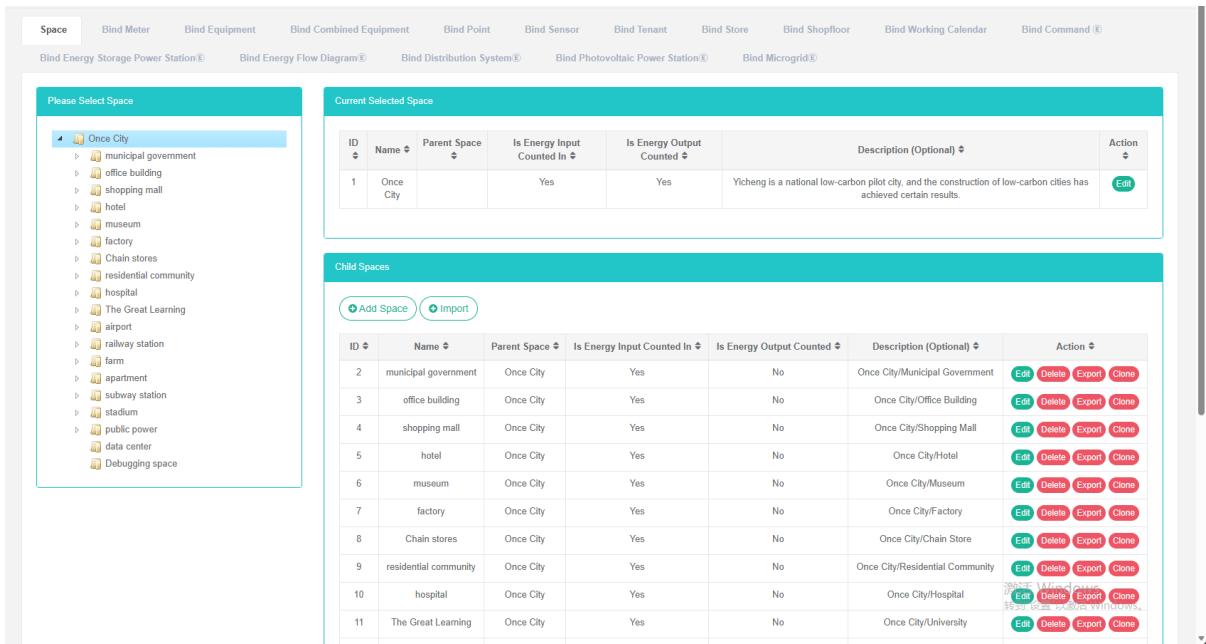
13. Space Management
This system can meet the demand of enterprise of energy management system, through to the main energy consumption equipment, energy utilization status quo of energy-using units monitoring analysis, statistical analysis method, method of energy audit and energy balance method, etc on a regular basis to the enterprise energy consumption situation and the analysis cost, help enterprises to determine the index system of energy consumption and energy saving, mining and energy saving potential of energy saving measures.
13.1. Space
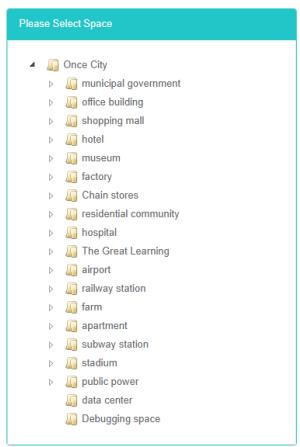
Check The Space:
- Click the menu "System management"
- Click on the menu 'space management'
- Click on the tab 'space'
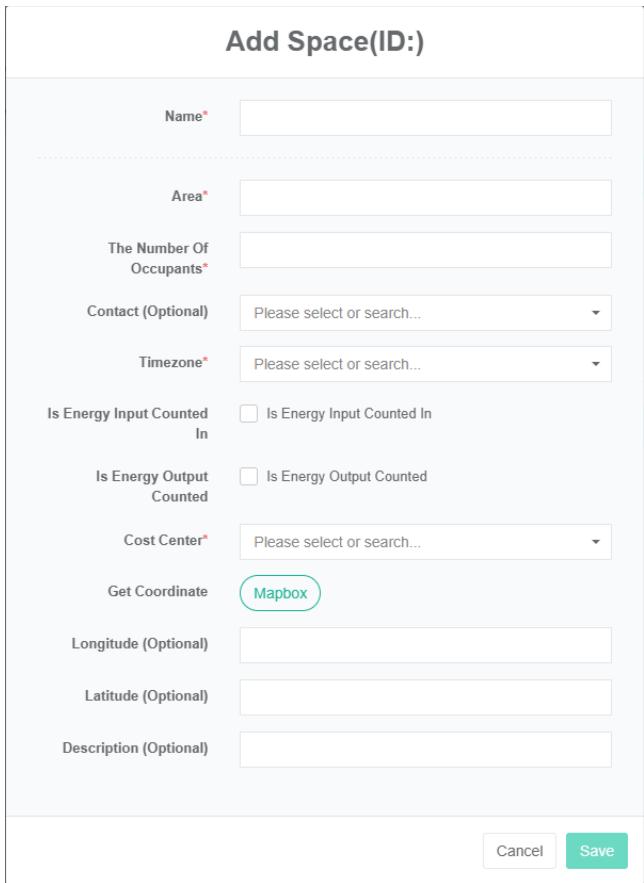
Add Space:
- Click the menu "System management"
- Click on the menu 'space management'
- Click on the tab 'space'
- Click on the 'add space' button
- In the 'add space' dialog box input "Name", "Area", "Number", "Contact", "Time zone", "Cost center", "Description", "", 'the latitude and longitude' pick up coordinates. According to the actual situation to decide whether to check the "Energy consumption in summary", "Energy output in summary'
- Click "Save" Button
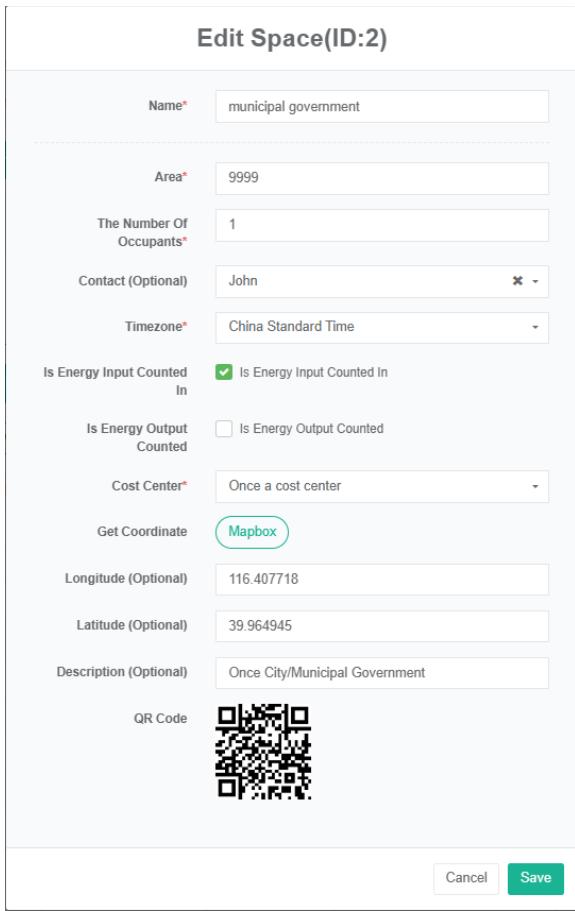
Edit Space:
- Click on the menu 'system administration'
- Click on the menu 'space management'
- Click on the tab 'space'
- Click "Edit" Button
- In 'editing space dialog input "Name", "Area", "Contact", "Time zone" And "Cost center", "Description". According to the actual situation to decide whether to check the "Energy consumption in summary", "Energy output in summary'
- Click "Save" Button
Delete The Space:
- Click the menu "System management"
- Click on the menu 'space management'
- Click on the tab 'space'
- Click "Delete" Button
- Click the 'confirm delete' button in the 'confirm delete' dialog box
13.2. Bind Meter
View Has Bind Meter:
-
Click the menu "System management"
-
Click on the menu 'space management'
-
Click on the tab 'bind meter'
-
Click on the name of the space you want to view in the 'select space' module

Bind Meter:
- Click the menu "System management"
- Click on the menu 'space management'
- Click on the tab 'bind meter'
- Click on the 'please select a space module next need bind meter of space
- In the 'meter module click on the drop-down box to choose meter type
- Click on the 'meter' the meter module and drag and drop to the bind table module
- Into a 'bind table module after release the left mouse button
- A 'bind meter successful' tip is bind
- Repeat the same meters into the "Wrong" Will light up to alert the same space
- If not click space 'space of the invalid id' prompt will appear

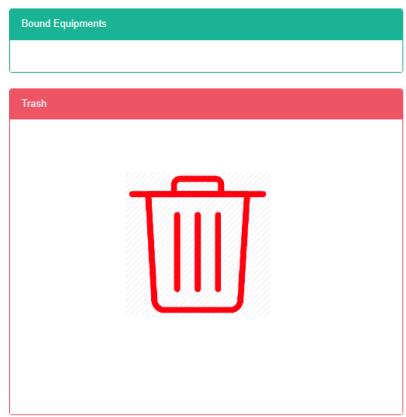
Unbind the meter:
- Click the menu "System management"
- Click on the menu 'space management'
- Click on the tab 'bind meter'
- Click on the meter you want to unbind in the 'Bind meter' module and drag it to the 'recycling bucket' module
- Into the recycling bins' 'module after release the left mouse button
- 'success' tie meter hints in which solutions to success
13.3. Bind Equipment
View Bind Equipment:
- Click the menu "System management"
- Click on the menu 'space management'
- Click on the tab 'bind equipment'
- In the 'please select a space module click to view the space
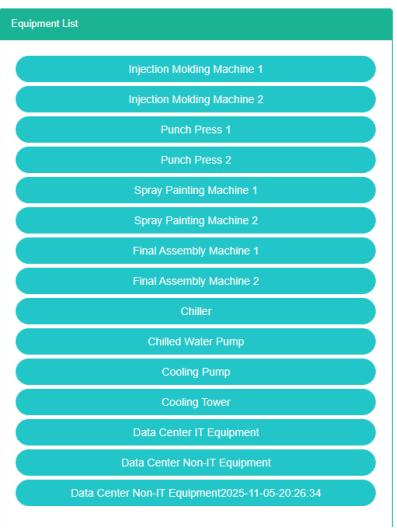
Bind equipment:
- Click the menu "System management"
- Click on the menu 'space management'
- Click on the tab 'bind equipment'
- Click on the 'please select a space module next need bind equipment space
- Click on the "Equipment list" Module of the equipment and drag and drop to the 'bind equipment module
- Into a 'bind equipment module after release the left mouse button
- A 'success' hint namely bind bind equipment
- Repeat same equipment into the same space can appear error prompt
- If the space is not clicked, the 'invalid space id' message will appear


Unbind Equipment:
- Click the menu "System management"
- Click on the menu 'space management'
- Click on the 'bind equipment' tab
- Click on the 'bind equipment modules require unbind of equipment and drag and drop to the' barrel 'module
- Into the recycling bins' 'module after release the left mouse button
- If the "Unbind equipment successfully" Prompt appears, the unbind is successful

13.4. Bind Combination Equipment
View Has Bind Combination Equipment:
-
Click the menu "System management"
-
Click on the menu 'space management'
-
Click on the tab 'bind combination equipment'
-
In the 'please select a space module click to view the space
Bind Combination Equipment:
- Click the menu "System management"
- Click on the menu 'space management'
- Click on the tab 'bind combination equipment'
- Click on the 'please select a space module next need bind combination equipment of space
- Click on the 'combination equipment list module combination of the equipment and drag and drop to "The combination of bind equipment module
- Into "A combination of bind equipment module after release the left mouse button
- 'bind combination equipment success tips in which bind success
- The same combination equipment repeated into the same space can appear error prompt
- If not click space 'space of the invalid id' prompt will appear
Bind Combination Equipment:
- Click the menu "System management"
- Click on the menu 'space management'
- Click on the tab 'bind combined equipment'
- Click on the 'the combination of bind equipment needs the combination of the unbind of module equipment and drag and drop to the' barrel 'module
- Into the recycling bins' 'module after release the left mouse button
- Emergence of 'success' tie combination equipment prompt solution to success
13.5. Bind Data Point
View Bind Data Point:
- Click the menu "System management"
- Click on the menu 'space management'
- Click on the tab 'bind data point'
- In the 'please select a space module click to view the space
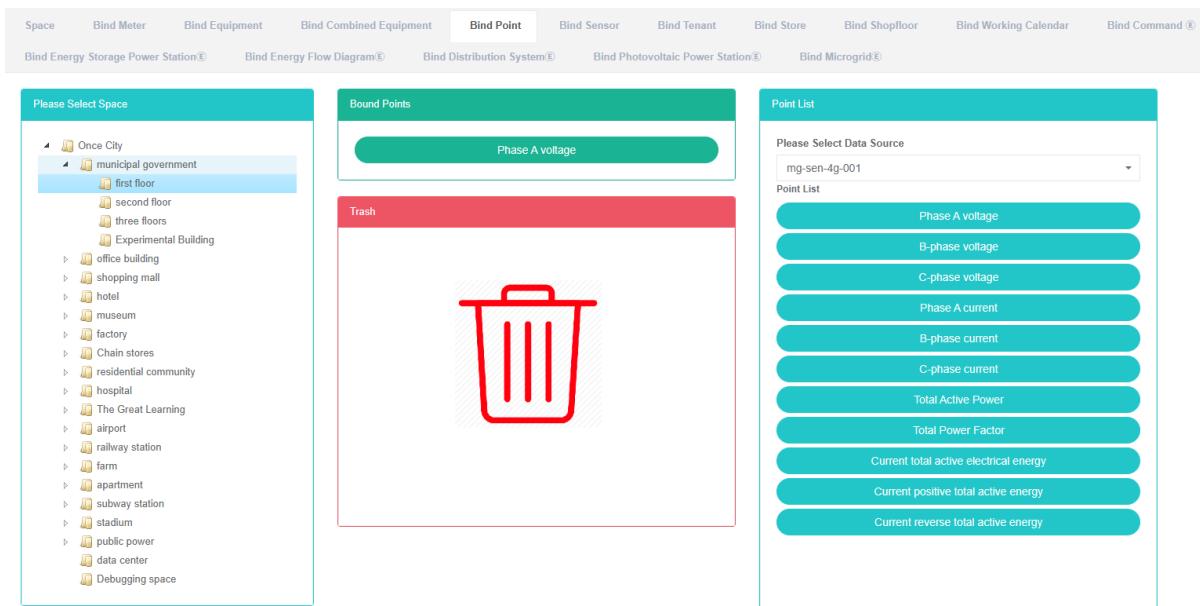
Bind Data Point:
-
Click the menu "System management"
-
Click on the menu 'space management'
-
Click on the tab 'bind data point'
-
Click on the 'please select a space module next need to bind data point of space
-
In the "List of data point in the module click a drop-down box to choose the data type
-
Click on the 'list of data point' data point in the module and drag and drop to the bind of data point module
-
Into a 'bind data point' module after release the left mouse button
-
A 'bind data point succeed' tip is bind
-
Dragging the same metering data point into the same space will result in an 'error' message
Unbind Data Point:
- Click the menu "System management"
- Click on the menu 'space management'
- Click on the tab 'bind data point'
- Click on the 'bind data point need solution to data point in the module and drag and drop to the' barrel 'module
- Into the recycling bins' 'module after release the left mouse button
- A 'success' hint that bind data point solutions to success
![]()
Success Unbind Point Success
13.6. Bind Sensor
View Has Bind Sensor:
- Click the menu "System management"
- Click on the menu 'space management'
- Click on the tab 'bind sensor'
- Click on the name of the space you want to view in the 'please select space' module
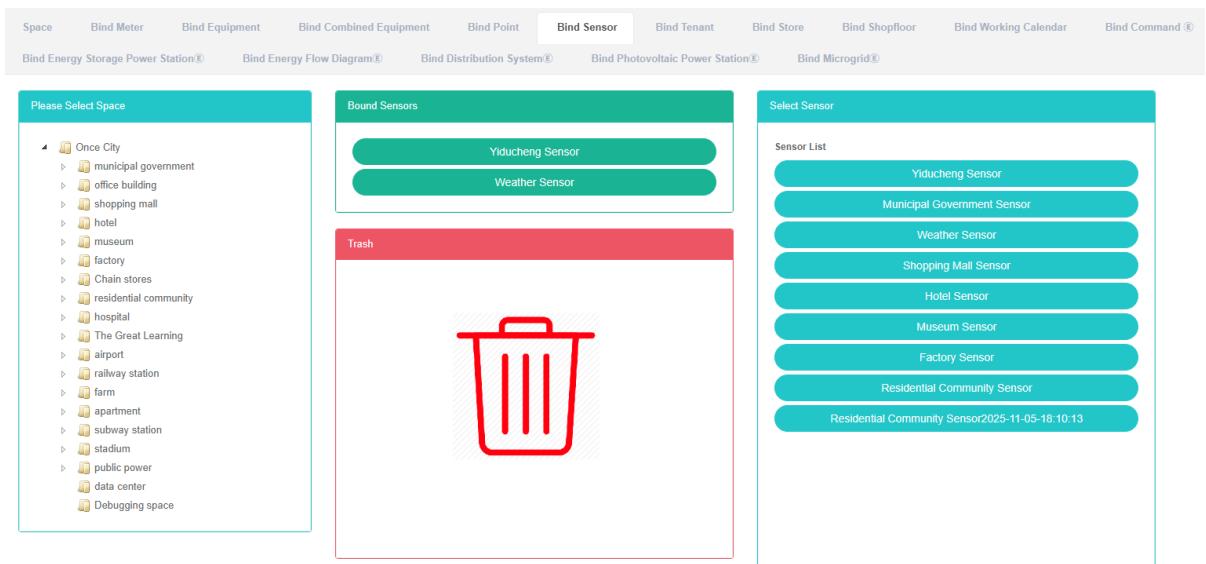
Bind Sensor:
-
Click the menu "System management"
-
Click on the menu 'space management'
-
Click on the tab 'bind sensor'
-
Click on the 'please select a space module next need bind sensor space
-
Click the "Select sensor module of sensor and drag and drop to the 'bind sensor module
-
Into a 'bind sensor module after release the left mouse button
-
A 'success' hint namely bind bind sensor
-
Repeat the same sensor into the same space can appear error prompt
-
If not click space 'space of the invalid id' prompt will appear
Unbind Sensor:
- Click the menu "System management"
- Click on the menu 'space management'
- Click on the tab 'bind sensor'
- Click on the sensor you want to unbind in the 'Bind sensor' module and drag it to the' recycling bucket 'module
- Release the left mouse button after dragging into the 'recycle bucket' module
- 'unbind sensor success tips in which solutions to success
13.7. Bind Tenant
View Has Bind The Tenant:
- Click the menu "System management"
- Click on the menu 'space management'
- Click on the tab 'bind tenant'
- In the 'please select a space module click to view the space

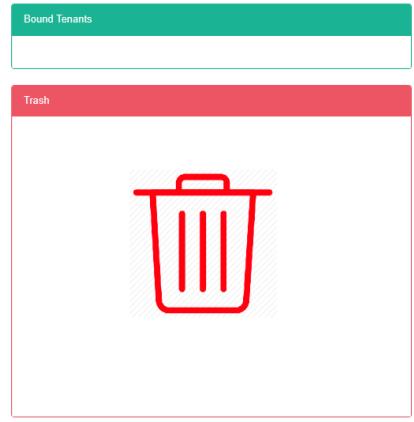
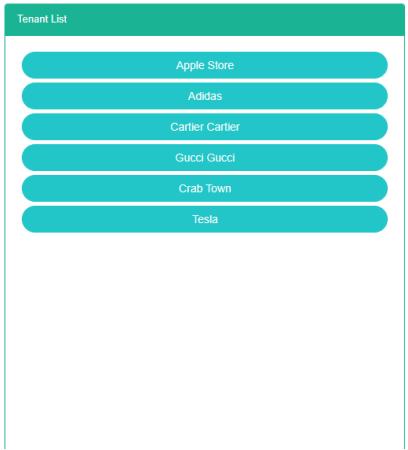
Bind The Tenant:
- Click the menu "System management"
- Click on the menu 'space management'
- Click on the tab 'bind tenant'
- Click on the 'please select a space module next need to bind the tenant space
- Click on the tenant' tenant list module and drag and drop to the 'bind tenant' module
- Into a 'bind table module after release the left mouse button
- Tenant' success 'bind tips in which bind success
- The same tenant repeatedly dragging into the same space will result in an 'error' message
- If not click space 'space of the invalid id' prompt will appear
![]()
Bind Tenant Success

Space Tenant RelationExists
![]()

![]()
Unbind The Tenant:
- Click the menu "System management"
- Click on the menu 'space management'
- Click on the tab 'bind tenant'
- Click on the 'bind tenant' module need unbind of tenant and drag and drop to the' barrel 'module
- Into the recycling bins' 'module after release the left mouse button
- 'unbind tenant success tips in which solutions to success
![]()
![]()
13.8. Bind Store
View Has Bind Store:
- Click the menu "System management"
- Click on the menu 'space management'
- Click on the tab 'bind store'
- In the 'please select a space module click to view the space
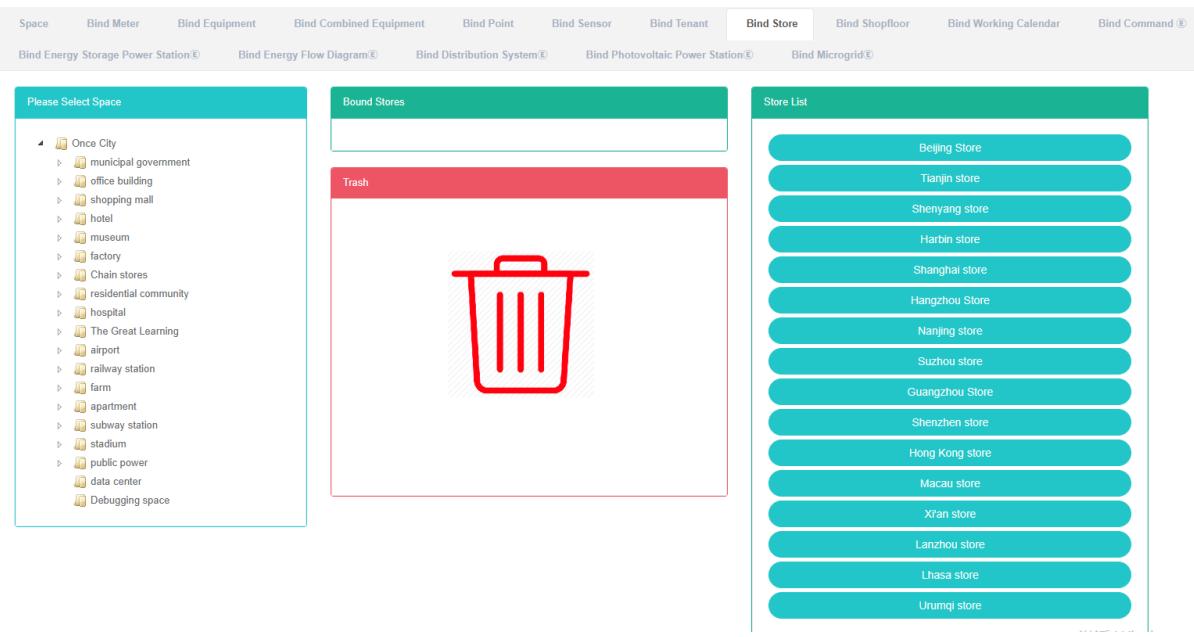
Bind store:
-
Click the menu "System management"
-
Click on the menu 'space management'
-
Click on the tab 'bind store'
-
Click on the 'please select a space module next need to bind the space of the store
-
Click on the 'store list module in the store and drag and drop to the' store of bind "Module
-
Drag into the 'Bind store' module and release the left mouse button
-
A 'bind store successful' tip is bind
-
The same store repeat into "Error" Will light up to alert the same space
-
If the space is not clicked, the 'invalid space id' will appear
!
Unbind Store:
- Click on the menu 'system administration'
- Click on the menu 'space management'
- Click on the tab 'bind store'
- Click on the 'bind store require unbind of module store and drag and drop to the' barrel 'module
- Into the recycling bins' 'module after release the left mouse button
- 'unbind outlets success tips in which solutions to success
13.9. Bind Shopfloor
Check The Bind Shopfloor:
- Click on the menu 'system administration'
- Click on the menu 'space management'
- Click on the tab 'bind shopfloor'
- Click on the name of the space you want to view in the 'please select space' module
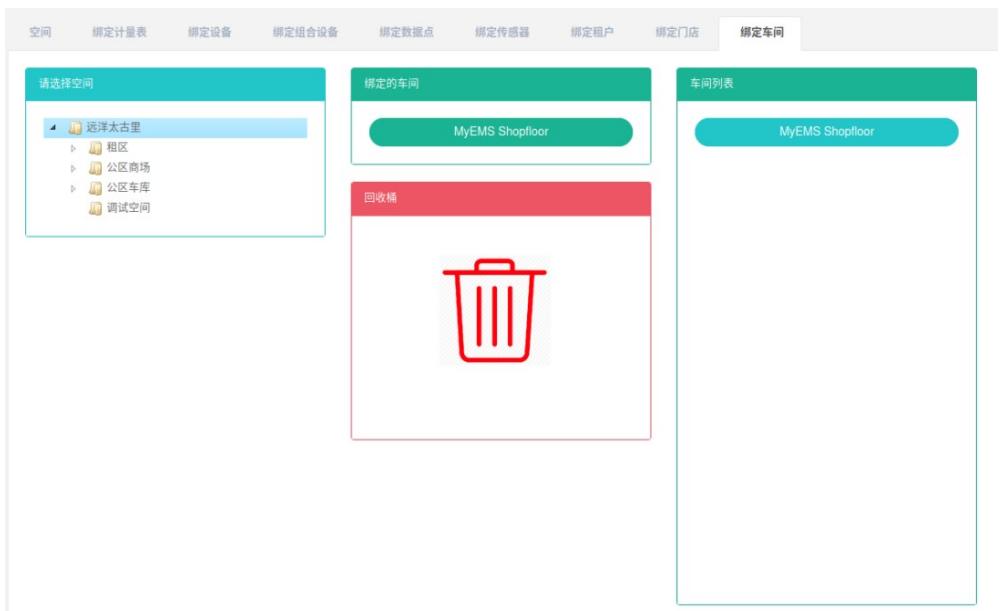
Bind Shopfloor:
-
Click the menu "System management"
-
Click on the menu 'space management'
-
Click on the tab 'bind shopfloor'
-
Click on the 'please select space' module under the space you need to bind the shopfloor
-
Click on the 'shop list module in the shopfloor and drag and drop to the' bind shopfloor module
-
Drag into the 'Bind shopfloor' module and release the left mouse button
-
A 'success' hint namely bind bind shopfloor
-
If the same shopfloor is dragged into the same space repeatedly, an 'error' will appear
-
If not click space 'space of the invalid id' prompt will appear

Fig.1340 Space Management-87Success Warning For Bind Shopfloor


Bind To The Shopfloor:
- Click on the menu 'system administration'
- Click on the menu 'space management'
- Click on the tab 'bind shopfloor'
- Click on the shopfloor you want to unbind in the 'Bind shopfloor' module and drag it to the 'recycling bucket' module
- Into the recycling bins' 'module after release the left mouse button
- "Unbind shopfloor successfully" Message is the solution to success

13.10. Bind Working Calendar
View Has The Bind Working Calendar:
- Click on the menu 'system administration'
- Click on the menu 'space management'
- Click on the tab 'bind working Calendar'
- In the 'please select a space module click to view the space
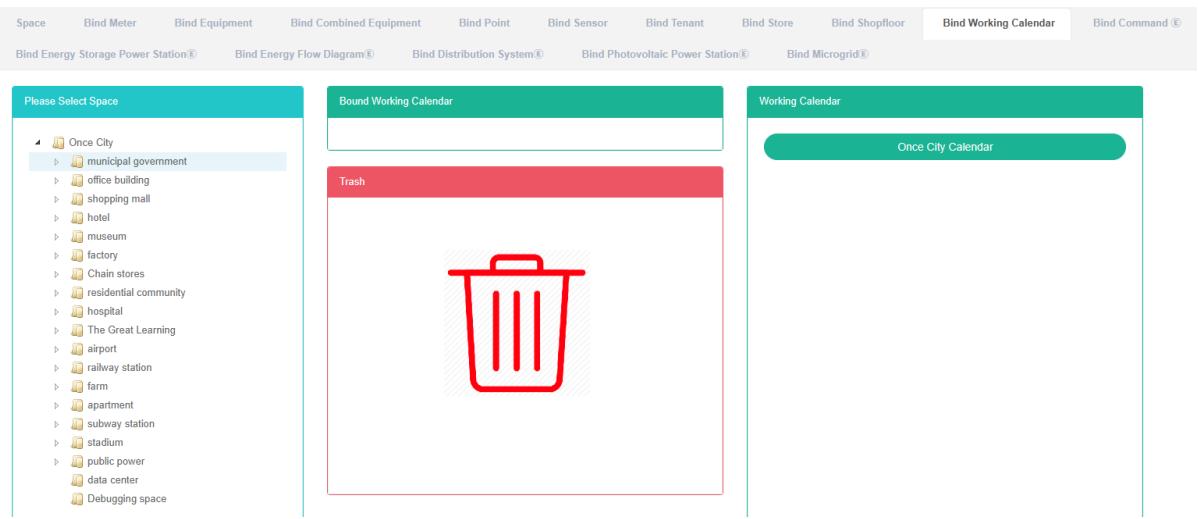
Bind Working Calendar:
-
Click on the menu 'system administration'
-
Click on the menu 'space management'
-
Click on the tab 'bind working Calendar'
-
Click on the 'please select a space module next need bind work space of the calendar
-
Click on the 'working calendar lists the working calendar module and drag and drop to the' bind working Calendar module
-
Into a 'bind working Calendar module after release the left mouse button
-
'success calendar bind work hints in which bind success
-
The same working calendar repeat into "Error" Will light up to alert the same space
Unbind The Working Calendar:
- Click on the menu 'system administration'
- Click on the menu 'space management'
- Click on the tab 'bind working Calendar'
- Click on the 'bind working Calendar module unbind work needs to be done in the calendar and drag and drop to the' barrel 'module
- Into the recycling bins' 'module after release the left mouse button
- If the "Unbind working Calendar successfully" Prompt appears, the unbind is successful
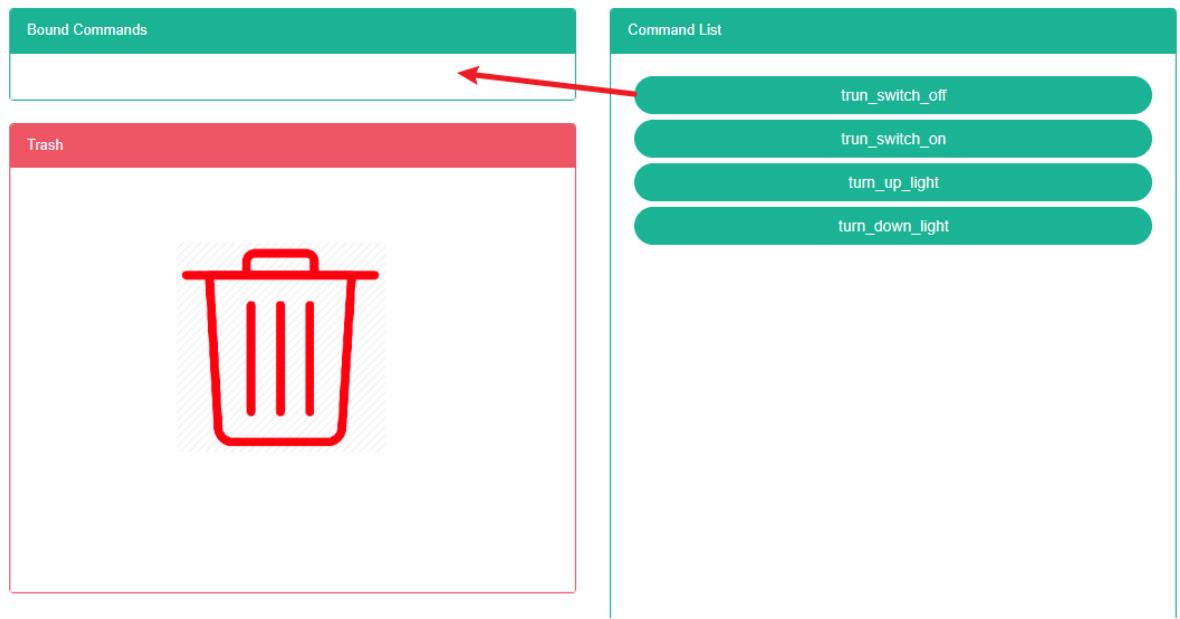
13.11. Bind CommandE
View Bind Command:
- Click the menu "System management"
- Click on the menu 'space management'
- Click on the tab 'bind command'
- Click on the name of the space you want to view in the 'please select space' module

Bind Command:
-
Click the menu "System management"
-
Click on the menu 'space management'
-
Click on the tab 'bind command'
-
Click on the 'please select a space module need bind under the command of space
-
Click on the 'command lists the command module and drag and drop to the' bind command module
-
Into a 'bind command module after release the left mouse button
-
A 'bind command successful' tip is bind
-
If the same command is repeatedly dragged into the same space, an 'error' will appear
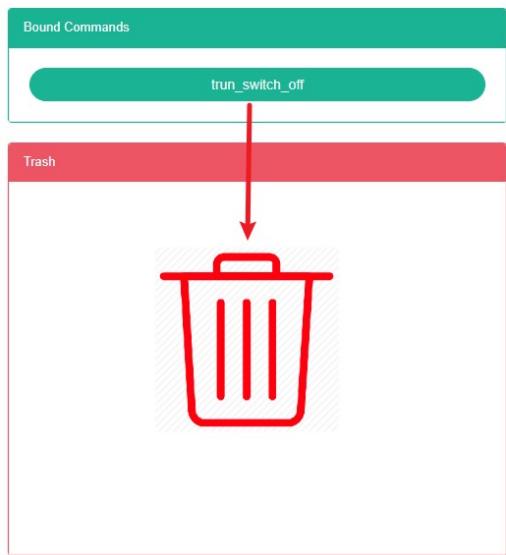
Unbind Command:
- Click the menu "System management"
- Click on the menu 'space management'
- Click on the tab 'bind command'
- Click on the 'bind command module need unbind of command and drag and drop to the' barrel 'module
- Into the recycling bins' 'module after release the left mouse button
- 'success' bind command prompt in which solutions to success
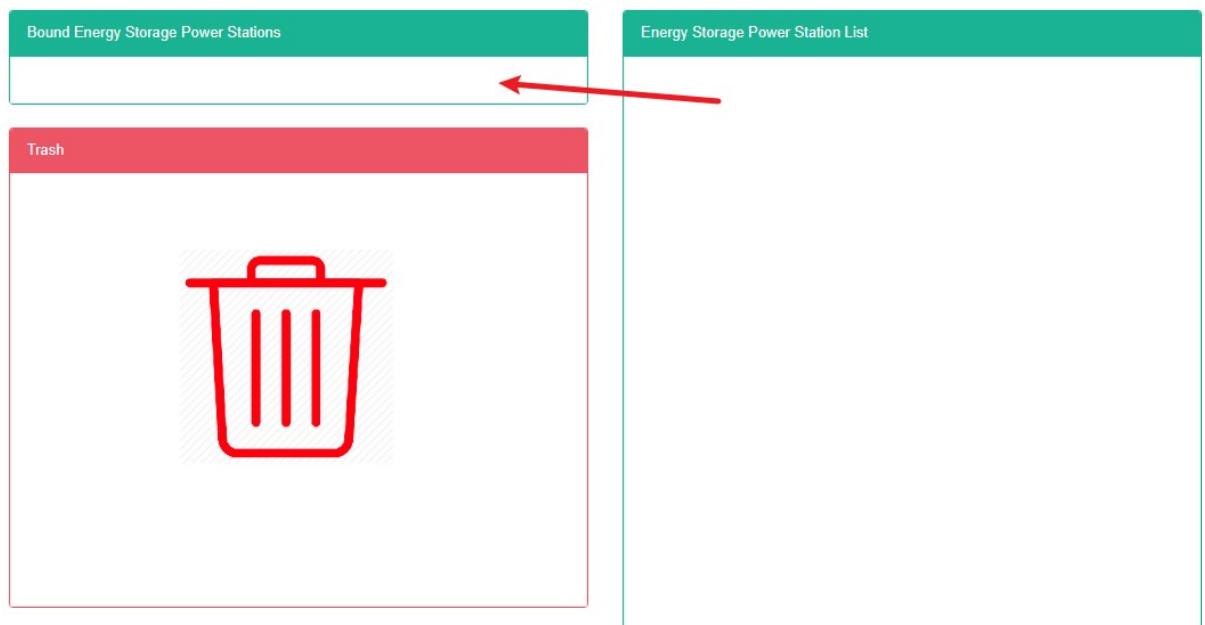
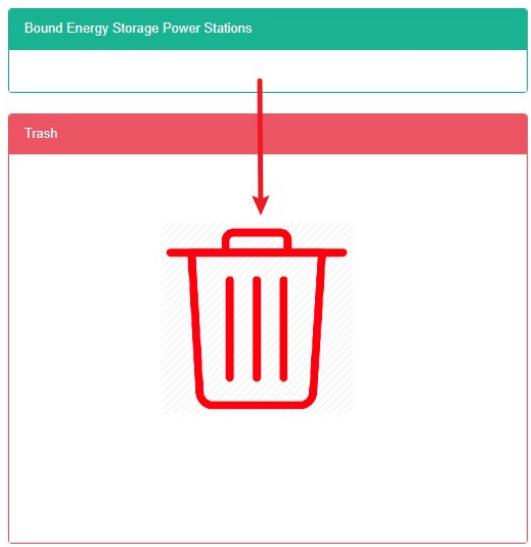
13.12. Bind Energy Storage Power Station
View Has The Bind Energy Storage Power Station:
- Click on the menu 'system management'
- Click on the menu 'space management'
- Click on the tab 'bind energy storage power station
- Click on the name of the space you want to view in the 'please select space' module

Bind Energy Storage Power Station:
- Click the menu "System management"
- Click on the menu 'space management'
- Click on the tab 'bind energy storage power station
- Click on the 'please select a space module need bind under the command of space
- Click on the "Energy storage power station list" The command module and drag and drop to the bind energy storage power station module
- Into a 'bind energy storage power station module after release the left mouse button
- A 'bind energy storage power station successful' tip is bind
- If the same command is repeatedly dragged into the same space, an 'error' will appear
Bind Energy Storage Power Station
- Click the menu "System management"
- Click on the menu 'space management'
- Click on the tab 'bind energy storage station'
- Click on the command to unbind in the 'Bind energy storage station' module and drag it to the 'recycling bucket' module
- Into the recycling bins' 'module after release the left mouse button
- If the "Unbind energy storage station successfully" Prompt appears, the unbind is successful
13.13. Bind Energy Flow Diagram
View Is Bind To Flow Diagram:
- Click the menu "System management"
- Click on the menu 'space management'
- Click the tab 'bind can flow diagram
- In the 'please select a space module click to view the space
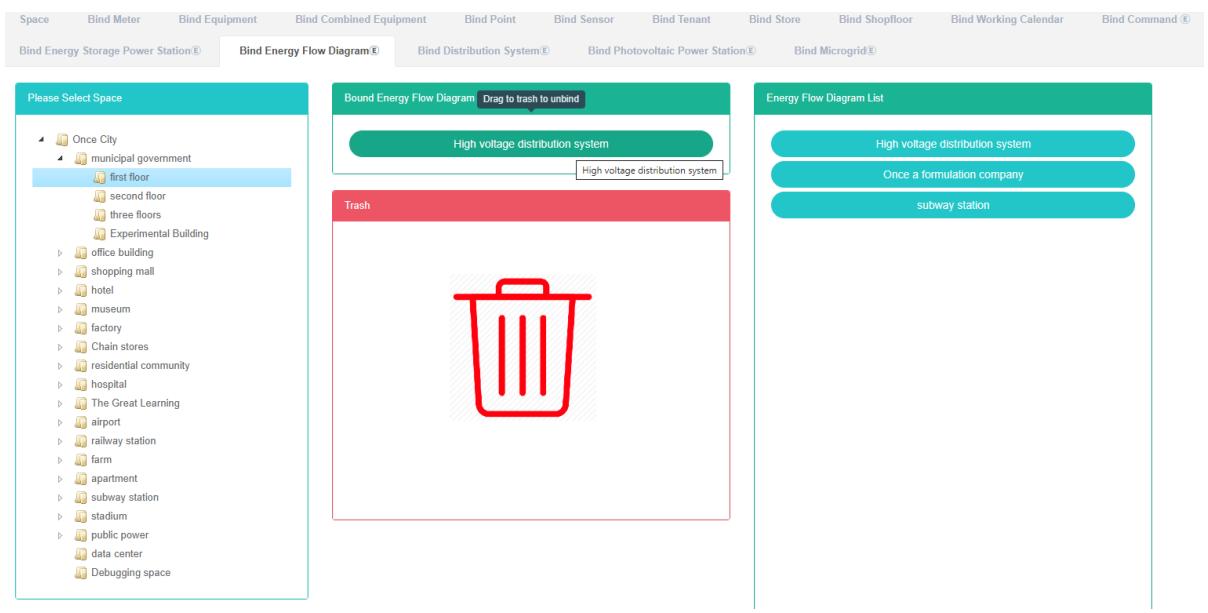
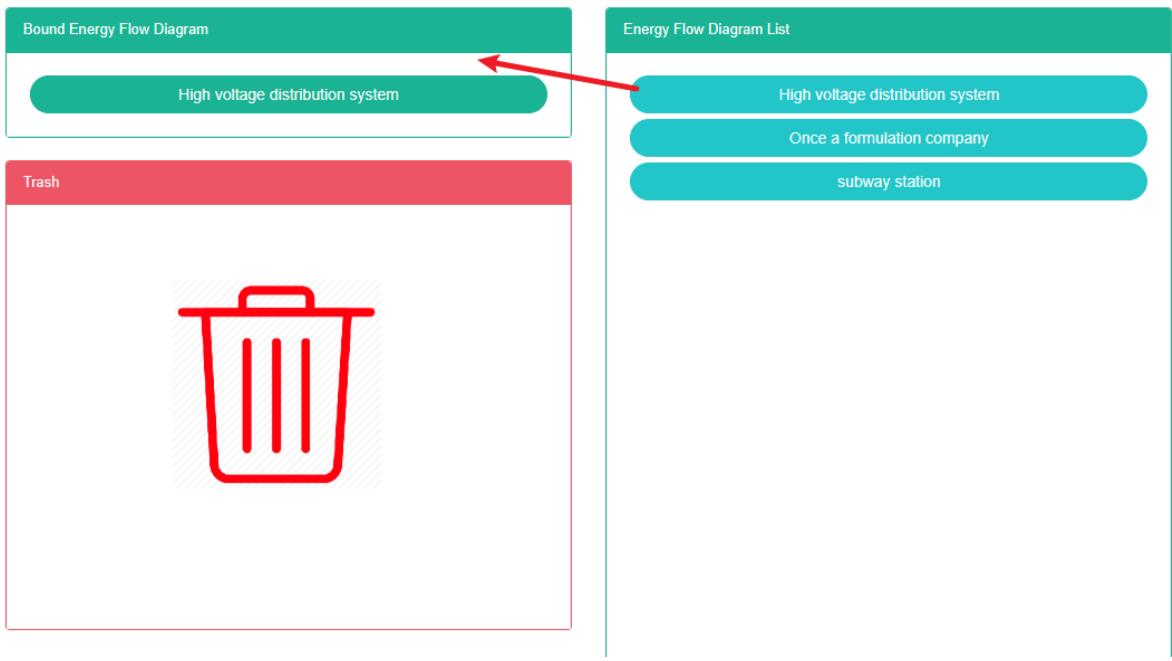
Bind Energy Flow Diagram:
- Click the menu "System management"
- Click on the menu 'space management'
- Click the tab 'bind can flow diagram
- Click on the space you want to bind command to under the 'please select space' module
- Click on 'can flow Figure lists the command module and drag and drop to' bind energy flow diagram of the module
- Into a 'bind energy flow Figure module after release the left mouse button
- 'bind can flow Figure success tips in which bind success
- The same command repeat into the same space can appear error prompt
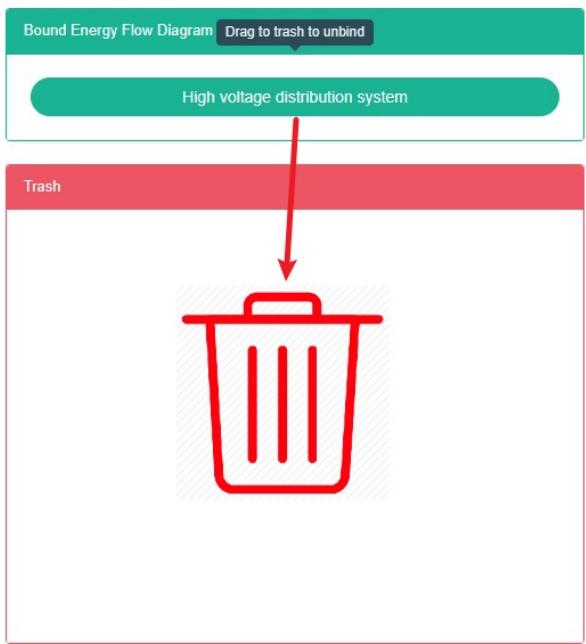
Unbind Flow Figure:
-
Click the menu "System management"
-
Click on the menu 'space management'
-
Click the tab 'bind can flow diagram
-
Click on the "Bind energy flow Figure module need unbind command and drag and drop to the 'barrel' module
-
Drag the 'recycle bucket' module and release the left mouse button
-
Can appear "Unbind flow Figure success 'hint namely unbind
13.14. Bind Power Distribution System
Check Has Been Bind Power Distribution System:
- Click the menu "System management"
- Click on the menu 'space management'
- Click on the tab 'bind distribution system'
- In the 'please select a space module click to view the space


Bind Power Distribution System:
- Click the menu "System management"
- Click on the menu 'space management'
- Click on the tab 'bind distribution systems'
- Click on the 'please select a space module need bind under the command of space
- Click on the 'list of power distribution system command in the module and drag and drop to the' bind power distribution system module
- Into a 'bind power distribution system module after release the left mouse button
- A 'success in bind distribution system' prompt indicates success in bind
- The same command repeat into the same space can appear error prompt
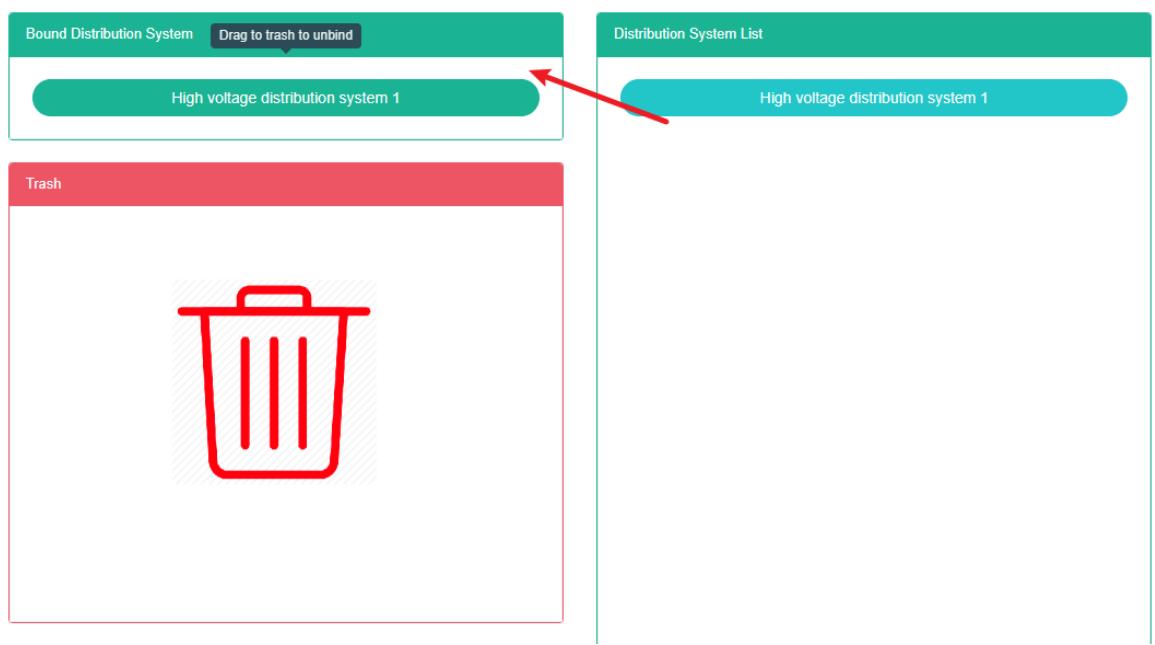
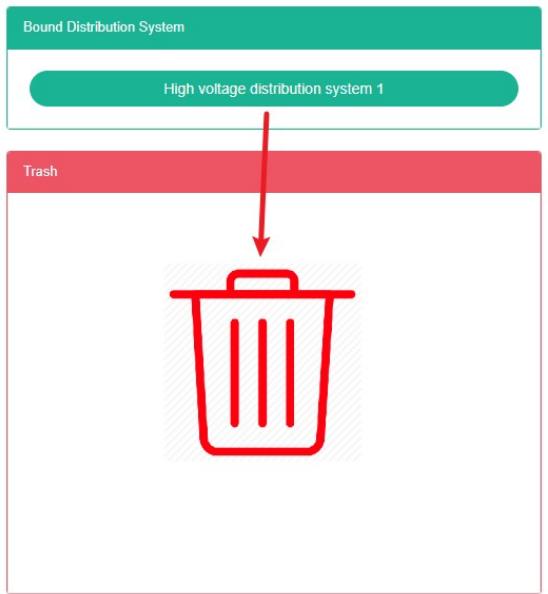
Solution To The Power Distribution System:
- Click the menu "System management"
- Click on the menu 'space management'
- Click on the tab 'bind distribution systems'
- Click on the 'bind power distribution system the need unbind command module and drag and drop to' barrels' module
- Into the recycling bins' 'module after release the left mouse button
- If the "Untie distribution system successfully" Prompt appears, the untie is successful
13.15. Bind Pv Station
View Bind Pv Station:
- Click the menu "System management"
- Click on the menu 'space management'
- Click the tab 'bind photovoltaic power station'
- In the 'please select a space module click to view the space
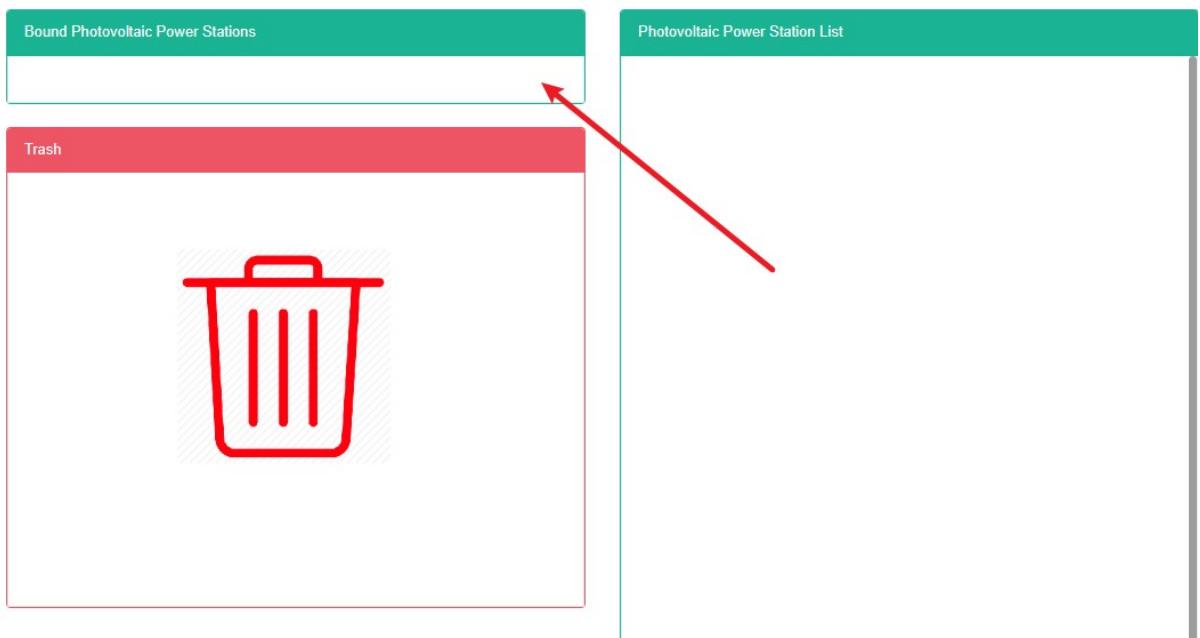
Bind Photovoltaic Power Station:
- Click the menu "System management"
- Click on the menu 'space management'
- Click the tab 'bind photovoltaic power station'
- Click on the 'please select a space module need bind under the command of space
- Click on the 'list of photovoltaic power station the command module and drag and drop to the bind of photovoltaic power station module
- Drag into the 'Bind pv station' module and release the left mouse button
- A 'bind photovoltaic power station successful' tip is bind
- The same command repeat into the same space can appear error prompt
Unbind Photovoltaic Power Station:
- Click the menu "System management"
- Click on the menu 'space management'
- Click on the tab 'bind pv plant'
- Click on the 'bind of photovoltaic power station module need unbind of command and drag and drop to' barrels' module
- Into the recycling bins' 'module after release the left mouse button
- If the "Unbind pv power station is successful" Prompt appears, the unbind is successful
14. Tenant Management
This system can meet the demand of enterprise of energy management system, through to the main energy consumption equipment, energy utilization status quo of energy-using units monitoring analysis, statistical analysis method, method of energy audit and energy balance method, etc on a regular basis to the enterprise energy consumption situation and the analysis cost, help enterprises to determine the index system of energy consumption and energy saving, mining and energy saving potential of energy saving measures.
14.1. Tenant
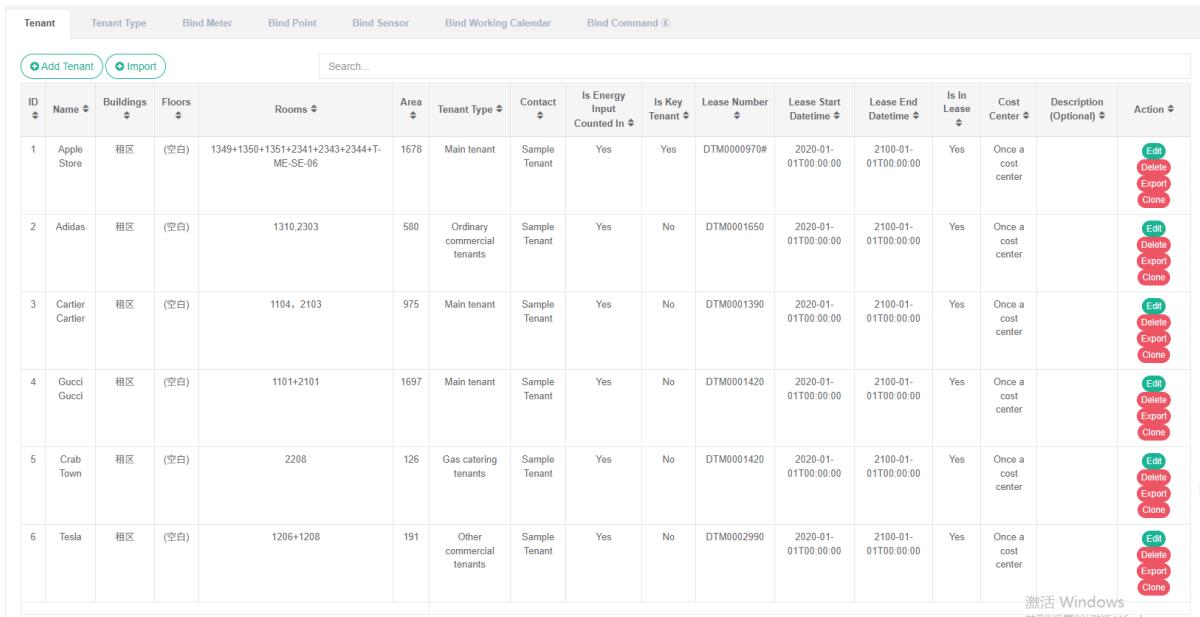
View Tenant:
- Click the menu "System management"
- Click on the menu 'tenant management'
- Click on the tab 'tenant'
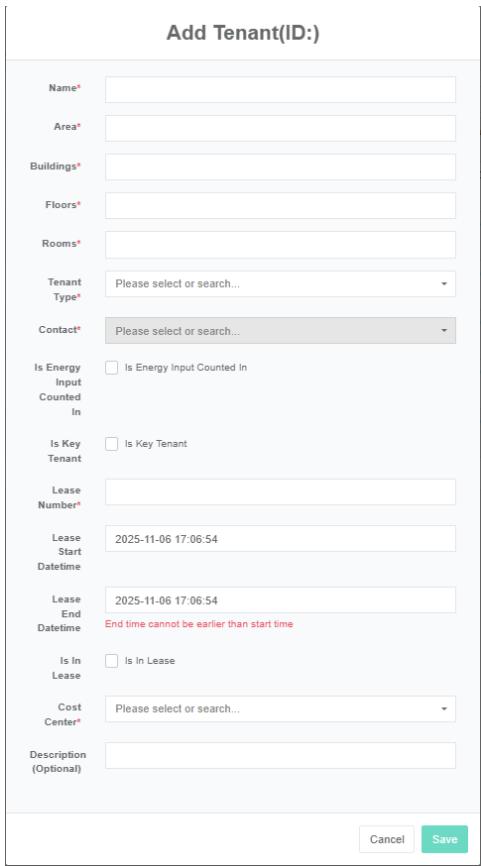
Add The Tenant:
-
Click on the menu 'system administration'
-
Click on the menu 'tenant management'
-
Click on the tab 'tenant'
-
Click on the 'add tenant' button
-
In the 'add tenant' dialog box input "Name", "Area", "Building", "Floor", "Room" And "Tenant type", "Contact", "Lease number", "Cost center", "Description". According to the actual situation to decide whether to check whether 'energy consumption in summary', 'main tenant', 'whether in rent
-
Click the 'save' button
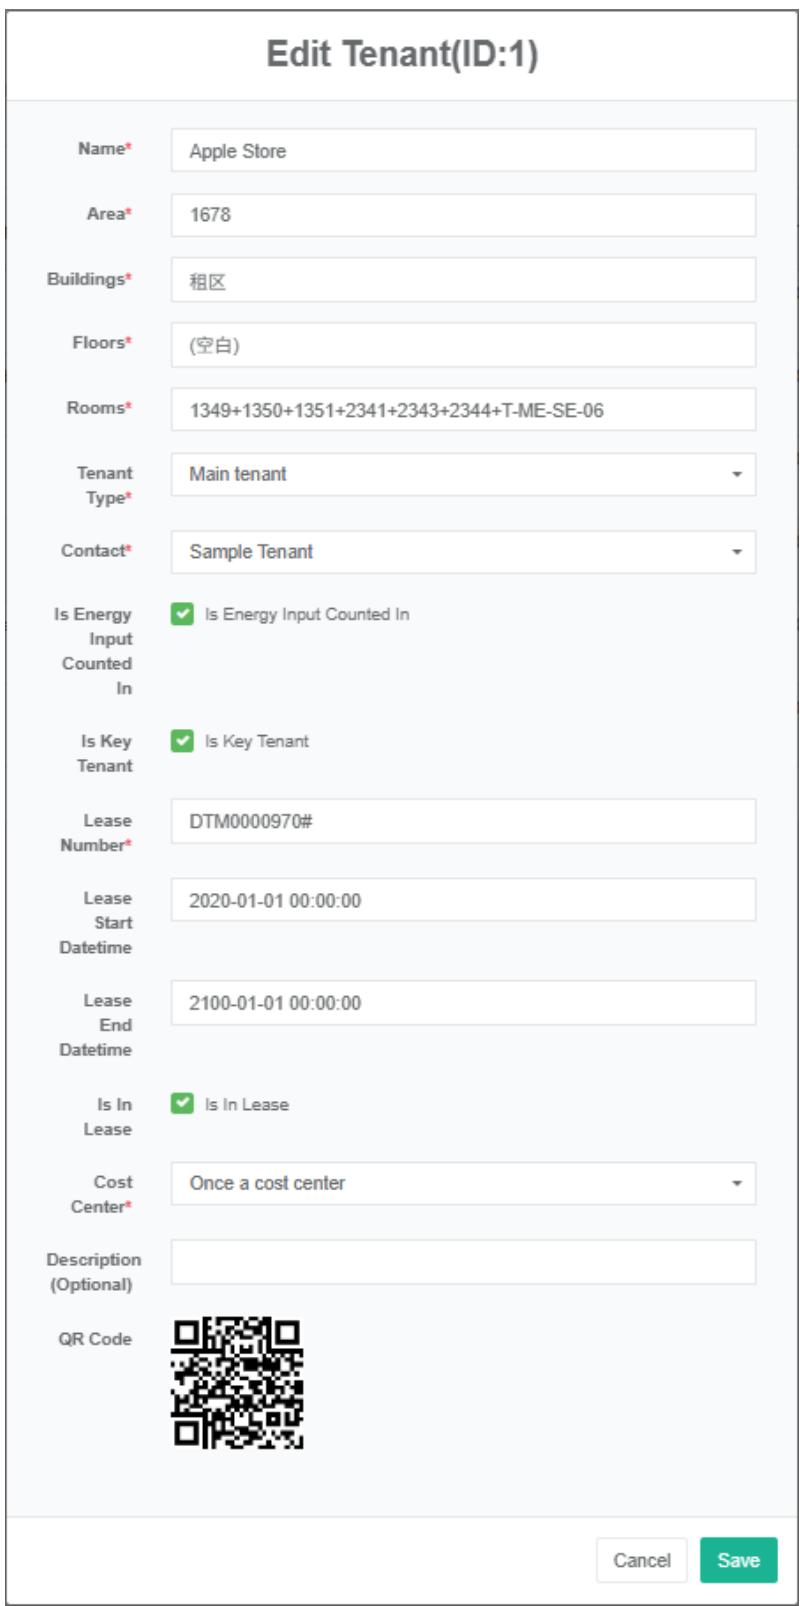
Edit The Tenant:
-
Click on the menu 'system administration'
-
Click the menu "Tenant management"
-
Click on the tab 'tenant'
-
Click "Edit" Button
-
In 'edit tenant' dialog input "Name", "Area", "Building", "Floor", "Room", "The tenant type", "Contact", "Lease number", "Cost center", "Description". According to the actual situation to decide whether to check whether 'energy consumption in summary', 'main tenant', 'whether in rent
-
Click "Save" Button
Delete The Tenant:
- Click the menu "System management"
- Click the menu "Tenant management"
- Click on the tab 'tenant'
- Click "Delete" Button
- Click the 'confirm delete' button in the 'confirm delete' dialog box
Import The Tenant:
- Click the menu "System management"
- Click the menu "Tenant management"
- Click on the tab 'tenant'
- Click on the 'import' button
- Enter data into the dialog box
- Click on the "Import"
ExportThe Tenant:
- Click the menu "System management"
- Click on the menu 'tenant management'
- Click on the tab 'tenant'
- Click on the "Export" Button
Clone The Tenant:
- Click the menu "System management"
- Click the menu "Tenant management"
- Click on the tab 'tenant'
- Click on 'clone' button
14.2.Bind The Meter
View Has Bind Meter:
- Click the menu "System management"
- Click the menu "Tenant management"
- Click on the tab 'bind meter'
- Click in the "Tenant" Module drop-down box to choose the tenant want to see
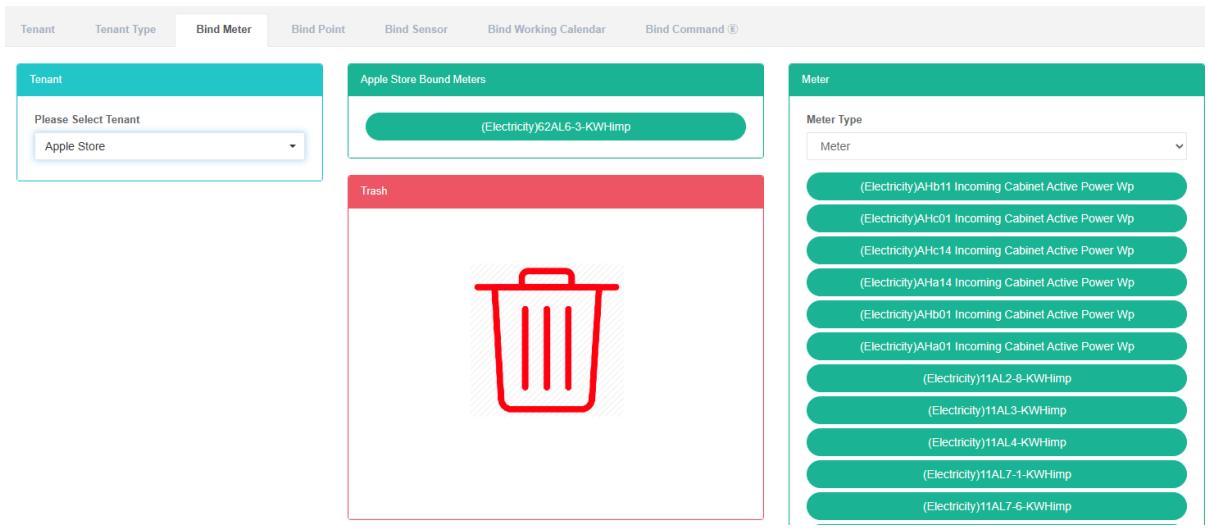
Bind Meter:
-
Click the menu "System management"
-
Click the menu "Tenant management"
-
Click on the tab 'bind meter'
-
Click in the "Tenant" Module drop-down box to choose the tenant want to see
-
In the 'meter module click on the drop-down box to choose meter type
-
Click on the 'meter' the meter module and drag and drop to the bind table module
-
Into a 'bind table module after release the left mouse button
-
A 'bind meter successful' tip is bind
-
Repeated dragging of the same meter into the same tenant will result in an 'error' message
-
If not choose tenant' invalid tenant id 'prompt will appear


Unbind Meter:
- Click the menu "System management"
- Click the menu "Tenant management"
- Click on the tab 'bind meter'
- Click in the "Tenant" Module drop-down box to choose the tenant want to see
- Click on the 'bind table module need unbind of meter and drag and drop to the' barrel 'module
- Into the recycling bins' 'module after release the left mouse button
- 'success' tie meter hints in which solutions to success
14.3. Bind Data Point
View Bind Data Point:
- Click the menu "System management"
- Click the menu "Tenant management"
- Click on the tab 'bind data point'
- Want to see on it in the 'tenant' module of tenant

Bind data point:
-
Click the menu "System management"
-
Click the menu "Tenant management"
-
Click on the tab 'bind data point'
-
Click in the "Tenant" Module drop-down box to choose the tenant want to see
-
In the "List of data point in the module click a drop-down box to choose the data source
-
Click on the 'list of data point' data point in the module and drag and drop to the bind of data point module
-
Into a 'bind data point' module after release the left mouse button
-
A 'bind data point succeed' tip is bind
-
The same measurement data point into the same tenant' mistakes will light up to alert
-
If not choose tenant' invalid tenant id 'prompt will appear


Unbind Data Point:
-
Click on the menu 'system administration'
-
Click the menu "Tenant management"
-
Click on the tab 'bind data point'
-
Click in the "Tenant" Module drop-down box to choose the tenant want to see
-
Click on the 'bind data point need solution to data point in the module and drag and drop to the' barrel 'module
-
Into the recycling bins' 'module after release the left mouse button
-
If the "Unbind data point successfully" Prompt appears, the unbind is successful

14.4. Bind Sensor
View Has Bind Sensor:
- Click the menu "System management"
- Click the menu "Tenant management"
- Click on the tab 'bind sensor'
- Want to see on it in the 'tenant' module of tenant
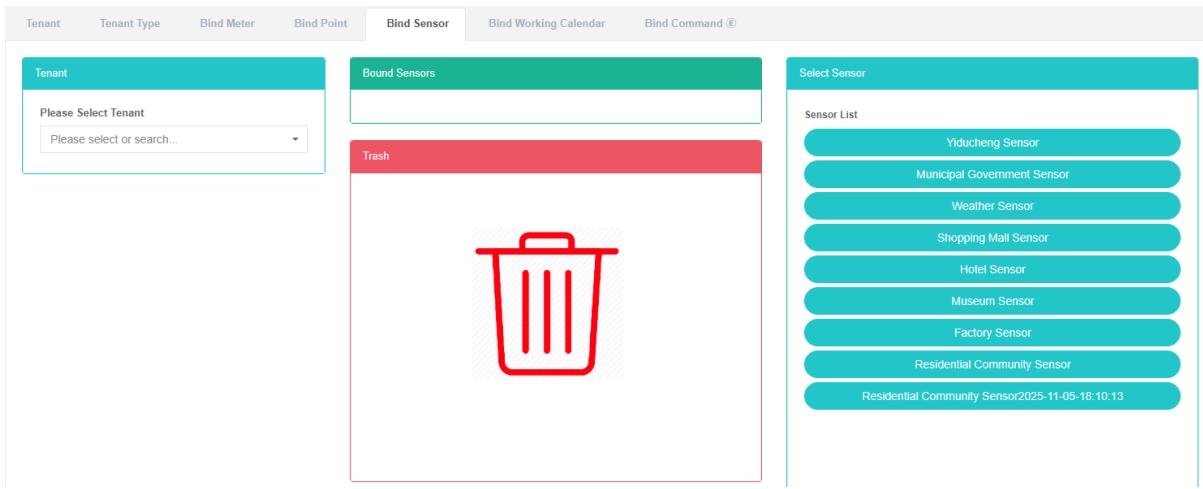
Bind Sensor:
- Click on the menu 'system administration'
- Click on the menu 'tenant management'
- Click on the tab 'bind sensor'
- Click in the "Tenant" Module drop-down box to choose the tenant want to see
- Click the "Select sensor module of sensor and drag and drop to the 'bind sensor module
- Drag the 'Bind sensor' module and release the left mouse button
- A 'success' hint namely bind bind sensor
- Repeat the same sensor into the same tenant' mistakes will light up to alert
- If not choose tenant' invalid tenant id 'prompt will appear


Unbind Sensor:
-
Click the menu "System management"
-
Click on the menu 'tenant management'
-
Click on the tab 'bind sensor'
-
Click in the "Tenant" Module drop-down box to choose the tenant want to see
-
Click on the 'bind sensor module need unbind of sensor and drag and drop to the' barrel 'module
-
Release the left mouse button after dragging into the 'recycle bucket' module
-
'unbind sensor success tips in which solutions to success

14.5. Bind a Working Calendar
View Bind Working Calendar:
- Click on the menu 'system administration'
- Click on the menu 'tenant management'
- Click on the tab 'bind working Calendar'
- Click on the tenant name you want to view in the 'please select tenant' module
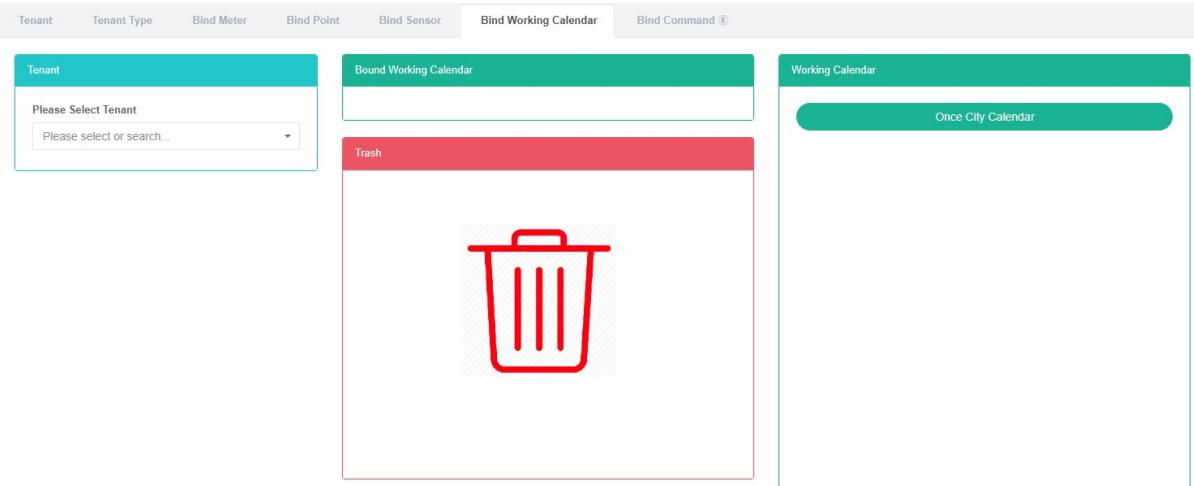
Bind Working Calendar:
- Click on the menu 'system administration'
- Click on the menu 'tenant management'
- Click on the tab 'bind working Calendar'
- Click on the tenant that you want to bind the working Calendar to under the 'please select tenant' module
- Click on the 'working calendar lists the working calendar module and drag and drop to the' bind working Calendar module
- Into a 'bind working Calendar module after release the left mouse button
- 'success calendar bind work hints in which bind success
- Dragging the same working Calendar into the same tenant repeatedly will result in an 'error' message

Unbind Working Calendar:
- Click on the menu 'system administration'
- Click on the menu 'tenant management'
- Click on the tab 'bind working Calendar'
- Click on the 'bind working Calendar module unbind work needs to be done in the calendar and drag and drop to the' barrel 'module
- Into the recycling bins' 'module after release the left mouse button
- If the "Unbind working Calendar successfully" Prompt appears, the unbind is successful
![]()
14.6. Bind command
View Bind command:
- Click on the menu 'system administration'
- Click on the menu 'tenant management'
- Click on the tab 'bind command'
- In the 'please select tenant' module click on the name of the tenant want to see
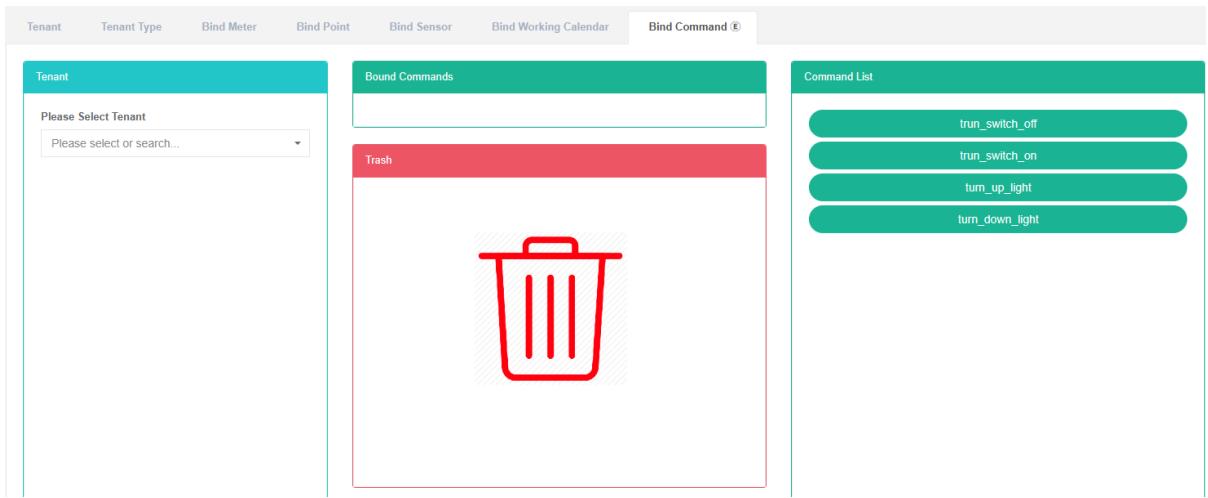
Bind command:
-
Click the menu "System management"
-
Click on the menu 'tenant management'
-
Click on the tab 'bind command'
-
Click on the 'please select tenant' module need bind under the command of the tenant
-
Click on the 'command lists the command module and drag and drop to the' bind command module
-
Into a 'bind command module after release the left mouse button
-
A 'bind command successful' tip is bind
-
The same command repeat into the same tenant' mistakes will light up to alert
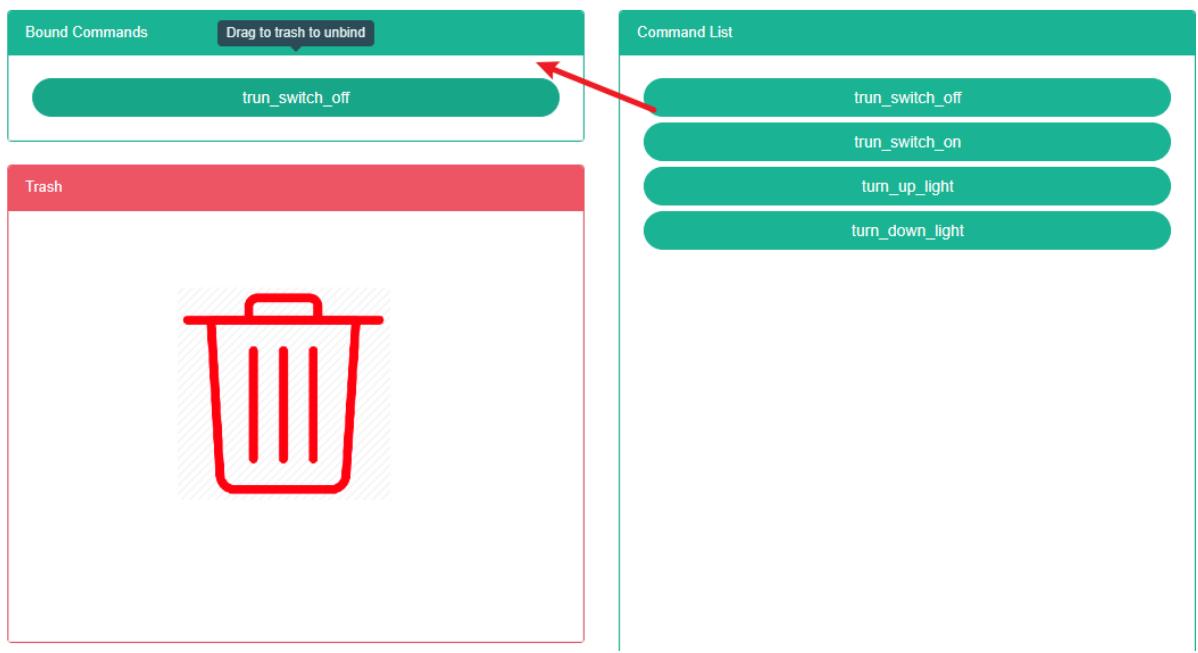
Unbind working calendar:
- Click the menu "System management"
- Click on the menu 'tenant management'
- Click on the tab 'bind command'
- Click on the 'bind command module need unbind of command and drag and drop to the' barrel 'module
- Into the recycling bins' 'module after release the left mouse button
- 'success' bind command prompt in which solutions to success
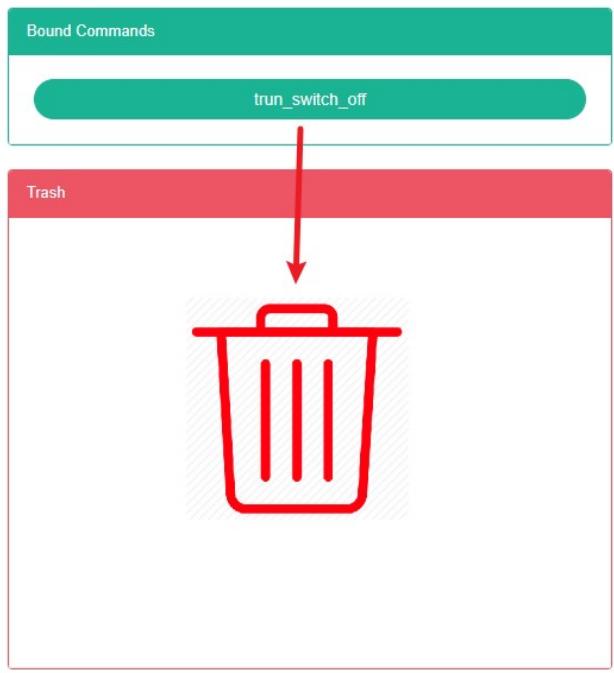
15. Store Management
This system can meet the demand of enterprise of energy management system, through to the main energy consumption equipment, energy utilization status quo of energy-using units monitoring analysis, statistical analysis method, method of energy audit and energy balance method, etc on a regular basis to the enterprise energy consumption situation and the analysis cost, help enterprises to determine the index system of energy consumption and energy saving, mining and energy saving potential of energy saving measures.
15.1. Store
Check The Store:
- Click the menu "System management"
- Click on the menu 'store management'
- Click on the tab 'store'
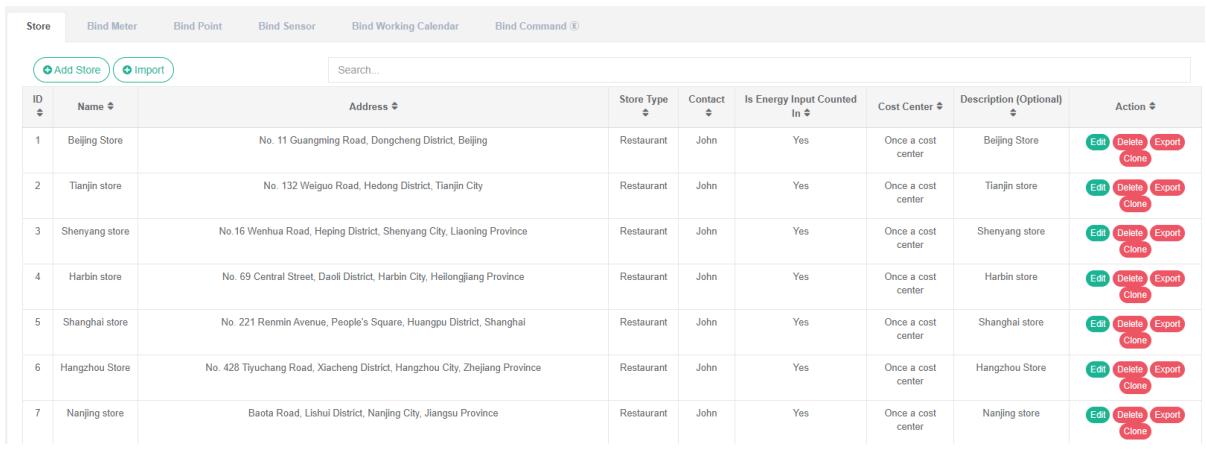
Add Store:
- Click the menu "System management"
- Click on the menu 'store management'
- Click on the tab 'store'
- Click the 'add store' button
- In the 'add store' dialog box input "Name", "Area", "Address", "Latitude", "Longitude" And "Store type", "Contact", "Cost center", "Description". According to the actual situation to decide whether to check the energy consumption in summary.
- Click "Save" Button
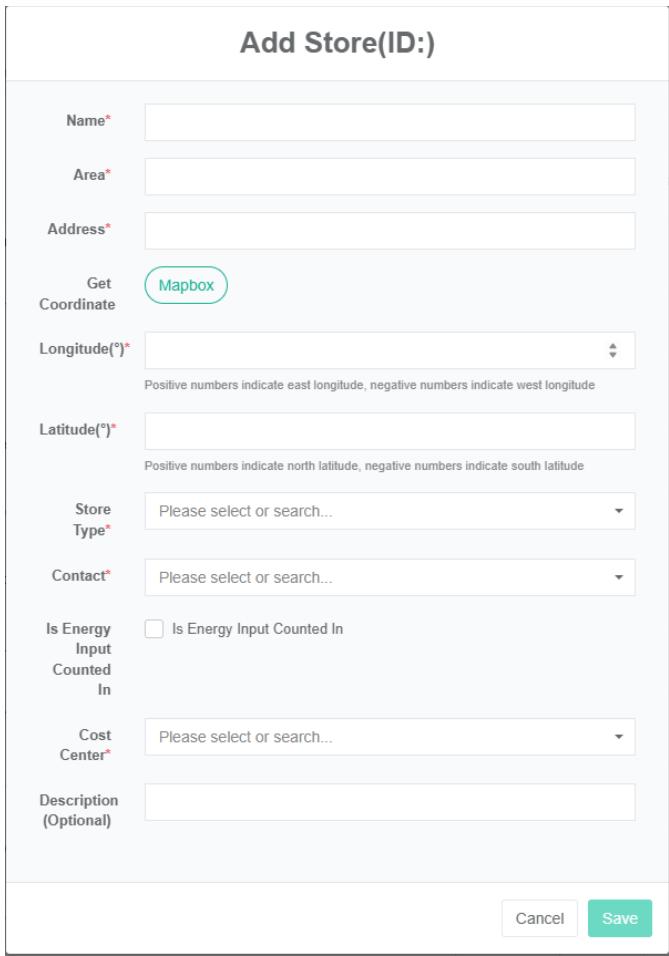
Edit Store:
- Click the menu "System management"
- Click on the menu 'store management'
- Click on the tab 'store'
- Click "Edit" Button
- In the 'edit store' dialog box input "Name", "Area", "Address", "Pick up coordinates' and 'latitude', 'longitude', 'store type', 'contacts', 'cost centers', 'description'. According to the actual situation to decide whether to check the energy consumption in summary.
- Click "Save" Button
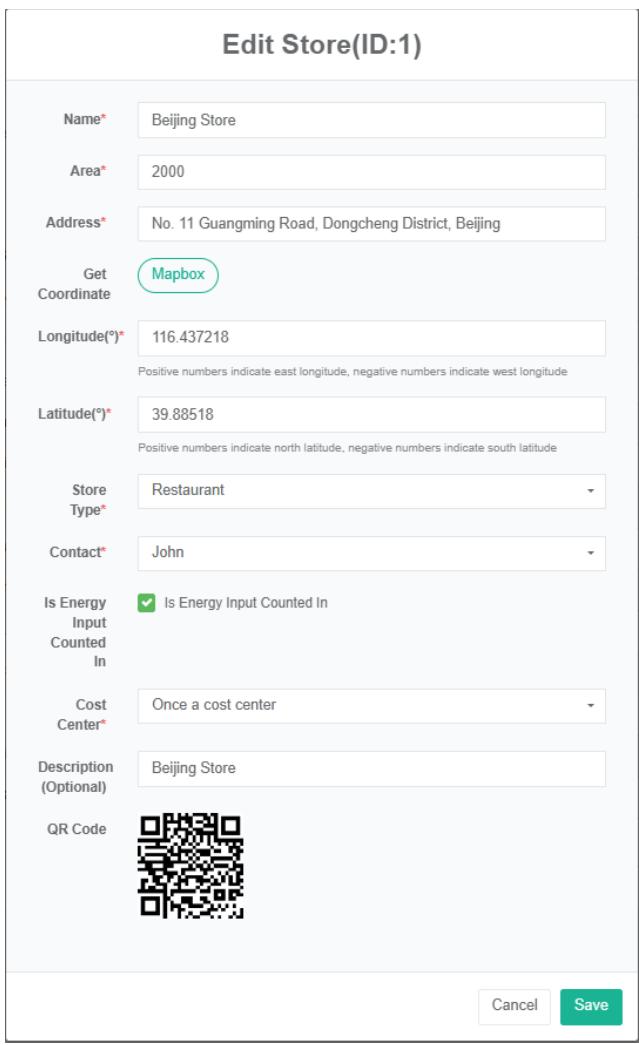
Delete Store:
- Click the menu "System management"
- Click on the menu 'store management'
- Click on the tab 'store'
- Click "Delete" Button
- Click the confirm delete button in the confirm delete dialog box
Import The Store:
- Click the menu "System management"
- Click on the menu 'store management'
- Click on the tab 'store'
- Click on the "Import" Button
- Enter the data into the dialog box
- Click the 'import' button
ExportStore:
- Click the menu "System management"
- Click on the menu 'store management'
- Click on the tab 'store'
- Click on the "Export" Button
Clone Store:
- Click the menu "System management"
- Click on the menu 'store management'
- Click on the tab 'store'
- Click on 'clone' button
15.2. Bind The Meter
View Bind Meter:
- Click the menu "System management"
- Click on the menu 'tenant management'
- Click on the tab 'bind meter'
- In the 'please select store' module click on the drop-down box to choose to view the store
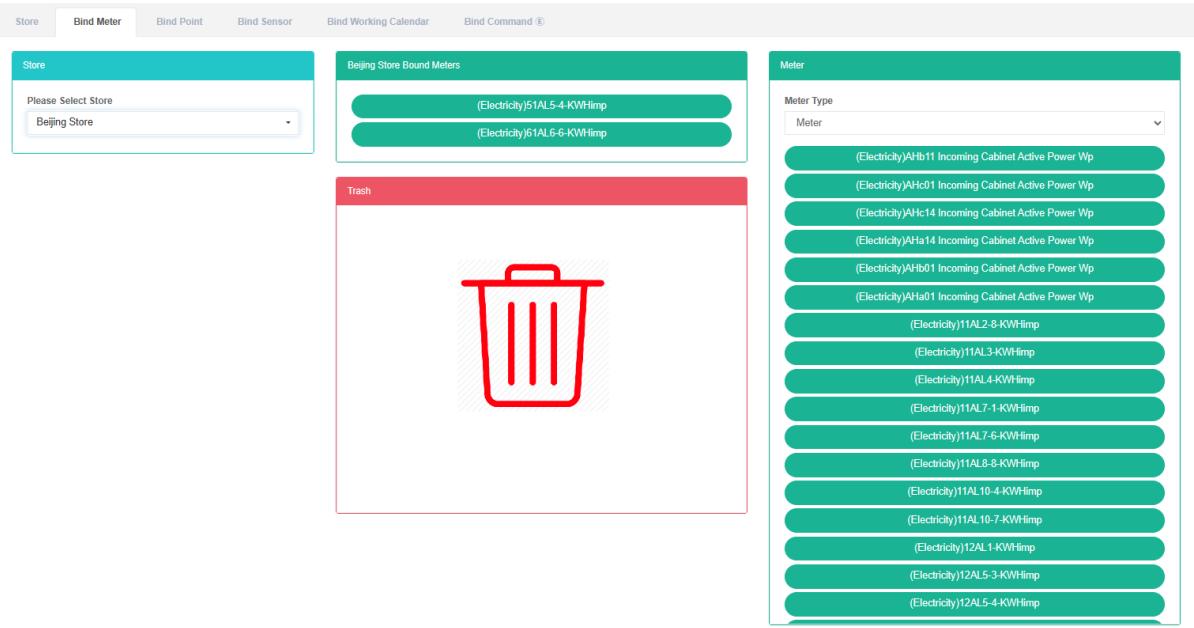
Bind Meter:
- Click the menu "System management"
- Click on the menu 'store management'
- Click on the tab 'bind meter'
- In the 'please select store' module click on the drop-down box to choose to view the store
- In the 'meter module click on the drop-down box to choose meter type
- Click on the 'meter' the meter module and drag and drop to the bind table module
- Drag the 'Bind table' module and release the left mouse button
- A 'bind meter successful' tip is bind
- If the same meter is dragged into the same store repeatedly, an 'error' message will appear
- If not choose store' invalid store id 'prompt will appear


Unbind Meter:
- Click the menu "System management"
- Click on the menu 'store management'
- Click on the tab 'bind meter'
- In the 'please select store' module click on the drop-down box to choose to view the store
- Click on the meter you want to unbind in the 'Bind meter' module and drag it to the 'recycling bucket' module
- Into the recycling bins' 'module after release the left mouse button
- 'success' tie meter hints in which solutions to success

15.3. Bind Data Point
View Bind Data Point:
- Click the menu "System management"
- Click on the menu 'store management'
- Click on the tab 'bind data point'
4. In the 'please select store' module click to view the store
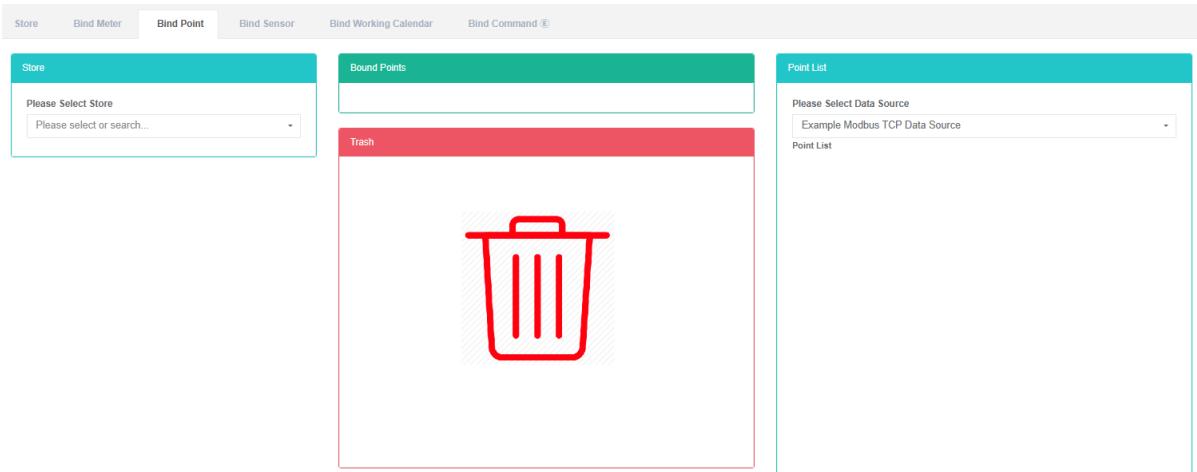
Bind Data Point:
- Click the menu "System management"
- Click on the menu 'store management'
- Click on the tab 'bind data point'
- In the 'please select store' module click on the drop-down box to choose to view the store
- In the "List of data point in the module click a drop-down box to choose the data source
- Click on the 'list of data point' data point in the module and drag and drop to the bind of data point module
- Into a 'bind data point' module after release the left mouse button
- A 'bind data point succeed' tip is bind
- When the same measurement data point is dragged into the same store, an 'error' message will appear
- If not choose store' invalid store id 'prompt will appear


Unbind Data Point:
- Click on the menu 'system administration'
- Click on the menu 'store management'
- Click on the tab 'bind data point'
- In the 'please select store' module click on the drop-down box to choose to view the store
- Click on the 'bind data point need solution to data point in the module and drag and drop to the' barrel 'module
- Into the recycling bins' 'module after release the left mouse button
- If the "Unbind data point successfully" Prompt appears, the unbind is successful

15.4. Bind The Sensor
View Bind Sensor:
- Click on the menu 'system administration'
- Click on the menu 'store management'
- Click on the tab 'bind sensor'
- In the 'please select store' module click to view the store
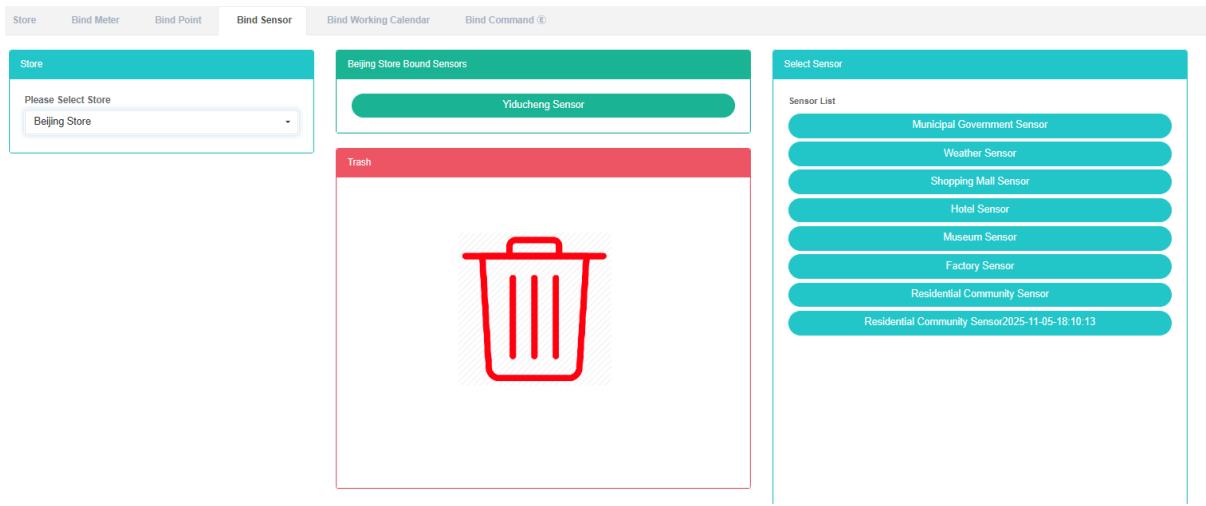
Bind Sensor:
- Click the menu "System management"
- Click on the menu 'store management'
- Click on the tab 'bind sensor'
- In the 'please select store' module click on the drop-down box to choose to view the store
- Click the "Select sensor module of sensor and drag and drop to the 'bind sensor module
- Into a 'bind sensor module after release the left mouse button
- A 'success' hint namely bind bind sensor
- Repeat the same sensor into the same store "Error" Will light up to alert
- If not choose store' invalid store id 'prompt will appear

Unbind Sensor:
- Click the menu "System management"
- Click on the menu 'store management'
- Click on the tab 'bind sensor'
- In the 'please select store' module click on the drop-down box to choose to view the store
- Click on the 'bind sensor module need unbind of sensor and drag and drop to the' barrel 'module
- Release the left mouse button after dragging into the 'recycle bucket' module
- If the "Unbind sensor successfully" Prompt appears, the unbind is successful
![]()
15.5. Bind Working Calendar
View Bind Working Calendar:
- Click on the menu 'system administration'
- Click on the menu 'store management'
- Click on the tab 'bind working Calendar'
- Click on the name of the store you want to view in the 'select a store' section
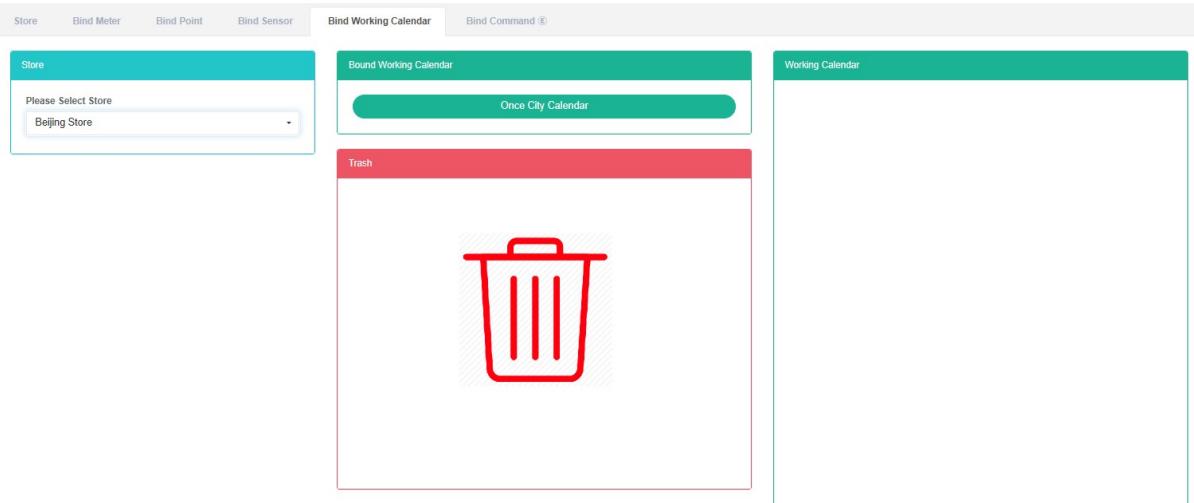
Bind Working Calendar:
- Click on the menu 'system administration'
- Click on the menu 'store management'
- Click on the tab 'bind working Calendar'
- Click on the store you want to bind your working Calendar to under the 'please select store' module
- Click on the working Calendar in the 'working Calendar list' module and drag it to the 'Bind working Calendar' module
- Into a 'bind working Calendar module after release the left mouse button
- The 'Bind working Calendar successfully' prompt appears, which means the bind is successful
- The same working calendar repeated into the same store "Error" Will light up to alert

Unbind Working Calendar:
- Click the menu "System management"
- Click on the menu 'store management'
- Click on the tab 'bind working Calendar'
- Click on the 'bind working Calendar module unbind work needs to be done in the calendar and drag and drop to the' barrel 'module
- Into the recycling bins' 'module after release the left mouse button
- If the "Unbind working Calendar successfully" Prompt appears, the unbind is successful
15.6. Bind Command
View Bind Command:
- Click the menu "System management"
- Click on the menu 'store management'
- Click on the tab 'bind command'
- In the 'please select store' module click to view the store name
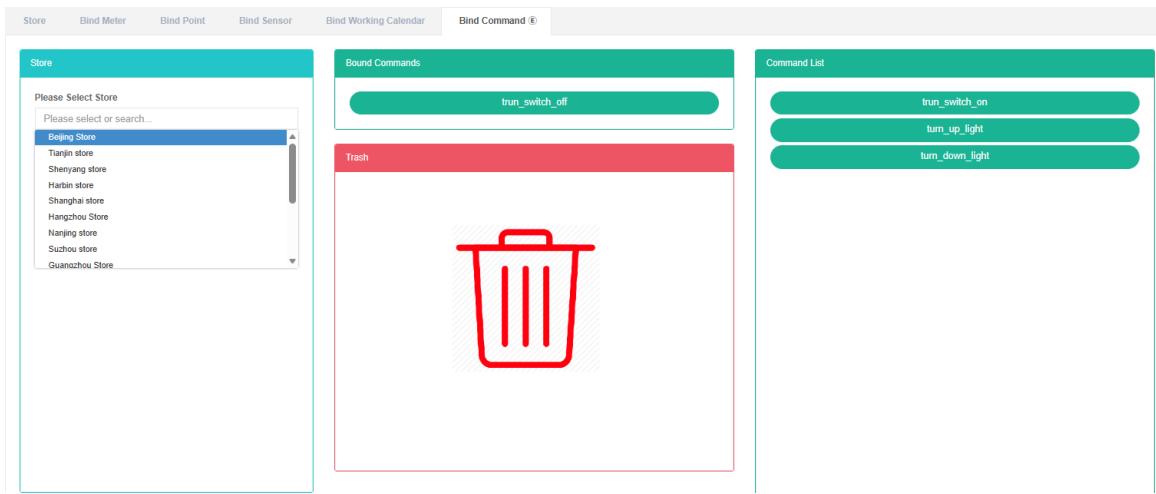
Bind Command:
-
Click on the menu 'system administration'
-
Click on the menu 'store management'
-
Click on the tab 'bind command'
-
Click on the 'please select store' module need bind command from store
-
Click on the 'command lists the command module and drag and drop to the' bind command module
-
Into a 'bind command module after release the left mouse button
-
A 'bind command successful' tip is bind
-
The same command repeat into the same store "Error" Will light up to alert


Unbind Command:
- Click the menu "System management"
- Click on the menu 'store management'
- Click on the tab 'bind command'
- Click on the 'bind command module need unbind of command and drag and drop to the' barrel 'module
- Into the recycling bins' 'module after release the left mouse button
- 'success' bind command prompt in which solutions to success

16. Shopfloor Management
This system can meet the demand of enterprise of energy management system, through to the main energy consumption equipment, energy utilization status quo of energy-using units monitoring analysis, statistical analysis method, method of energy audit and energy balance method, etc on a regular basis to the enterprise energy consumption situation and the analysis cost, help enterprises to determine the index system of energy consumption and energy saving, mining and energy saving potential of energy saving measures.
16.1. Shopfloor
Check The Shopfloor:
- Click the menu "System management"
- Click on the menu 'shopfloor management'
- Click on the tab 'shop'
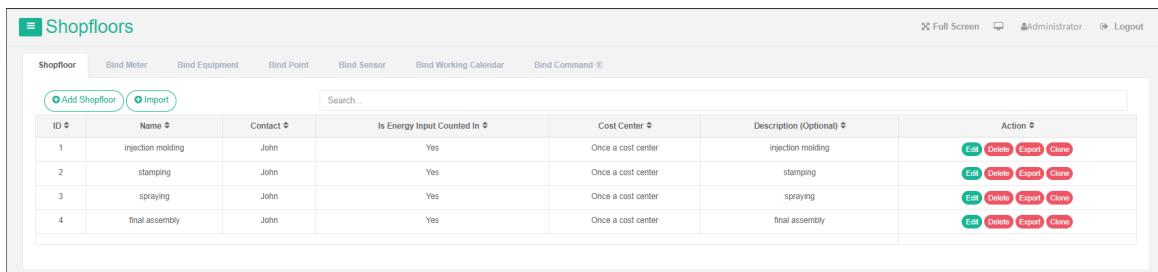
Add Shopfloor:
-
Click the menu "System management"
-
Click on the menu 'shopfloor management'
-
Click on the tab 'shop'
-
Click on the 'add shopfloor' button
-
In the 'add shopfloor "Dialog input" Name ", "Area", "Contact", "Cost center", "Description". According to the actual situation to decide whether to check the energy consumption in summary.
-
Click "Save" Button
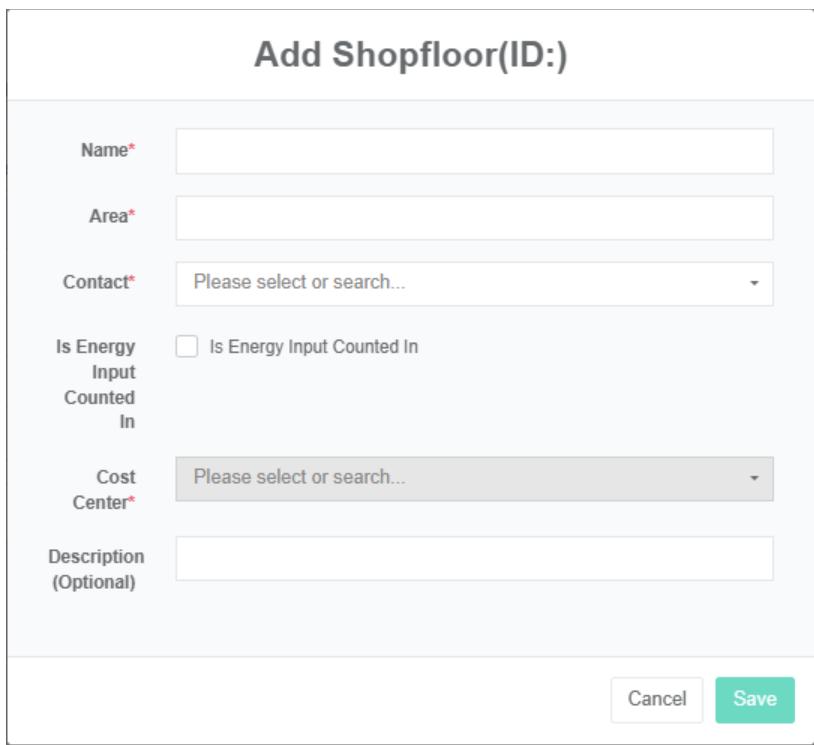
Edit Shopfloor:
- Click the menu "System management"
- Click on the menu 'shopfloor management'
- Click on the tab 'shop'
- Click "Edit" Button
- In 'edit tenant' dialog input "Name", "Area", "Contact", "Cost center", "Description". According to the actual situation to decide whether to check the energy consumption in summary.
- Click "Save" Button
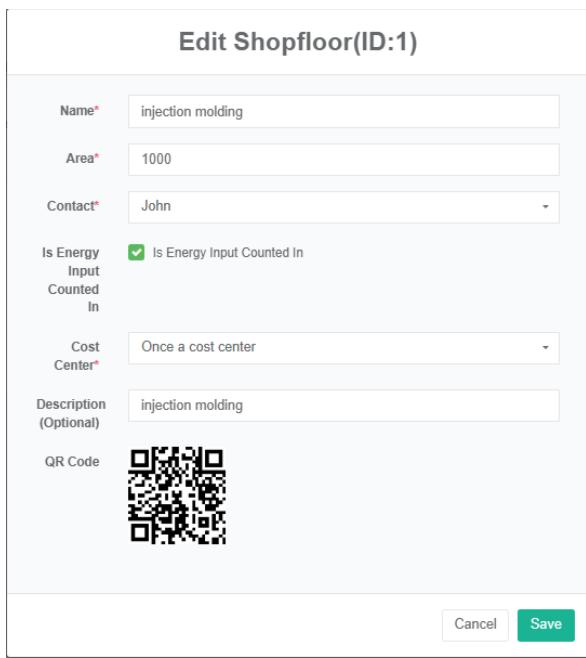
Delete The Shopfloor:
- Click on the menu 'system administration'
- Click on the menu 'shopfloor management'
- Click on the tab 'shop'
- Click "Delete" Button
- Click the 'confirm delete' button in the 'confirm delete' dialog box
Import The Shopfloor:
- Click the menu "System management"
- Click on the menu 'shopfloor management'
- Click on the tab 'shop'
- Click the 'import' button
- Enter the data into the dialog box
- Click on the "Import"
ExportThe Shopfloor:
- Click on the menu 'system administration'
- Click on the menu 'shopfloor management'
- Click on the tab 'shop'
- Click on the 'export' button
Clone Shopfloor:
- Click the menu "System management"
- Click on the menu 'shopfloor management'
- Click on the tab 'shop'
- Click on the 'clone' button
16.2. Bind The Meter
View Has Bind Meter:
- Click the menu "System management"
- Click on the menu 'shopfloor management'
- Click on the tab 'bind meter'
- In 'please select shop module click on the drop-down box to choose to view the shopfloor
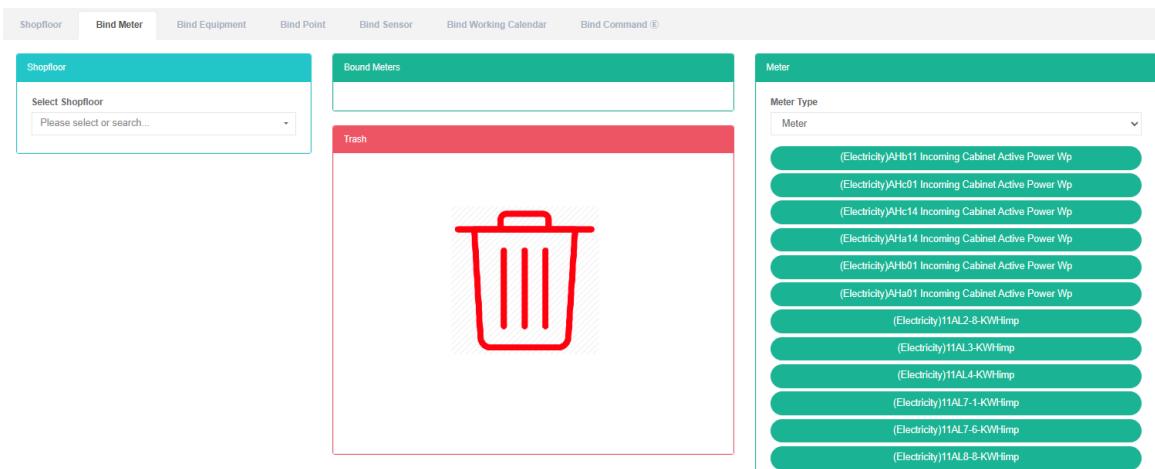
Bind Meter:
- Click the menu "System management"
- Click on the menu 'shopfloor management'
- Click on the tab 'bind meter'
- In 'please select shop module click on the drop-down box to choose to view the shopfloor
- Click on the drop-down box in the 'meter' module to select the type of meter
- Click on the 'meter' the meter module and drag and drop to the bind table module
- Into a 'bind table module after release the left mouse button
- A 'bind meter successful' tip is bind
- Repeat the same meters into the "Wrong" Will light up to alert the same shopfloor
- If no selection shopfloor 'api_INVALID.shopfloor_id prompt will appear


Unbind The Meter:
-
Click on the menu 'system administration'
-
Click on the menu 'shopfloor management'
-
Click on the tab 'bind meter'
-
Click the drop-down box in the 'please select shopfloor' module to select the shopfloor you want to view
-
Click on the 'bind table module need unbind of meter and drag and drop to the' barrel 'module
-
Drag into the 'recycling bucket' module and release the left mouse button
-
'success' tie meter hints in which solutions to success

16.3. Bind Equipment
View Bind Equipment:
- Click on the menu 'system administration'
- Click on the menu 'shopfloor management'
- Click on the tab 'bind equipment'
- In the 'please select shop module click to view the shopfloor
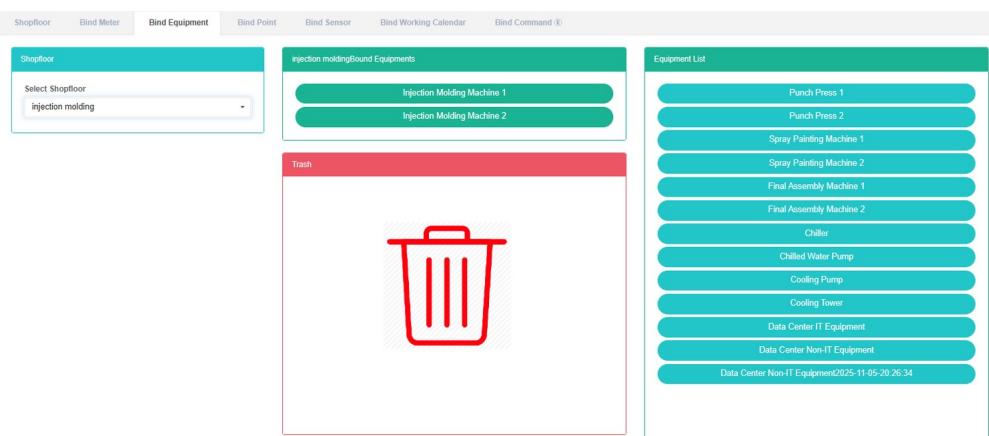
Bind Equipment:
- Click on the menu 'system administration'
- Click on the menu 'shopfloor management'
- Click on the 'bind equipment' tab
- Click on the 'please select shop module need bind equipment shopfloor
- Click on the "Equipment list" Module of the equipment and drag and drop to the 'bind equipment module
- Into a 'bind equipment module after release the left mouse button
- A 'success' hint namely bind bind equipment
- Repeat same equipment into the "Wrong" Will light up to alert the same shopfloor
- If not click on the shopfloor will be "Invalid id shopfloor" Prompt


Unbind Equipment:
-
Click on the menu 'system administration'
-
Click on the menu 'shopfloor management'
-
Click on the tab 'bind equipment'
-
In 'please select shop module click on the drop-down box to choose to view the shopfloor
-
Click on the 'bind equipment modules require unbind of equipment and drag and drop to the' barrel 'module
-
Drag the recycle bucket module and release the left mouse button
-
If the "Unbind equipment successfully" Prompt appears, the unbind is successful

16.4. Bind Data Point
View Bind Data Point:
- Click on the menu 'system administration'
- Click on the menu 'shopfloor management'
- Click on the tab 'bind data point'
- In the 'please select shop module click to view the shopfloor
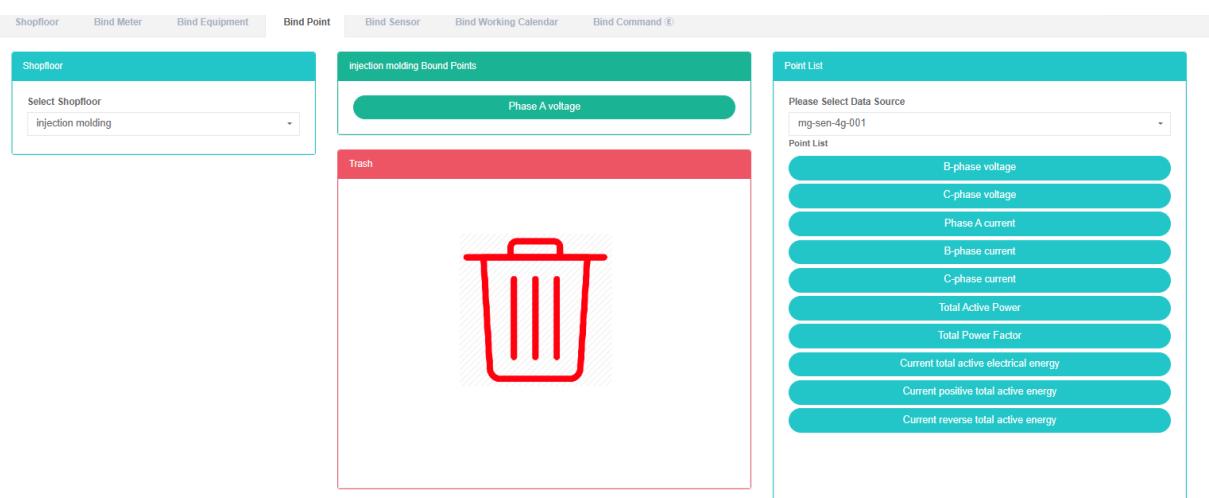
Bind Data Point:
- Click on the menu 'system administration'
- Click on the menu 'shopfloor management'
- Click on the tab 'bind data point'
- In 'please select shop module click on the drop-down box to choose to view the shopfloor
- Click on the drop-down box in the 'data point list' module to select the data source
- Click on the data point in the 'data point list' module and drag it to the 'Bind data point' module
- Into a 'bind data point' module after release the left mouse button
- The 'Bind data point successfully' prompt will indicate that the bind is successful
- The same measurement data point into a "Wrong" Will light up to alert the same shopfloor
- If no selection shopfloor "Invalid id shopfloor" Will light up to alert


Unbind Data Point:
-
Click on the menu 'system administration'
-
Click on the menu 'shopfloor management'
-
Click on the tab 'bind data point'
-
In 'please select shop module click on the drop-down box to choose to view the shopfloor
-
Click on the 'bind data point need solution to data point in the module and drag and drop to the' barrel 'module
-
Into the recycling bins' 'module after release the left mouse button
-
If the "Unbind data point successfully" Prompt appears, the unbind is successful

16.5. Bind The Sensor
View Bind Sensor:
- Click the menu "System management"
- Click on the menu 'shopfloor management'
- Click on the tab 'bind sensor'
- In the 'please select shop module click to view the shopfloor
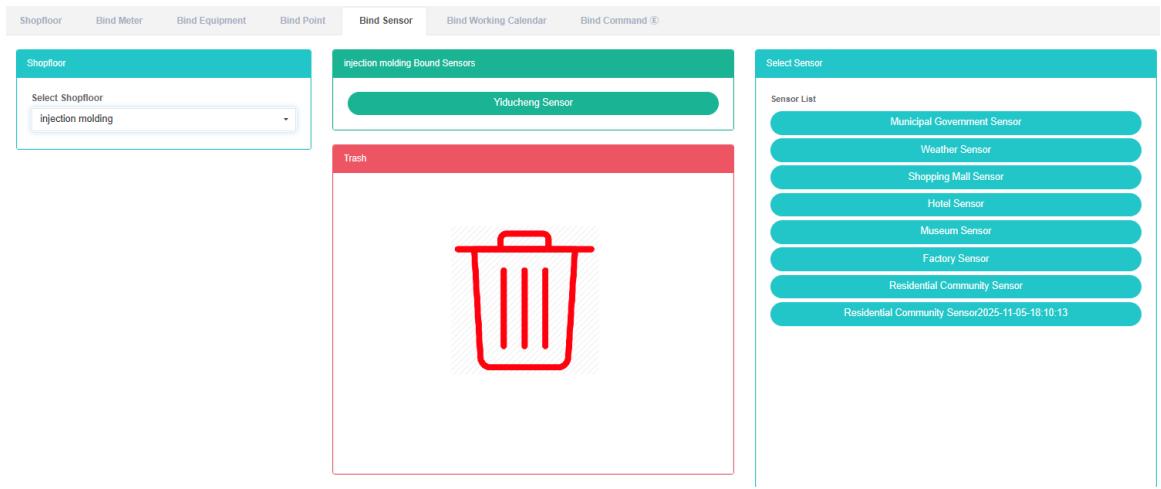
Bind Sensor:
- Click the menu "System management"
- Click on the menu 'shopfloor management'
- Click on the tab 'bind sensor'
- In 'please select shop module click on the drop-down box to choose to view the shopfloor
- Click the "Select sensor module of sensor and drag and drop to the 'bind sensor module
- Into a 'bind sensor module after release the left mouse button
- A 'success' hint namely bind bind sensor
- If the same sensor is dragged into the same shopfloor repeatedly, an 'error' message will appear
- If no selection shopfloor "Invalid id shopfloor" Will light up to alert


Unbind Sensor:
-
Click the menu "System management"
-
Click on the menu 'tenant management'
-
Click on the tab 'bind sensor'
-
In 'please select shop module click on the drop-down box to choose to view the shopfloor
-
Click on the 'bind sensor module need unbind of sensor drag and drop to the' barrel 'module
-
Into the recycling bins' 'module after release the left mouse button
-
If the "Unbind sensor successfully" Prompt appears, the unbind is successful

16.6. Bind Working Calendar
View Bind Working Calendar:
- Click on the menu 'system administration'
- Click on the menu 'shopfloor management'
- Click on the tab 'bind working Calendar'
- Click on the name of the shopfloor you want to view in the 'please select shopfloor' module

Bind working Calendar:
- Click on the menu 'system administration'
- Click on the menu 'shopfloor management'
- Click on the tab 'bind working Calendar'
- Click on the 'please select shop module shopfloor need bind working Calendar
- Click on the 'working calendar lists the working calendar module and drag and drop to the' bind working Calendar module
- Into a 'bind working Calendar module after release the left mouse button
- The 'Bind working Calendar successfully' prompt appears, which means the bind is successful
- The same working calendar repeat into "Error" Will light up to alert the same shopfloor


Unbind working calendar:
-
Click on the menu 'system administration'
-
Click on the menu 'shopfloor management'
-
Click on the tab 'bind working Calendar'
-
Click on the working Calendar you want to unbind in the 'Bind working Calendar' module and drag it to the 'recycle bucket' module
-
Into the recycling bins' 'module after release the left mouse button
-
If the "Unbind working Calendar successfully" Prompt appears, the unbind is successful

16.7. Bind Command
View Bind Command:
- Click on the menu 'system administration'
- Click on the menu 'shopfloor management'
- Click on the tab 'bind command'
- In the 'please select shop module click on the name of the shop want to see
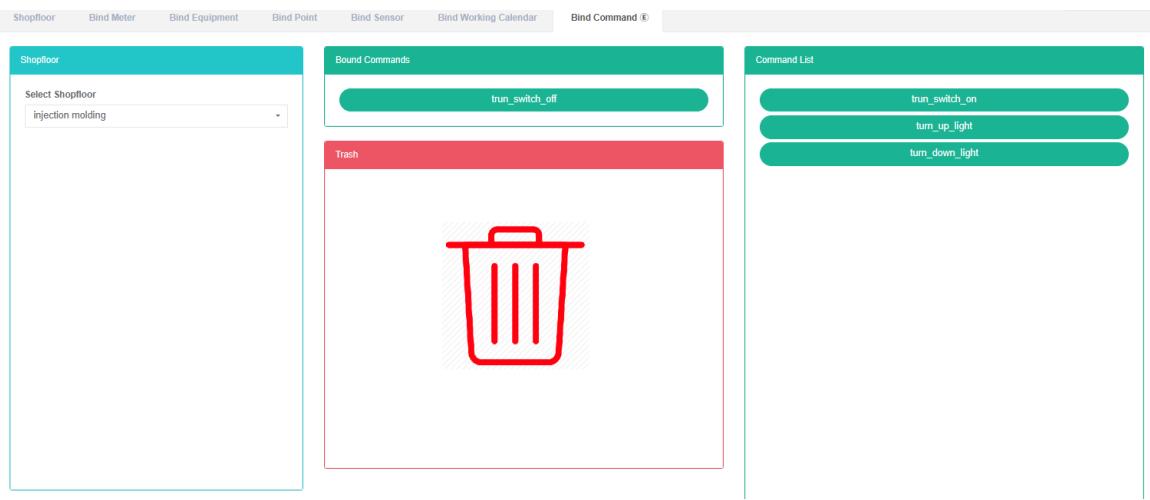
Bind Command:
- Click on the menu 'system administration'
- Click on the menu 'shopfloor management'
- Click on the tab 'bind command'
- Click on the 'please select shop module need bind under the command of the shopfloor
- Click on the 'command lists the command module and drag and drop to the' bind command module
- Into a 'bind command module after release the left mouse button
- A 'bind command successful' tip is bind
- The same command repeat into "Error" Will light up to alert the same shopfloor
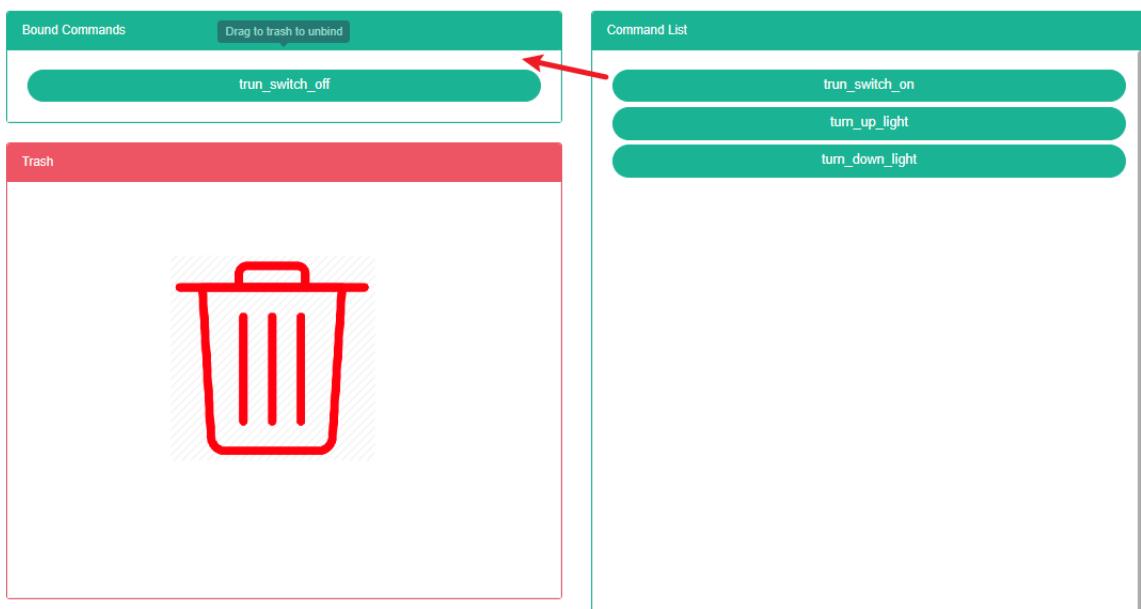
Unbind Command:
-
Click the menu "System management"
-
Click on the menu 'shopfloor management'
-
Click on the tab 'bind command'
-
Click the command you want to unbind in the 'Bind command' module and drag it to the' recycle bucket 'module
-
Into the recycling bins' 'module after release the left mouse button
-
'success' bind command prompt in which solutions to success
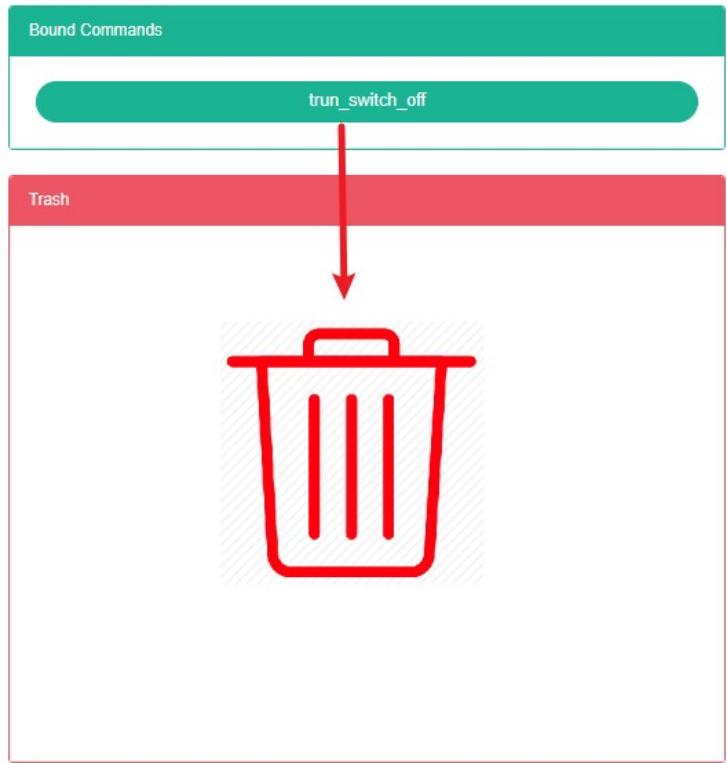
17. Energy Flow Diagram
This system can meet the demand of enterprise of energy management system, through to the main energy consumption equipment, energy utilization status quo of energy-using units monitoring analysis, statistical analysis method, method of energy audit and energy balance method, etc on a regular basis to the enterprise energy consumption situation and the analysis cost, help enterprises to determine the index system of energy consumption and energy saving, mining and energy saving potential of energy saving measures.
17.1. Energy Flow Diagram
View Energy Flow Figure:
- Click the menu "System management"
- Click on the menu 'can flow graph management'
- Click the tab 'can flow diagram

Add Flow Figure:
- Click the menu "System management"
- Click on the menu 'can flow graph management'
- Click the tab 'can flow diagram
- Click the 'add energy flow Figure' button
- In the 'can add flow Figure dialog box input "Name"
- Click the "Save" Button
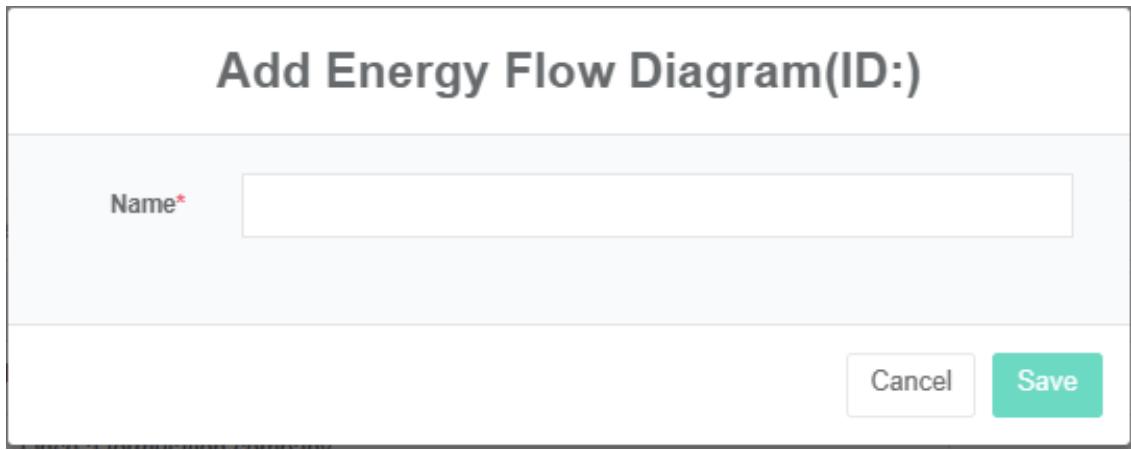
Editor Can Flow Diagram:
- Click the menu "System management"
- Click on the menu 'can flow graph management'
- Click the tab 'can flow diagram
- Click "Edit" Button
- In the 'can edit flow Figure' dialog box input "Name"
- Click the "Save" Button
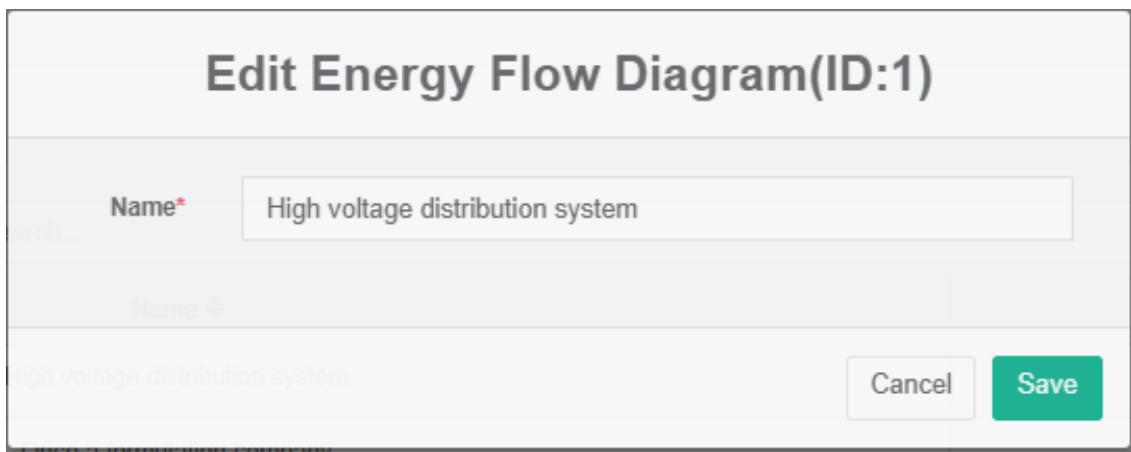
Delete The Energy Flow Figure:
-
Click on the menu 'system administration'
-
Click on the menu 'can flow graph management'
-
Click the tab 'can flow diagram
-
Click "Delete" Button
-
Click the 'click' confirm delete 'button in the' confirm delete 'dialog box
Import Flow Figure:
- Click on the menu 'system administration'
- Click on the menu 'can flow graph management'
- Click on the tab 'energy flow Figure'
- Click on the "Import" Button
- Enter the data into the dialog box
- Click on the "Import"
Export Flow Figure:
- Click on the menu 'system administration'
- Click on the menu 'ability flow Figure management'
- Click the tab 'can flow diagram
- Click on the "Export" Button
Clone Can Flow Diagram:
- Click on the menu 'system administration'
- Click on the menu 'ability flow Figure management'
- Click the tab 'can flow diagram
- Click on 'clone' button
17.2. Nodes
Check The Nodes:
-
Click the menu "System management"
-
Click on the menu 'can flow graph management'
-
Click on the tab 'nodes'
-
Can choose 'flow Figure'
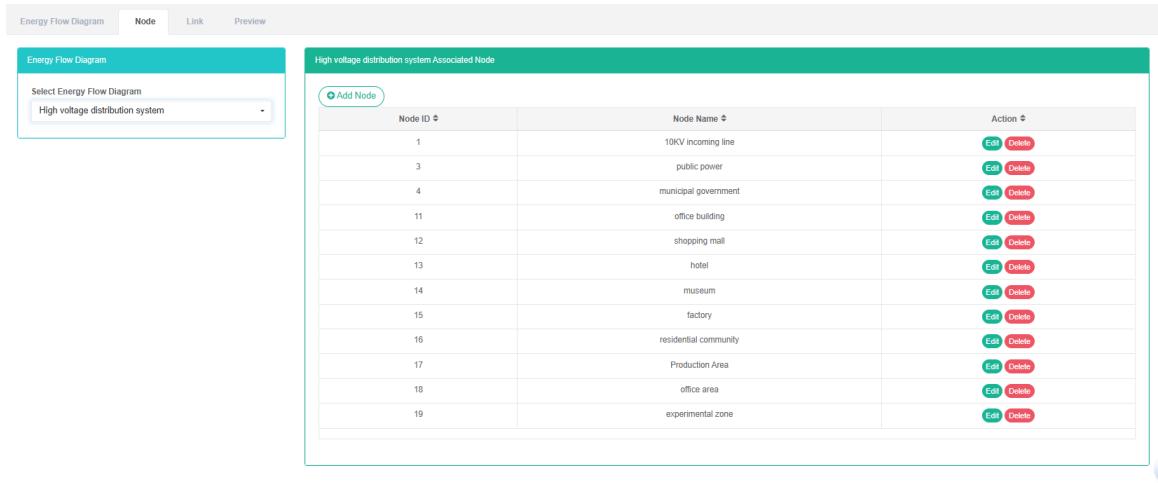
Add Node:
- Click the menu "System management"
- Click on the menu 'can flow graph management'
- Click on the tab 'nodes'
- Click on the 'add' button
- In the 'add nodes' dialog box input node name
- Click the "Save" Button
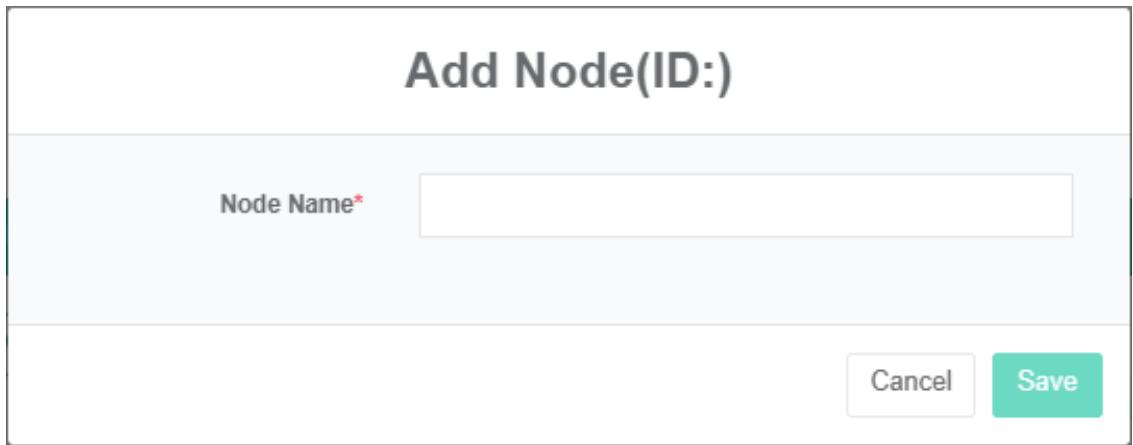
Edit The Node:
- Click on the menu 'system administration'
- Click on the menu 'can flow graph management'
- Click on the tab 'nodes'
- Click "Edit" Button
- Type 'node name' in the 'edit node' dialog box
- Click the "Save" Button
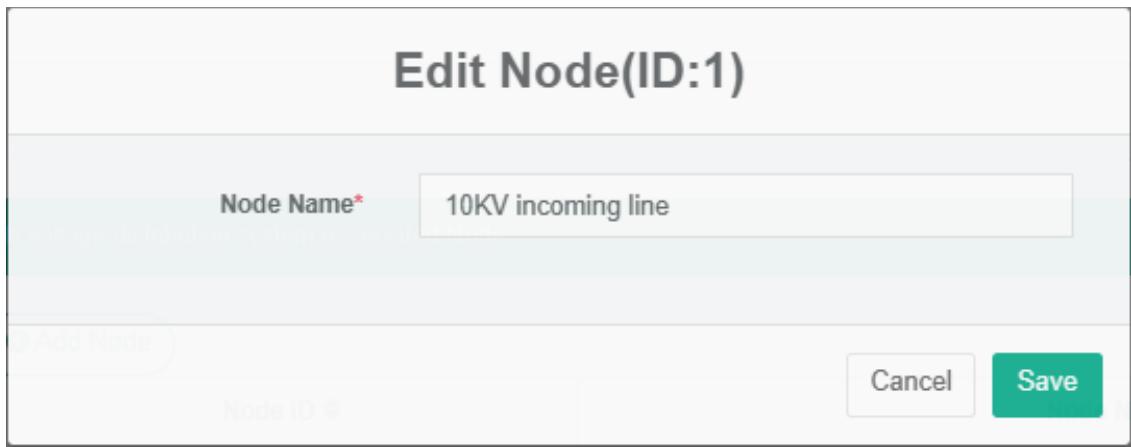
Delete Nodes:
- Click the menu "System management"
- Click on the menu 'ability flow Figure management'
- Click on the tab 'nodes'
- Click "Delete" Button
- Click the 'click' confirm delete 'button in the' confirm delete 'dialog box
17.3. Link
Check The Link:
- Click the menu "System management"
- Click on the menu 'can flow graph management'
- Click on the tab 'links'
- Select 'energy flow Figure'
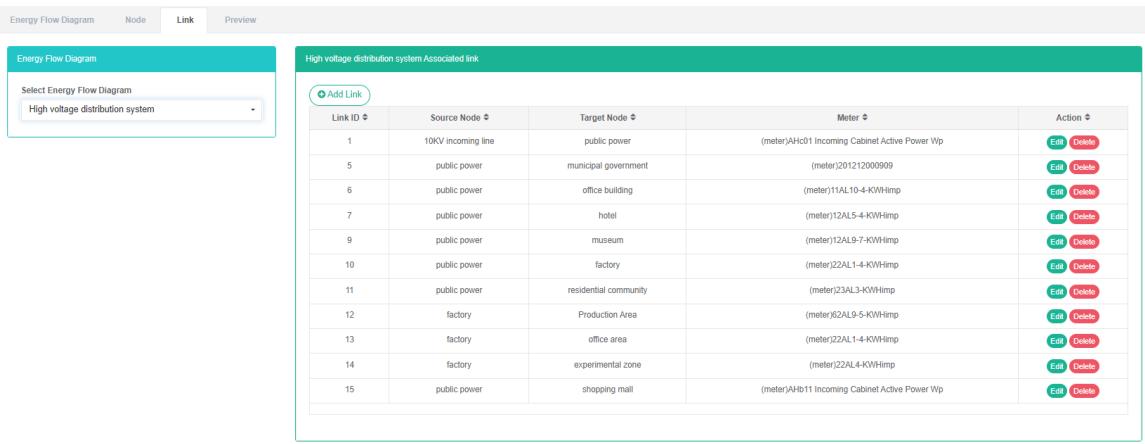
Add Links:
- Click the menu "System management"
- Click on the menu 'can flow graph management'
- Click on the tab 'links'
- Click on the 'add link' button
- In the "Add link" Dialog, select "Source nodes", 'target node' And "Meter"
- Click the "Save" Button
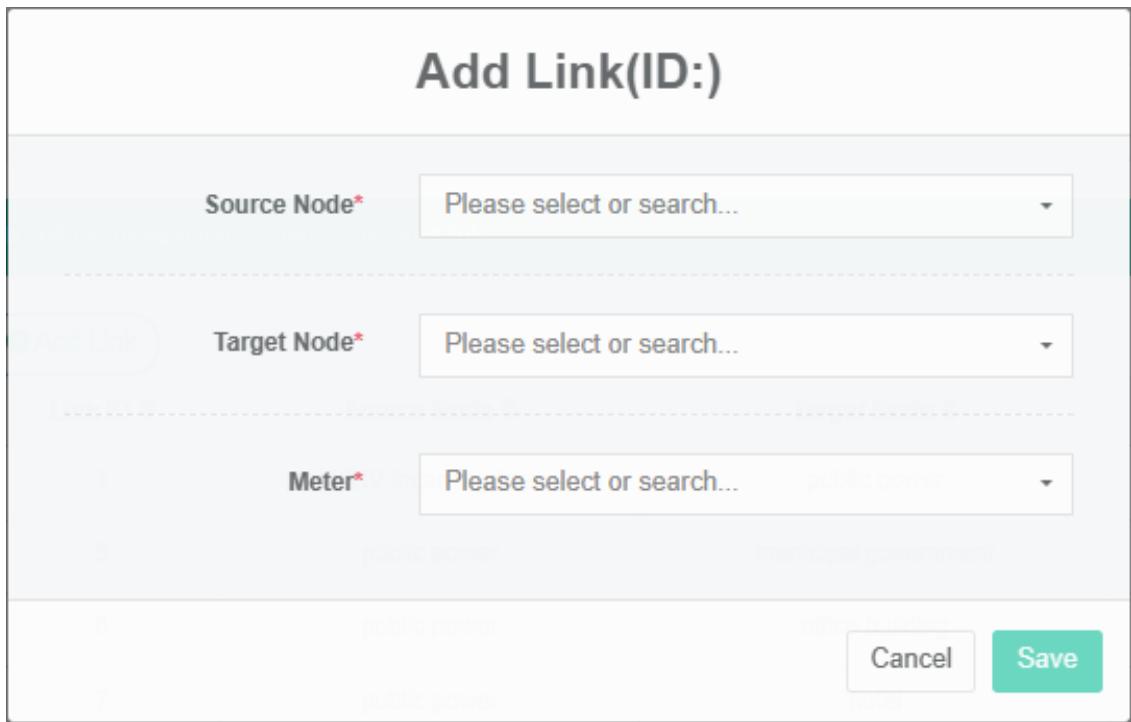
Edit Link:
- Click the menu "System management"
- Click on the menu 'ability flow Figure management'
- Click on the tab 'links'
- Click the 'modify' button
- In the "Edit link" Dialog, select "Source nodes", 'target node' And "Meter"
- Click the "Save" Button
Delete Link:
- Click the menu "System management"
- Click on the menu 'can flow graph management'
- Click on the tab 'links'
- Click "Delete" Button
- Click the 'click' confirm delete 'button in the' confirm delete 'dialog box
17.4. Preview
Check The Preview:
- Click the menu "System management"
- Click on the menu 'can flow graph management'
- Click on the tab "Preview"
- Can choose 'flow Figure'
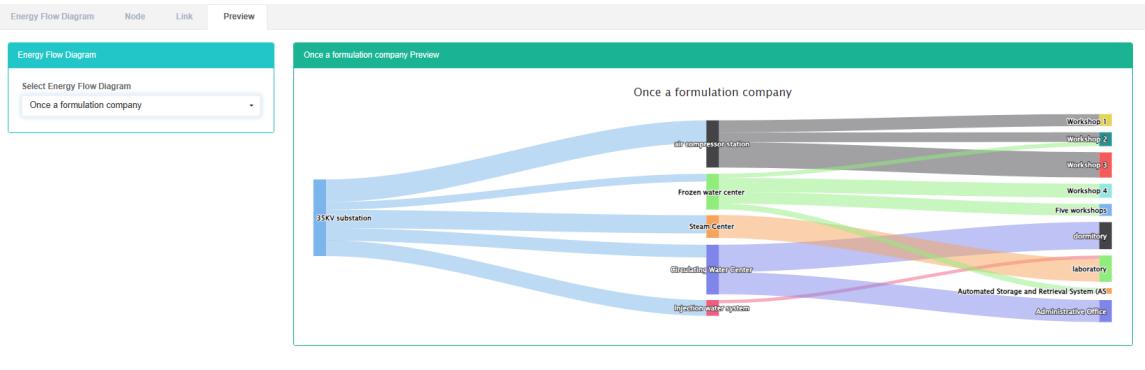
18. Distribution System Management
This system can meet the demand of enterprise of energy management system, through to the main energy consumption equipment, energy utilization status quo of energy-using units monitoring analysis, statistical analysis method, method of energy audit and energy balance method, etc on a regular basis to the enterprise energy consumption situation and the analysis cost, help enterprises to determine the index system of energy consumption and energy saving, mining and energy saving potential of energy saving measures.
18.1. Distribution System
Check The Distribution System:
- Click the menu "System management"
- Click on the menu 'distribution system management'
- Click on the tab 'distribution system'

Add The Distribution System:
- Click the menu "System management"
- Click on the menu 'distribution system management'
- Click on the tab 'distribution system'
- Click on the 'add distribution systems' button
- In the 'add distribution systems' dialog box input "Name"
- Click the "Save" Button
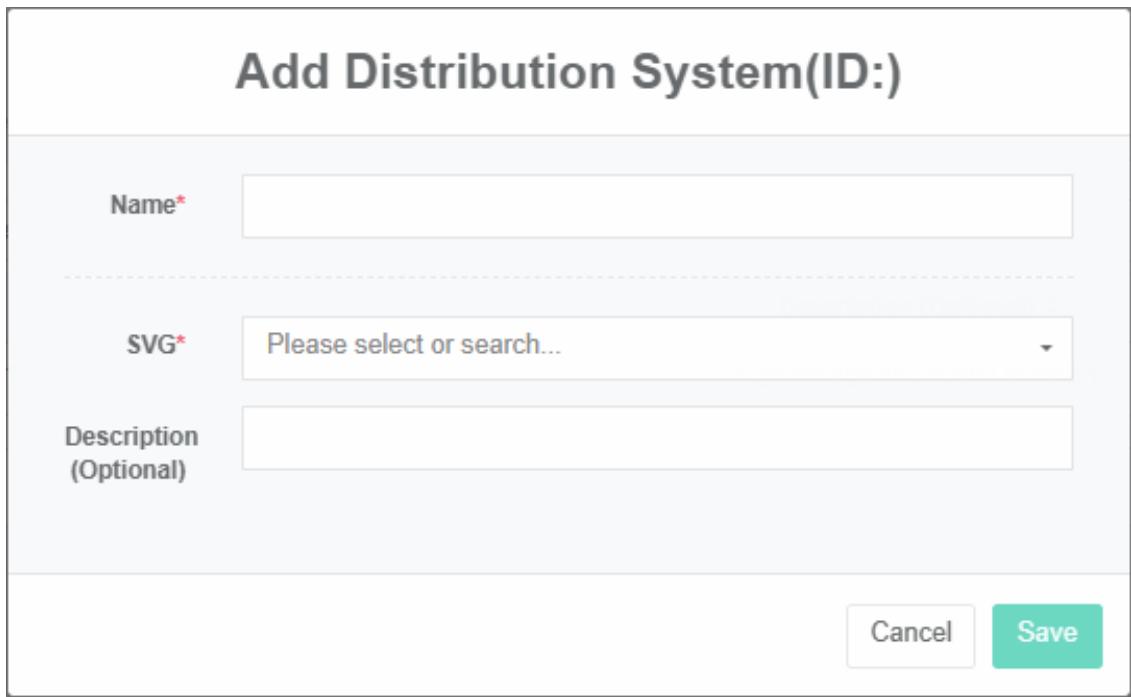
Edit Distribution System:
-
Click the menu "System management"
-
Click on the menu 'distribution system management'
-
Click on the tab 'distribution system'
-
Click "Edit" Button
-
In 'edit distribution system "Dialog input" Name"
-
Click the "Save" Button
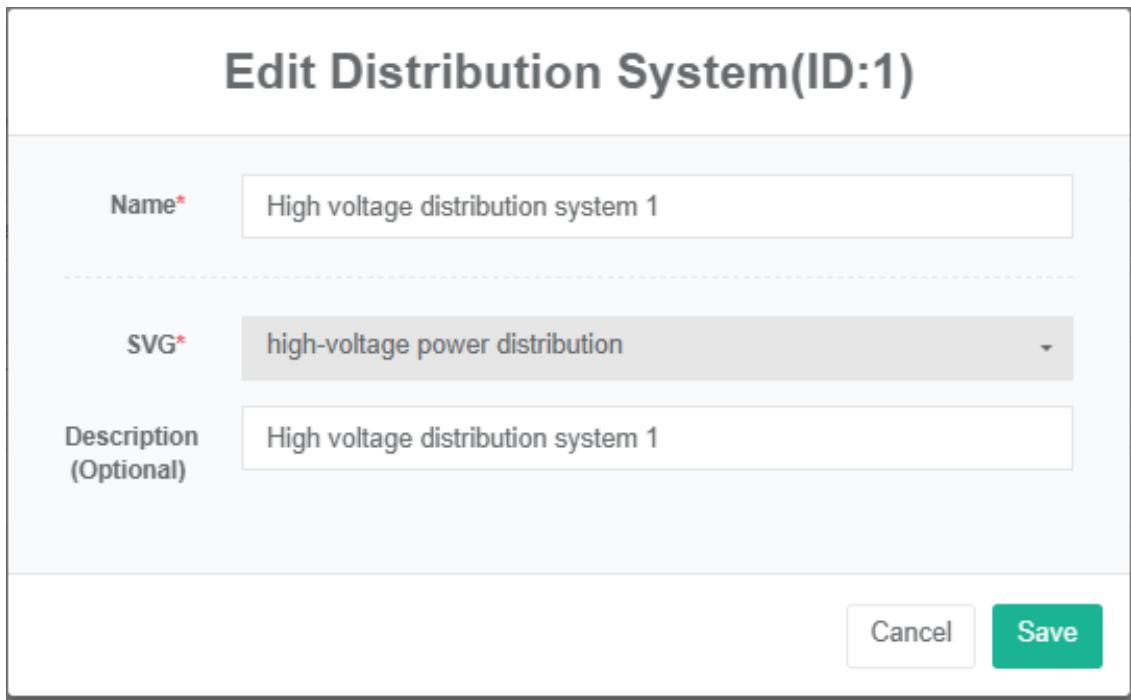
Remove The Power Distribution System:
- Click the menu "System management"
- Click on the menu 'distribution system management'
- Click on the tab 'distribution system'
- Click "Delete" Button
- Click the 'click' confirm delete 'button in the' confirm delete 'dialog box
Import Distribution System:
-
Click on the menu 'system administration'
-
Click on the menu 'distribution system management'
-
Click on the tab 'distribution system'
-
Click on the "Import" Button
-
Enter the data into the dialog box
-
Click on the "Import"
ExportDistribution System:
- Click on the menu 'system administration'
- Click on the menu 'distribution system management'
- Click on the tab 'distribution systems'
- Click on the "Export" Button
Clone Distribution System:
- Click the menu "System management"
- Click on the menu 'distribution system management'
- Click on the tab 'distribution system'
- Click on 'clone' button
18.2. Distribution Circuit
Check Distribution Circuit:
- Click the menu "System management"
- Click on the menu 'distribution system management'
- Click on the tab 'distribution circuit'
- Choose 'distribution system'

Add Distribution Circuit:
-
Click the menu "System management"
-
Click on the menu 'distribution system management'
-
Click on the tab 'distribution circuit'
-
Click on the 'add distribution circuit' button
-
In the 'add power distribution circuit input "Name" Dialog box, with the power supply, power distribution cabinets, maximum capacity,' maximum current ', 'user' and 'qualification meters'
-
Click the "Save" Button

Edit Power Distribution Circuit:
-
Click on the menu 'system administration'
-
Click on the menu 'distribution system management'
-
Click on the tab 'distribution circuit'
-
Click "Edit" Button
-
Distribution circuit in the 'edit' input 'name dialog box, with the power supply, power distribution cabinets,' capacity ', 'maximum current', 'user' and 'qualification meters'
-
Click the "Save" Button

Remove The Power Distribution Circuit:
- Click the menu "System management"
- Click on the menu 'distribution system management'
- Click on the tab 'distribution circuit'
- Click the 'delete' button
- Click the 'click' confirm delete 'button in the' confirm delete 'dialog box
18.3. Bind Data Point
Check The Bind Data Point:
- Click on the menu 'system administration'
- Click on the menu 'distribution system management'
- Click on the tab 'bind data point'
- Choose 'distribution circuit'
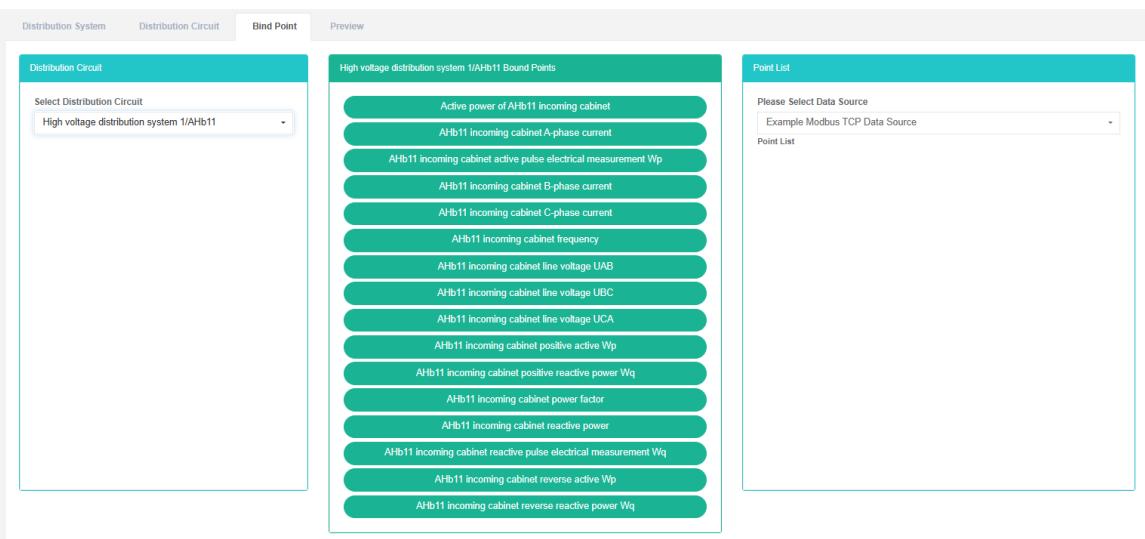
Add Data Point:
- Click on the menu 'system administration'
- Click on the menu 'distribution system management'
- Click on the tab 'bind data point'
- Choose 'distribution circuit'
- Data point in the list box select 'data source', drag and drop the frame data point to the green box in the middle
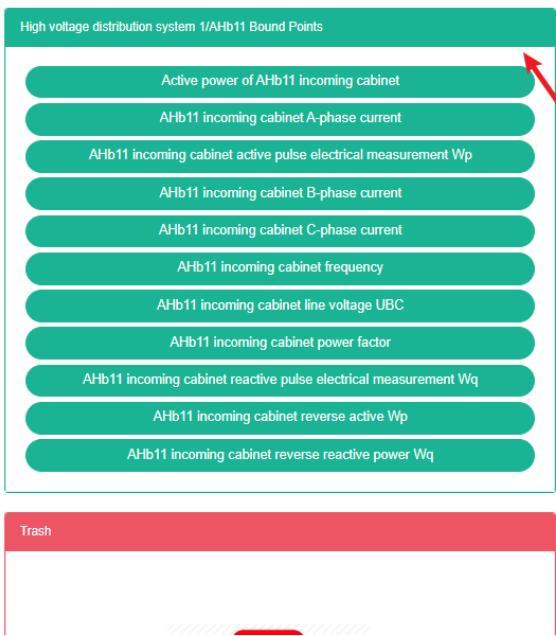
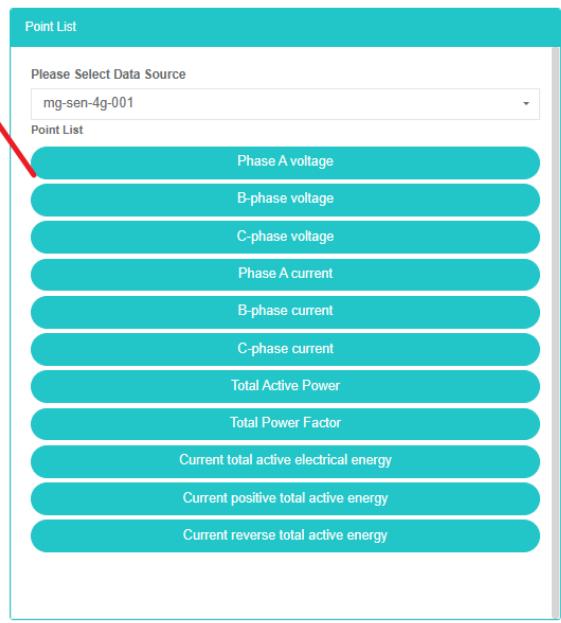
Remove The Bind Data Point:
- Click the menu "System management"
- Click on the menu 'distribution system management'
- Click on the tab 'bind data point'
- Choose 'distribution circuit'
- Drag and drop the box in the middle of green box below the table to the recycling bins red
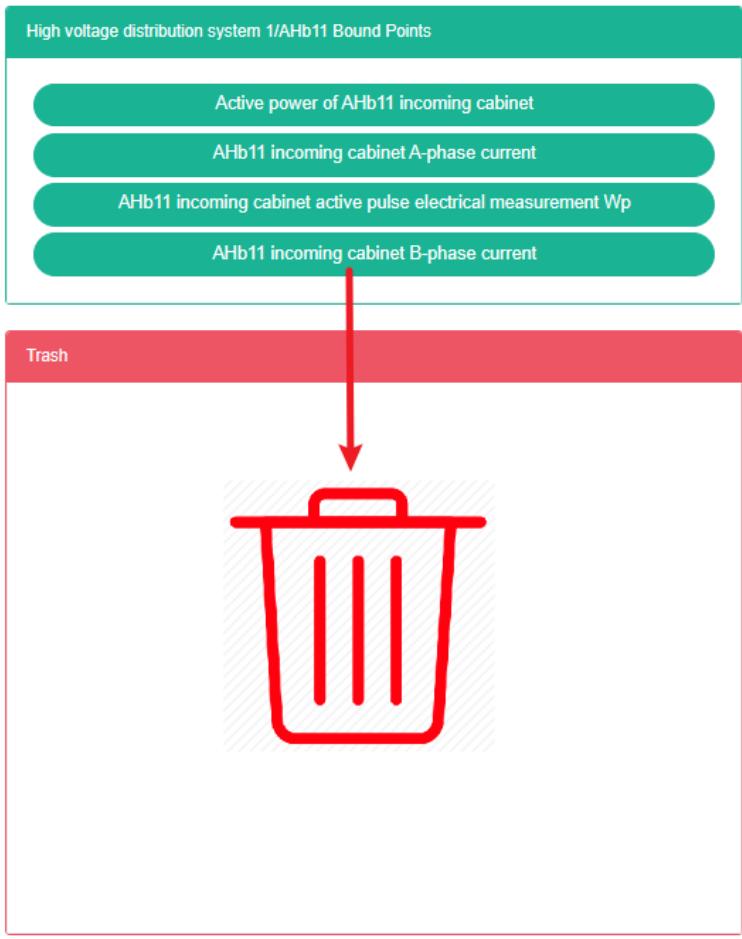
18.4. Preview
Check The Preview:
- Click the menu "System management"
- Click on the menu 'distribution system management'
- Click on the tab "Preview"
- Select "Preview"
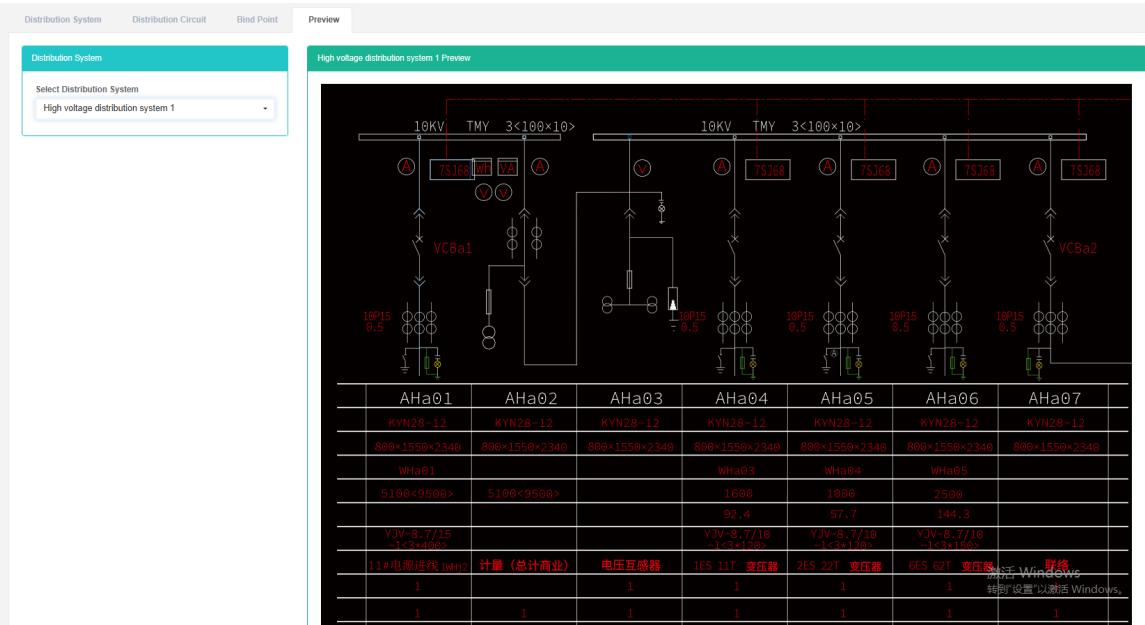
19. Menu Management
The menu refers to the menu options displayed by the user to access the web page data, and only the 'whether to hide' attribute can be modified.
Check The Menu:
- Click the menu "System management"
- Click on the menu 'management'
- Click on the tab 'menu'
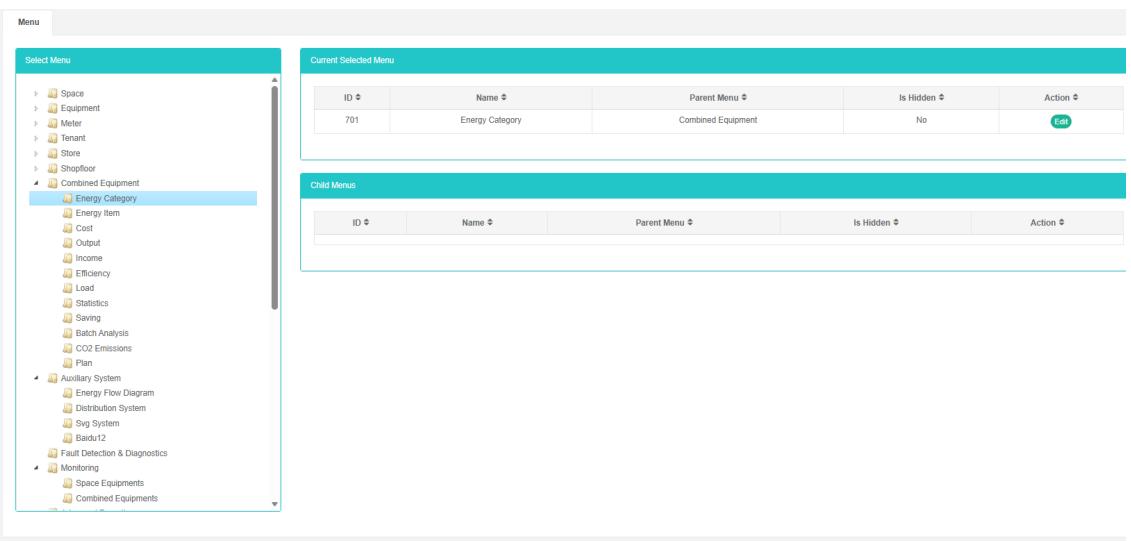
Edit The Menu:
- Click on the menu 'system administration'
- Click on menu 'menu management'
- Click on the tab 'menu'
- Click the 'add menu' button
- In the 'add menu dialog, select "Hide"
- Click the "Save" Button
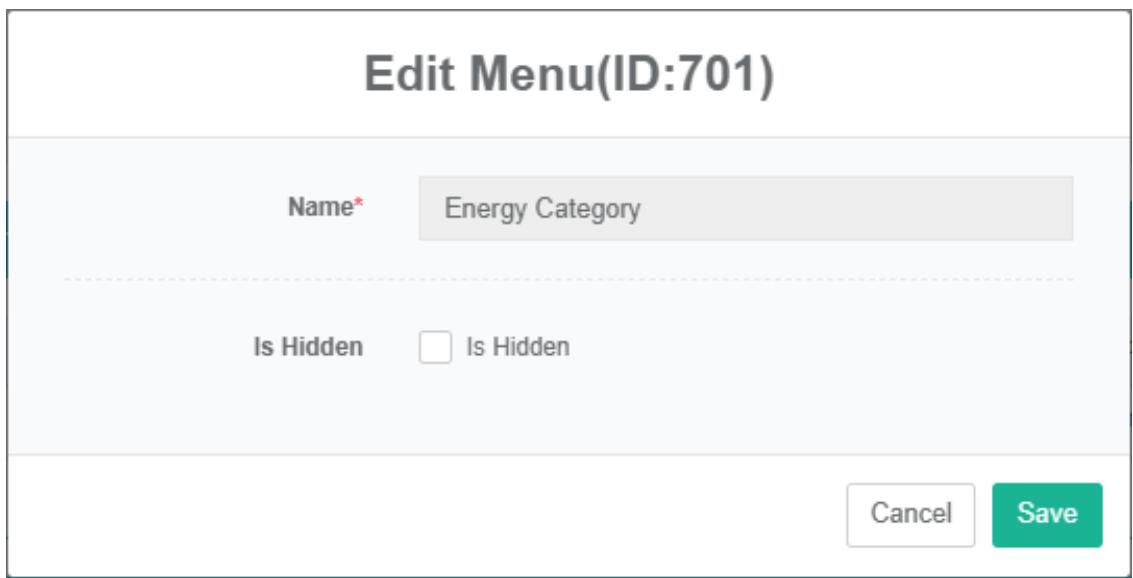
20. Knowledge Base Management
The knowledge base is used to upload some knowledge files.
Check Out The List Of Knowledge Files:
- Click "System management"
- Click on the e-mail 'knowledge management'
- Click on the tab 'knowledge file list'
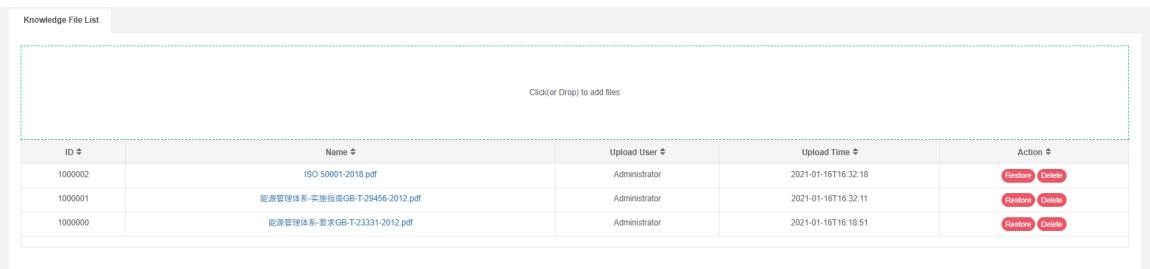
Restore Knowledge File:
- Click on the email 'system administration'
- Click on the email 'knowledge base management'
- Click on the tab 'knowledge file list'
- Click the 'restore' button
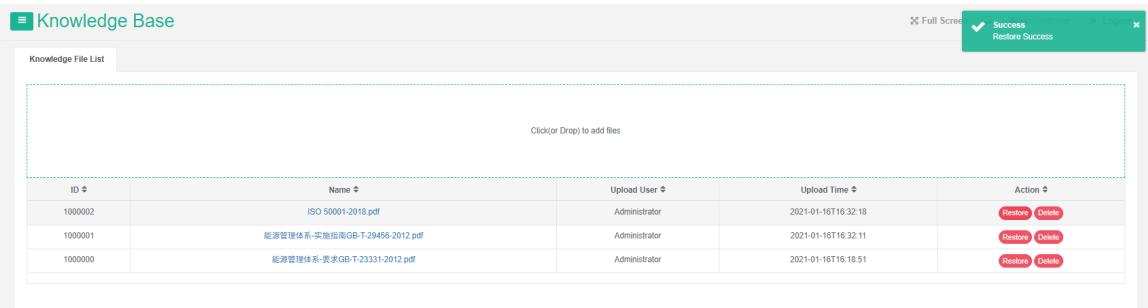
Delete The Knowledge File:
- Click on the email 'system administration'
- Click on the email 'knowledge base management'
- Click on the tab 'knowledge file list'
- Click "Delete" Button
- Click the 'confirm delete' button in the 'confirm delete' dialog box
21. Working Calendar Management
This system can meet the demand of enterprise of energy management system, through to the main energy consumption equipment, energy utilization status quo of energy-using units monitoring analysis, statistical analysis method, method of energy audit and energy balance method, etc on a regular basis to the enterprise energy consumption situation and the analysis cost, help enterprises to determine the index system of energy consumption and energy saving, mining and energy saving potential of energy saving measures.
21.1. Working Calendar
Check The Working Calendar:
- Click the menu "System management"
- Click on the menu 'working calendar management'
- Click on the tab 'working Calendar'

Add a Working Calendar:
- Click the menu "System management"
- Click on the menu 'working calendar management'
- Click on the tab 'working Calendar'
- Click the 'add working Calendar' button
- In the 'new working calendar dialog box input' name ', description'.
- Click the 'save' button
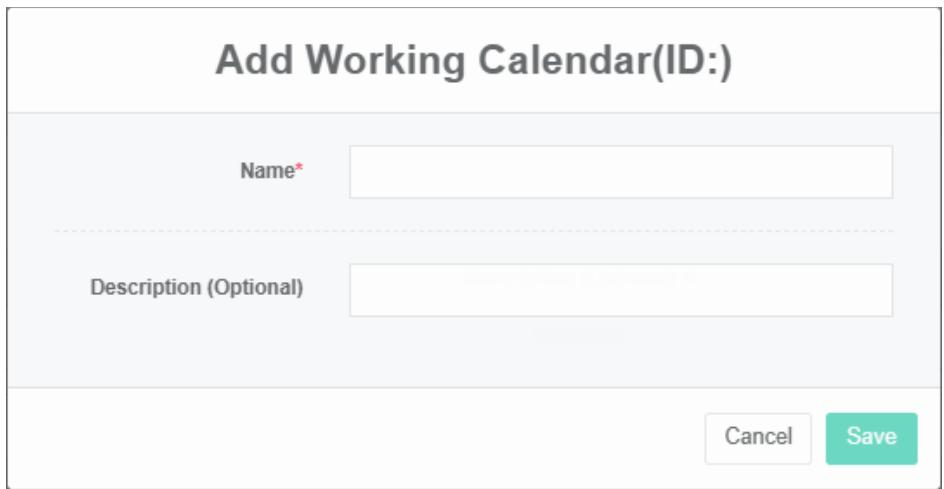
Edit The Working Calendar:
- Click on the menu 'system administration'
- Click the menu 'working Calendar management'
- Click on the tab 'working Calendar'
- Click on the 'modify' button
- In the 'update working calendar dialog box input' name ', 'description'.
- Click "Save" Button

Delete The Working Calendar:
- Click the menu "System management"
- Click on the menu 'working Calendar management'
- Click on the tab 'working calendar'
- Click "Delete" Button
- Click the 'confirm delete' button in the 'confirm delete' dialog box
Import The Working Calendar:
- Click the menu "System management"
- Click the menu 'working Calendar management'
- Click on the tab 'working calendar'
- Click on the "Import" Button
- Enter the data into the dialog box
- Click on the "Import"
ExportWorking Calendar:
-
Click the menu "System management"
-
Click on the menu 'working calendar management'
-
Click on the tab 'working Calendar'
-
Click on the "Export" Button
Clone The Working Calendar:
- Click the menu "System management"
- Click on the menu 'working calendar management'
- Click on the tab 'working calendar'
- Click on the 'clone' button
21.2. The Working Day
Check The Working Days:
- Click the menu "System management"
- Click the menu 'working Calendar management'
- Click on the tab 'a day'
- In the 'please select working calendar module click on the dropdown box to choose to view the working calendar
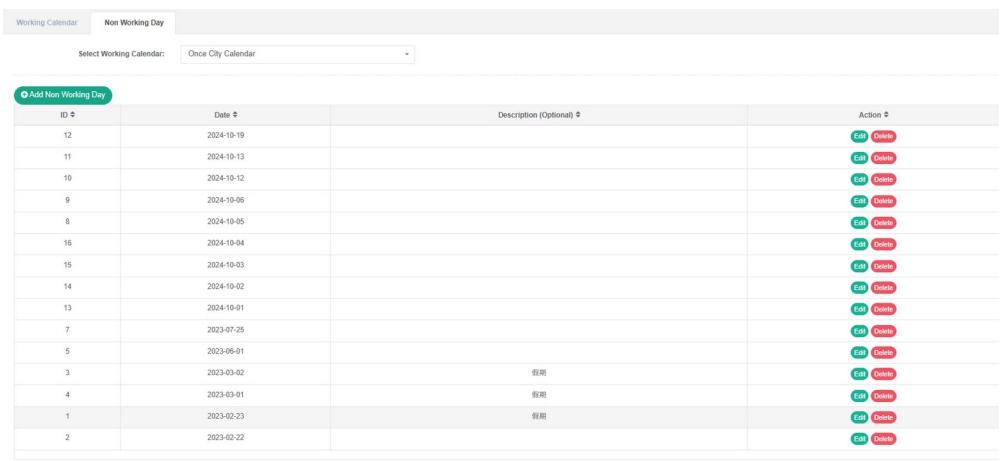
Add a Non-Working Day:
-
Click the menu "System management"
-
Click on the menu 'working calendar management'
-
Click on the tab 'a day'
-
Click on the 'new' button not working days
-
In the 'new working calendar dialog box input' date ', 'description'.
-
Click "Save" Button

Edit The Calendar:
- Click the menu "System management"
- Click on the menu 'working calendar management'
- Click on the tab 'a day'
- Click on the 'modify' button
- In "A day" Dialog input 'date', 'description'.
- Click "Save" Button
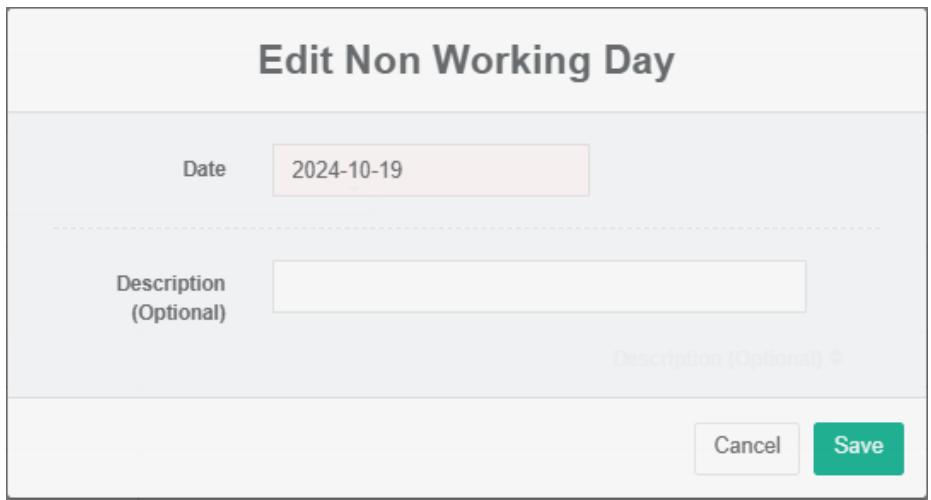
Remove The Working Calendar:
- Click the menu "System management"
- Click on the menu 'working calendar management'
- Click on the tab 'a day'
- Click the 'delete' button
- Click the 'confirm delete' button in the 'confirm delete' dialog box
22. SVG
Scalable vector graphics (scalable vector graphics, SVG) based on xml markup language, is used to describe two-dimensional vector graphics
View SVG:
- Click on the menu 'advanced settings'
- Click on the menu 'SVG®'
- Click on the tab 'SVG'

Add SVG:
- Click on the menu 'advanced settings'
- Click on the menu 'SVG $Ⓔ$
- Click on the tab 'SVG'
- Click on the 'add SVG' button
- In the 'add SVG' dialog box input "Name", "Source code" And "Description"
- Click "Save" Button
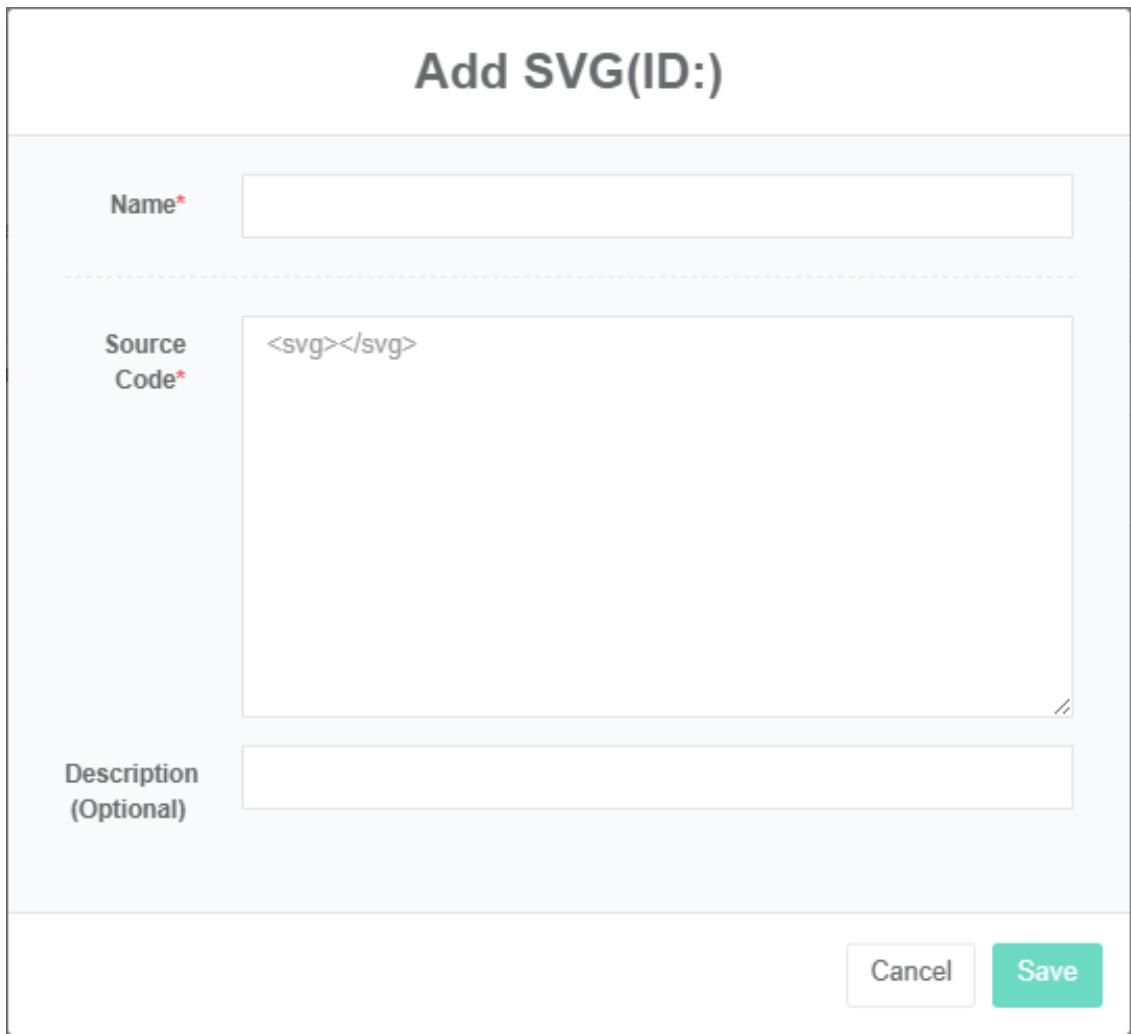
Edit SVG:
- Click on the menu 'advanced settings'
- Click on the menu 'SVG $Ⓔ$
- Click on the tab 'SVG'
- Click on 'modify' button in the list
- In 'edit SVG dialog input "Name", "Source code" And "Description"
- Click "Save" Button

Delete the SVG:
- Click on the menu 'advanced settings'
- Click on the menu 'SVG $Ⓔ$
- Click on the tab 'SVG'
- Click "Delete" Button
- Click the 'click' confirm delete 'button in the' confirm delete 'dialog box
Import SVG:
-
Click on the menu 'advanced settings'
-
Click on the menu 'SVG $Ⓔ$
-
Click on the tab 'SVG'
-
Click on the "Import" Button
-
Enter the data into the dialog box
-
Click on the "Import"
ExportSVG:
- Click on the menu 'advanced settings'
- Click on the menu 'SVG $Ⓔ$
- Click on the tab 'SVG'
- Click on the "Export" Button
Clone SVG:
- Click on the menu 'advanced settings'
- Click on the menu 'SVG $Ⓔ$
- Click on the tab 'SVG'
- Click the 'clone' button
Check The Preview:
- Click on the menu 'advanced settings'
- Click on the menu 'SVG $Ⓔ$
- Click on the tab 'SVG'
- Select "Preview"
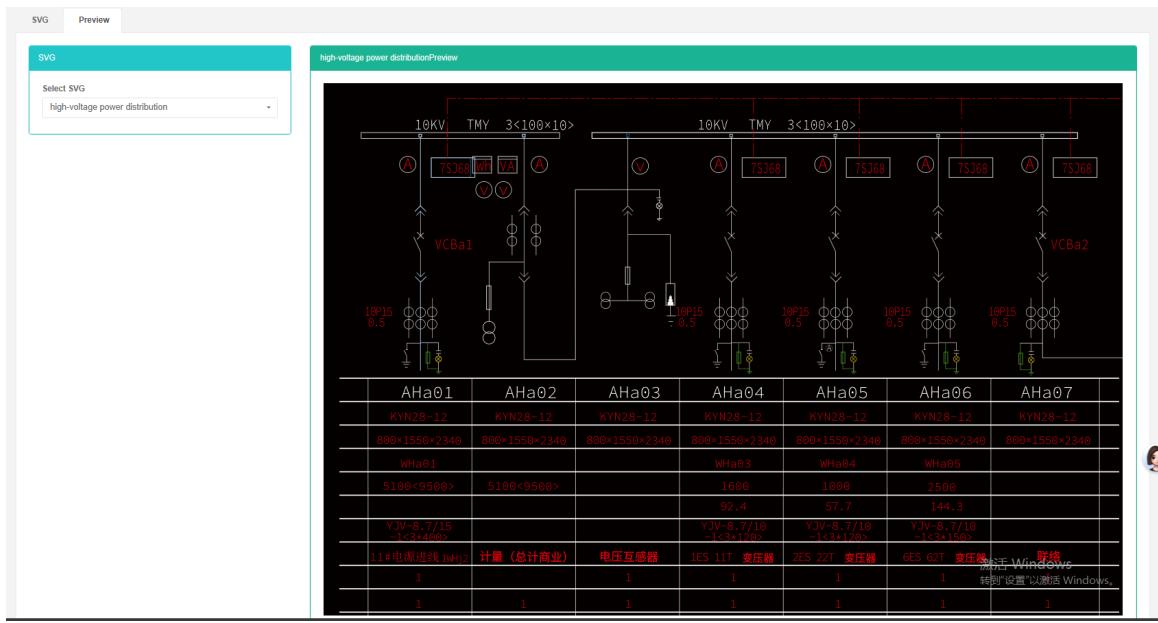
23. Command
Used to configure management command, command can be used to "Meter", "Sensor" Module configuration, etc
Check The Command:
- Click on the menu 'advanced settings'
- Click on the menu 'command $Ⓔ$
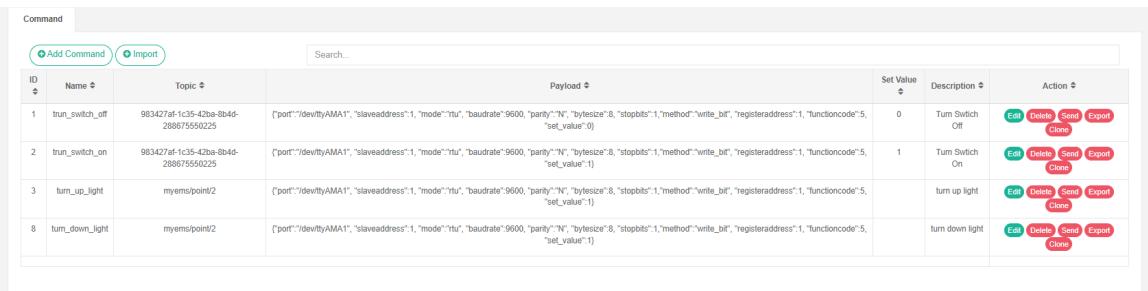
Add The Command:
-
Click on the menu 'advanced settings'
-
Click on the menu 'command $Ⓔ$
-
Click on the 'add command' button
-
In the 'add command dialog box input' name ', 'theme', 'load', 'value', 'description'.
-
Click the 'save' button.
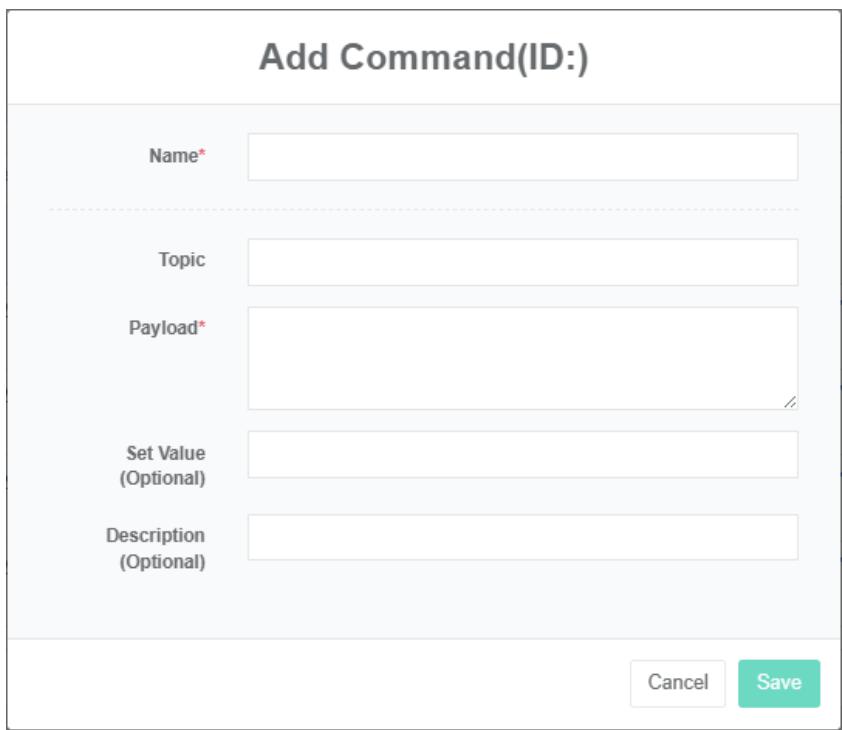
Edit The Command:
- Click on the menu 'advanced settings'
- Click on the menu 'command $Ⓔ$
- Click on 'modify' button in the list
- In 'edit command dialog input' name ', 'theme', 'load', 'value', 'description'.
- Click "Save" Button.
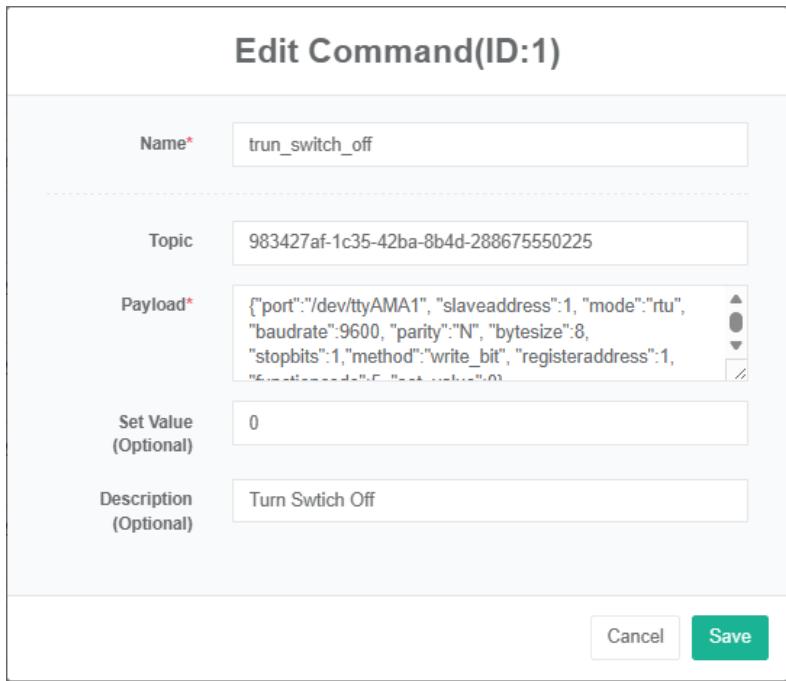
The Delete Command:
- Click on the menu 'advanced settings'
- Click on the menu 'command $E$
- Click on the list "Remove" Button
- In the "Delete" Dialog box click on the "Click" Delete "Button.
Send Command:
- Click the menu "System management"
- Click the menu "Order management"
- Click on 'send' button in the list
Import The Command:
-
Click on the menu 'advanced settings'
-
Click on the menu 'command $Ⓔ$
-
Click on the "Import" Button
-
Enter the data into the dialog box
-
Click on the "Import"
ExportCommand:
- Click on the menu 'advanced settings'
- Click on the menu 'command $⑤$
- Click on the "Export" Button
Clone Command:
- Click on the menu 'advanced settings'
- Click on the menu 'command $⑤$
- Click on 'clone' button
24. Control Mode
Check The Control Mode:
- Click on the menu 'advanced settings'
- Click the menu "Control mode management"
- Click on the tab 'control mode list'

Add The Micro Control Mode:
-
Click on the menu 'advanced settings'
-
Click the menu "Control mode management"
-
Click on the tab 'control mode list'
-
Click on the 'add control mode' button
-
In the 'add control mode dialog box input' name ', 'whether open', 'mail start time', 'end times'," power value.
-
Click the "Save" Button
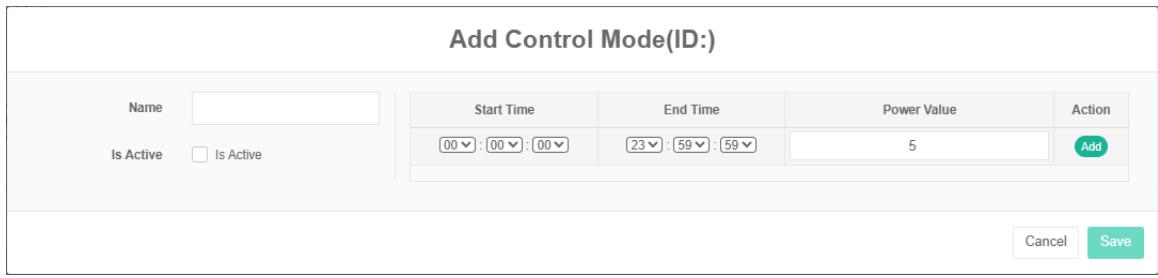
Delete The Control Mode:
- Click on the menu 'advanced settings'
- Click the menu "Control mode management"
- Click on the tab 'control mode list'
- Click "Delete" Button
- Click the 'click' confirm delete 'button in the' confirm delete 'dialog box
Import Control Mode:
- Click on the menu 'advanced settings'
- Click on the menu 'control mode management'
- Click on the tab 'control mode list'
- Click the 'import' button
- Enter the data into the dialog box
- Click 'import'
ExportControl Mode:
- Click on the menu 'advanced settings'
- Click the menu "Control mode management"
- Click on the tab 'control mode list'
- Click on the "Export" Button
Clone Control Mode:
- Click the menu 'advanced settings'
- Click on the menu 'control mode management'
- Click on the tab 'control mode list'
- Click the 'clone' button
25. Mcirogrid E
This system can meet the demand of enterprise of energy management system, through to the main energy consumption equipment, energy utilization status quo of energy-using units monitoring analysis, statistical analysis method, method of energy audit and energy balance method, etc on a regular basis to the enterprise energy consumption situation and the analysis cost, help enterprises to determine the index system of energy consumption and energy saving, mining and energy saving potential of energy saving measures.
25.1. Mcirogrid
Check Mcirogrid:
- Click on the menu 'advanced settings'
- Click on the menu 'mcirogrid $Ⓔ$
- Click on the tab 'microgrid'

Add Mcirogrid:
- Click on the menu 'advanced settings'
- Click on the menu 'mcirowgrid $Ⓔ$
- Click on the tab 'microgrid'
- Click on the 'add microgrid' button
- In the 'add microgrid dialog box input "Name", "Address", "Zip code", "Pick up coordinates', 'dimensions', 'longitude', 'rated capacity, rated power, SVG,'serial number ', 'description', 'stage', 'architecture type choice, whether display cost data," Contacts ", "Cost center".
- Click on the 'save' button
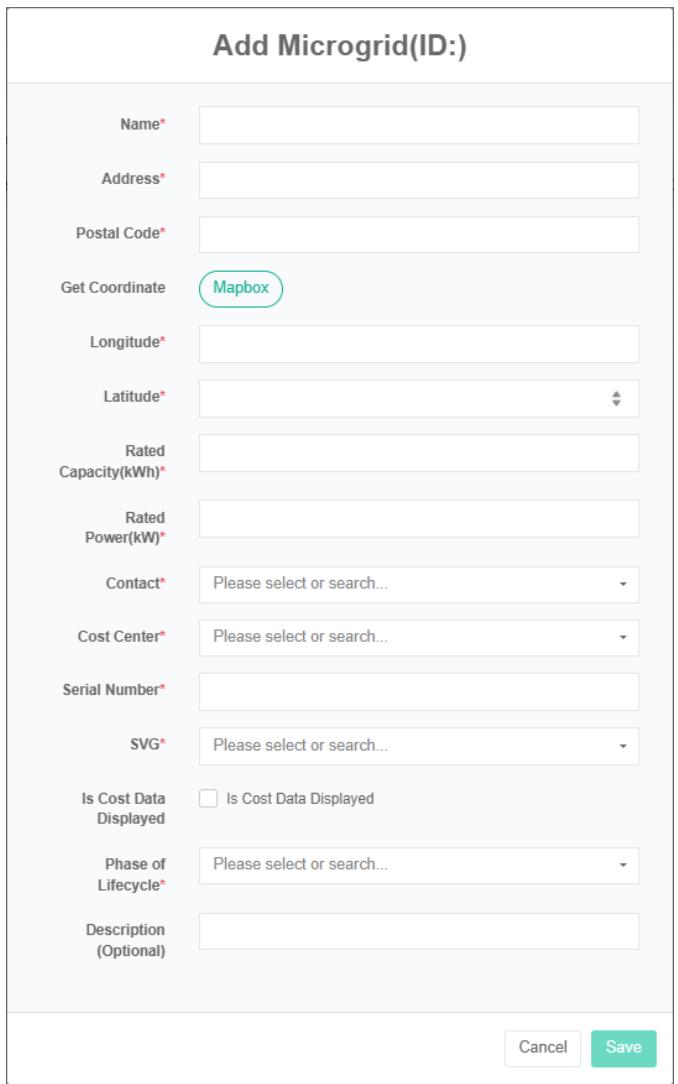
Edit Mcirogrid:
- Click on the menu 'advanced settings'
- Click on the menu 'mcirogrid $Ⓔ$
- Click on the tab 'microgrid'
- Click on 'modify' button in the list
- In the 'add microgrid dialog box input "Name", "Address", "Zip code", "Pick up coordinates', 'dimensions', 'longitude', 'rated capacity, rated power," Contacts ", "Cost center", "Serial number","SVG ", 'description', choose whether to display cost data, 'architecture types', 'owner type.
- Click the "Save" Button
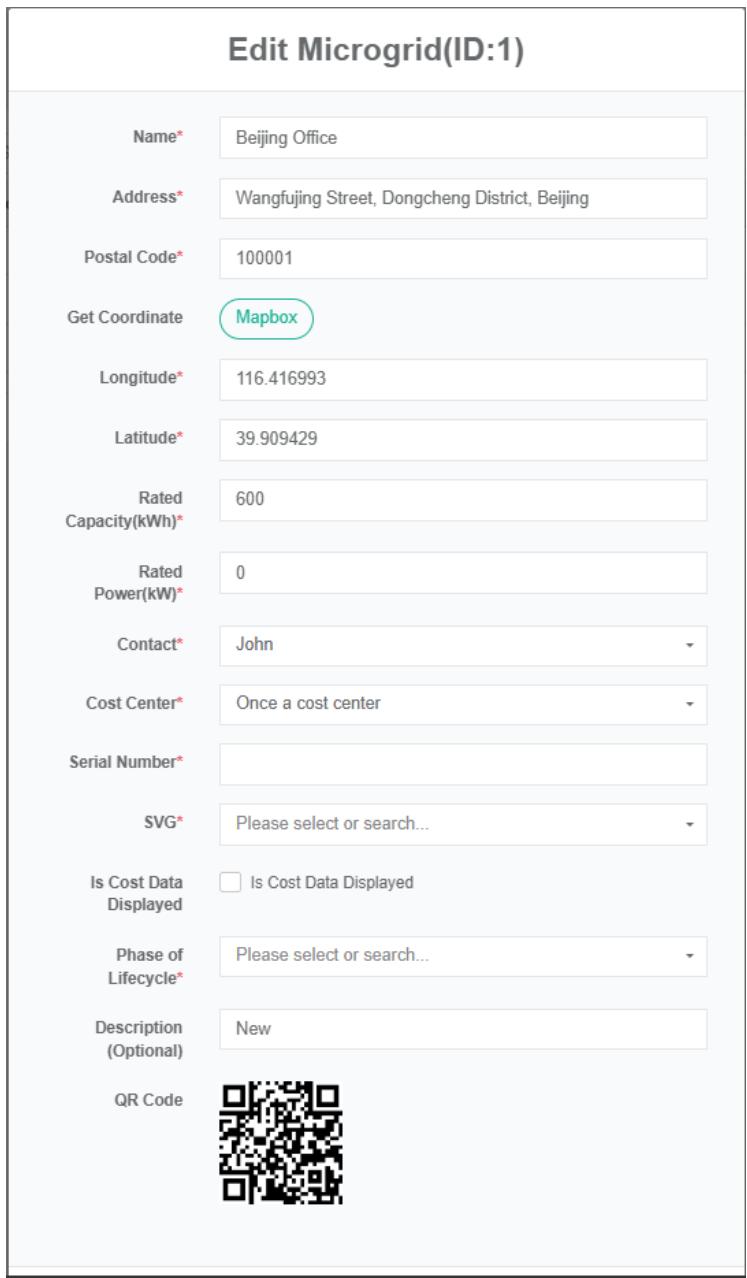
Remove Mcirogrid:
- Click on the menu 'advanced settings'
- Click on the menu 'mcirogrid $Ⓔ$
- Click on the tab 'microgrid'
- Click "Delete" Button
- Click the 'click' confirm delete 'button in the' confirm delete 'dialog box
Import Mcirogrid:
- Click on the menu 'advanced settings'
- Click on the menu 'mcirogrid $Ⓔ$
- Click on the tab 'microgrid'
- Click on the "Import" Button
- Enter the data into the dialog box
- Click on the "Import"
ExportMicrogrid:
- Click the menu "Senior management"
- Click on the menu 'mcirogrid $Ⓔ$
- Click on the tab 'microgrid'
- Click on the "Export" Button
Clone Microgrid:
- Click on the menu 'advanced settings'
- Click on the menu 'mcirogrid $Ⓔ$
- Click on the tab 'microgrid'
- Click on the 'clone' button
25.2. Power Conversion System (Pcs)
Check The Power Conversion System:
-
Click on the menu 'advanced settings'
-
Click on the menu 'mcirowgrid $Ⓔ$
-
Click on the tab "Power conversion system (PCS)"
-
In the 'please select a microgrid module click on the drop-down box to choose to view mcirogrid

Add Power Conversion System:
- Click on the menu 'advanced settings'
- Click on the menu 'mcirogrid $Ⓔ$
- Click on the tab "Power conversion system (PCS)"
- In the 'please select a microgrid module click on the drop-down box to choose to view mcirogrid
- Click on "Add power conversion system (PCS)" Button
- In the 'add power conversion system (PCS) dialog input power conversion system (PCS) name,' running status data point', 'the rated output power, charging quantity data point today,' today put power data point' and 'total charge data point' and 'total discharge data point'
- Click "Save" Button.
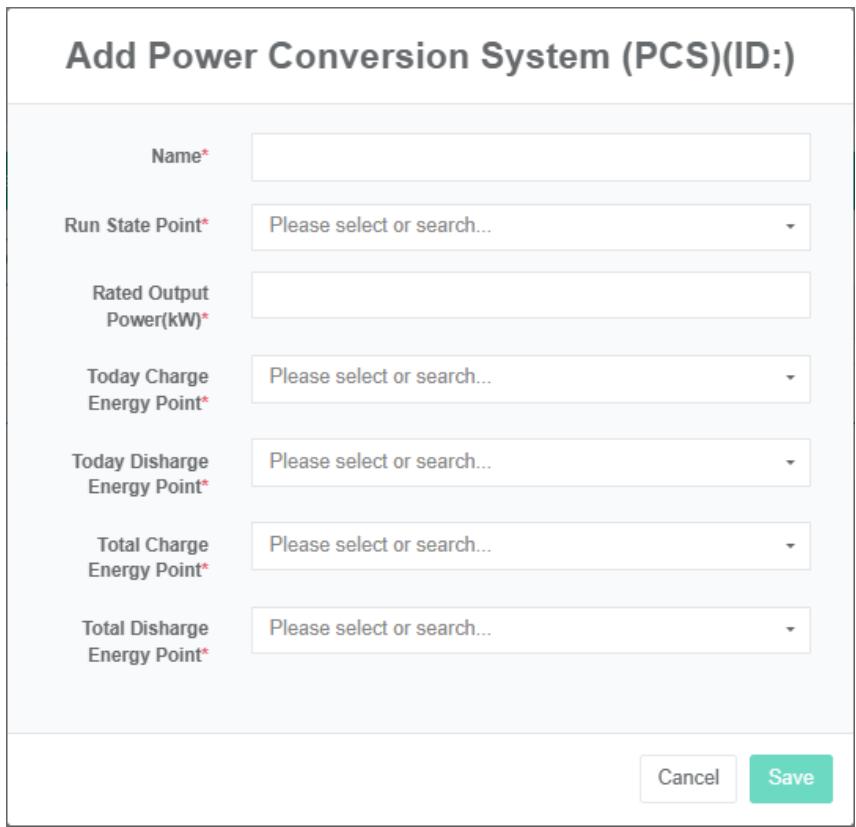
Edit The Power Conversion System:
- Click on the menu 'advanced settings'
- Click on the menu 'mcirogrid $Ⓔ$
- Click on the tab "Power conversion system (PCS)"
- Click on the drop-down box in the 'please select microgrid' module to select the microgrid you want to view
- Click on 'modify' button in the list
- In the 'edit power conversion system (PCS)' dialog box, enter 'name of power conversion system (PCS)', 'data point of operation status', 'rated output power', 'data point of charge today', 'data point of discharge today', 'total charge data point' and 'total discharge data point'
- Click "Save" Button.
Remove Power Conversion System:
- Click on the menu 'advanced settings'
- Click on the menu 'microgrid $Ⓔ$
- Click on the tab "Power conversion system (PCS)"
- In the 'please select a microgrid module click on the drop-down box to choose to view mcirogrid
- Click on the list "Remove" Button
- In the "Delete" Dialog box click on the "Click" Delete "Button
25.3. Photovoltaic
Check The Photovoltaic (Pv) :
- Click on the menu 'advanced settings'
- Click on the menu 'mcirogrid $Ⓔ$
- Click on the tab "Pv"
- In the 'please select a microgrid module click on the drop-down box to choose to view mcirogrid

Add The Photovoltaic (Pv) :
-
Click on the menu 'advanced settings'
-
Click on the menu 'micro phone $Ⓔ$
-
Click on the tab "Pv"
-
In the 'please select a microgrid module click on the drop-down box to choose to view mcirogrid
-
Photovoltaic click 'add' button
-
In the "Pv" Dialog box input pv name, 'power data point', photovoltaic capacity, choose 'meter'.
-
Click "Save" Button.
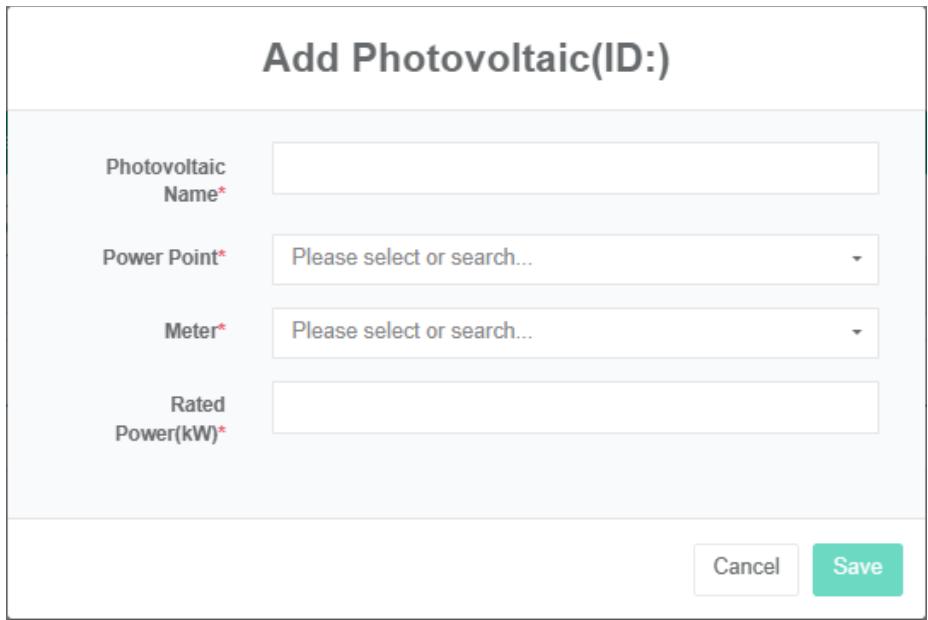
Edit Pv:
- Click on the menu 'advanced settings'
- Click on the menu 'mcirogrid $Ⓔ$
- Click on the tab "Pv"
- In the 'please select a microgrid module click on the drop-down box to choose to view mcirogrid
- Click on 'modify' button in the list
- In the "Pv" Dialog box input pv name, 'power data point', photovoltaic capacity, choose 'meter'.
- Click "Save" Button.
Delete The Photovoltaic (Pv):
-
Click on the menu 'advanced settings'
-
Click on the menu 'microgrid'
-
Click on the tab "Pv"
-
Click on the drop-down box in the 'please select microgrid' module to select the microgrid you want to view
-
Click on the list 'delete' button
-
In the "Delete" Dialog box click on the "Click" Delete "Button
25.4. Battery
Check The Battery:
- Click the menu "Senior management"
- Click on the menu 'mcirogrid $Ⓔ$
- Click on the tab 'battery'
- In the 'please select a microgrid module click on the drop-down box to choose to view mcirogrid

Add The Battery:
-
Click on the menu 'advanced settings'
-
Click on the menu 'mcirogrid $Ⓔ$
-
Click on the tab 'battery'
-
In the 'please select a microgrid module click on the drop-down box to choose to view mcirogrid
-
Click 'add' button battery
-
In the 'add batteries' dialog box type in the name' battery', 'battery status data point' and select' soc data point', 'power data point', meter charging, discharge meter, rated capacity, rated power, 'nominal voltage
-
Click "Save" Button.
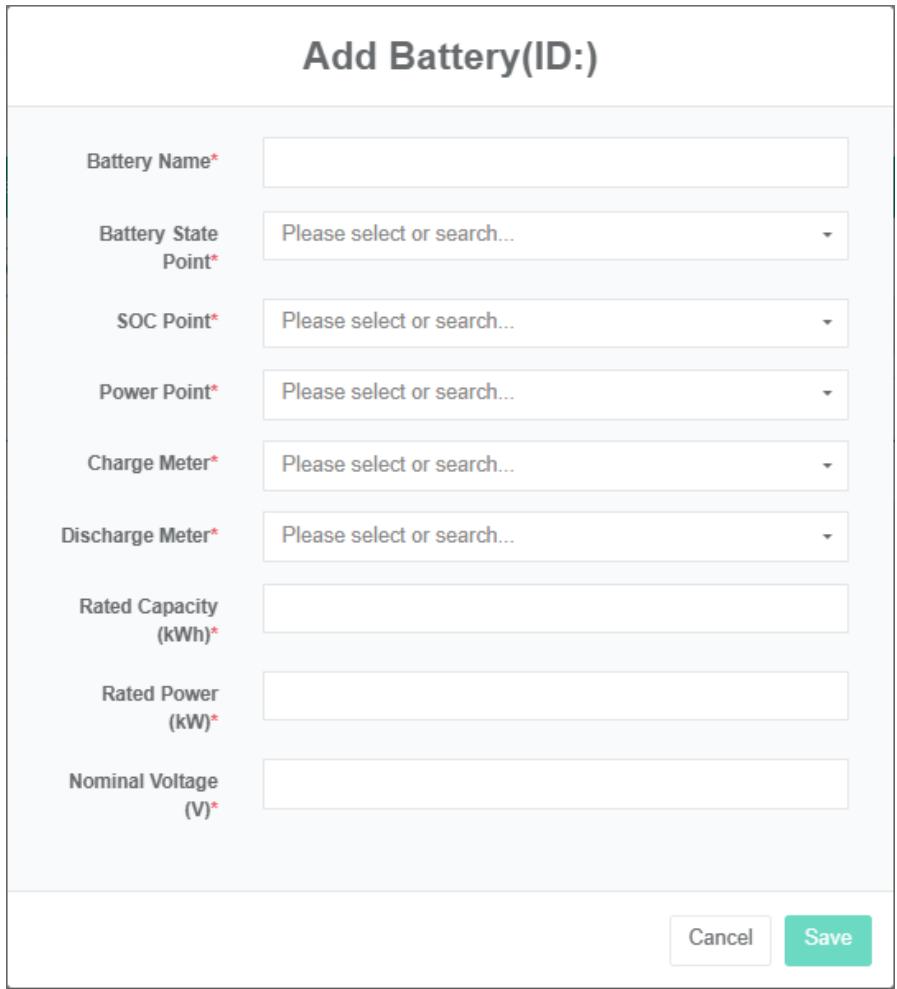
Edit the battery:
-
Click on the menu 'advanced settings'
-
Click on the menu 'mcirogrid $Ⓔ$
-
Click on the tab 'battery'
-
In the 'please select a microgrid module click on the drop-down box to choose to view mcirogrid
-
Click on 'modify' button in the list
-
In the 'edit batteries' dialog box type in the name' battery', 'battery status data point, choose' soc data point', 'power data point', meter charging, discharge meter, rated capacity, rated power, 'the nominal voltage.
-
Click "Save" Button.
Remove the battery:
- Click on 'advanced settings'
- Click on the menu 'microgrid $Ⓔ$
- Click on the tab 'battery'
- Click on the drop-down box in the 'please select microgrid' module to select the microgrid you want to view
- Click on the list 'delete' button
- Click the 'click' confirm delete 'button in the' confirm delete 'dialog box
25.5. EV Charger
Check out the EV charger:
- Click on the menu 'advanced settings'
- Click on the menu 'microgrid $Ⓔ$
- Click on the tab 'EV charger'
- In the 'please select a microgrid module click on the drop-down box to choose to view mcirogrid

Add a EV Charger:
- Click on the menu 'advanced settings'
- Click on the menu 'microgrid $Ⓔ$
- Click on the tab 'EV charger'
- In the 'please select a microgrid module click on the drop-down box to choose to view mcirogrid
- Click on the 'add EV charger' button
- In the 'EV chargers' dialog box input name EV charger, the rated power output, choose' power data point, 'meter'.
- Click "Save" Button.
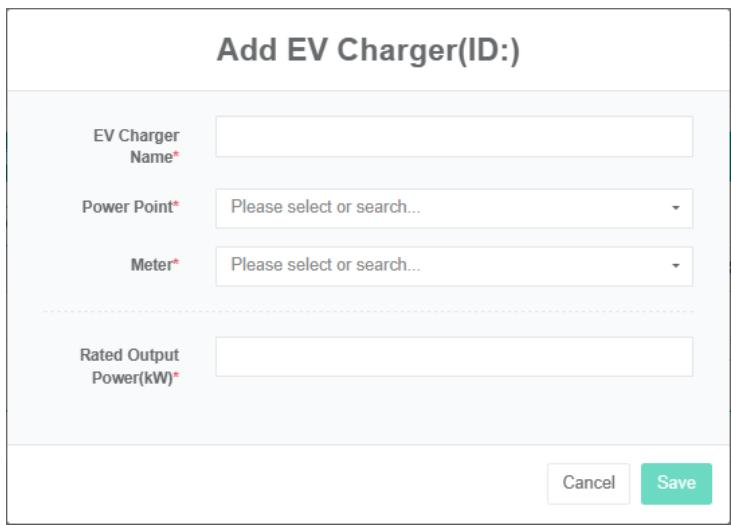
Edit EV charger:
-
Click on the menu 'advanced settings'
-
Click on the menu 'microgrid $Ⓔ$
-
Click on the tab 'EV charger'
-
In the 'please select a microgrid module click on the drop-down box to choose to view mcirogrid
-
Click on 'modify' button in the list
-
In the 'EV chargers' dialog box input name EV charger, the rated power output, choose' power data point, 'meter'.
-
Click "Save" Button.
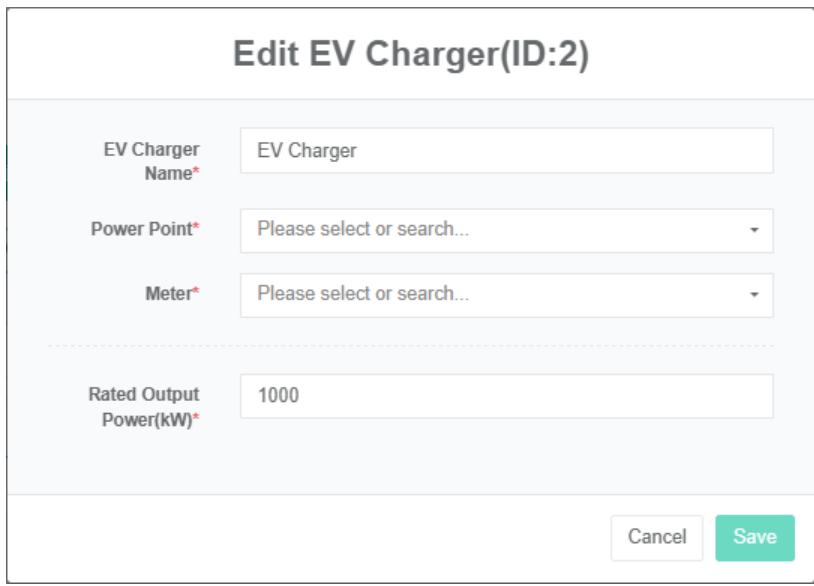
Delete the EV Charger:
- Click on the menu 'advanced settings'
- Click on the menu 'microgrid $Ⓔ$
- Click on the tab 'EV chargers'
- In the 'please select a microgrid module click on the drop-down box to choose to view mcirogrid
- Click on the list 'delete' button
- Click the 'click' confirm delete 'button in the' confirm delete 'dialog box
Grid, load, heat pumps, generators, wind turbine operation and charge the same.
25.6. Power Grid
Check The Grid:
- Click on the menu 'advanced settings'
- Click on the menu 'microgrid $Ⓔ$
- Click on the tab 'grid'
- Click on the drop-down box in the 'please select microgrid' module to select the microgrid you want to view

Add The Grid:
- Click on the menu 'advanced settings'
- Click on the menu 'mcirogrid $Ⓔ$
- Click on the tab 'grid'
- In the 'please select a microgrid module click on the drop-down box to choose to view mcirogrid
- Click on the 'add grid' button
- In the power system of "Grid" Dialog input "Name", "Capacity", choose 'purchase meter,' power data point', 'sales meter.
- Click "Save" Button.
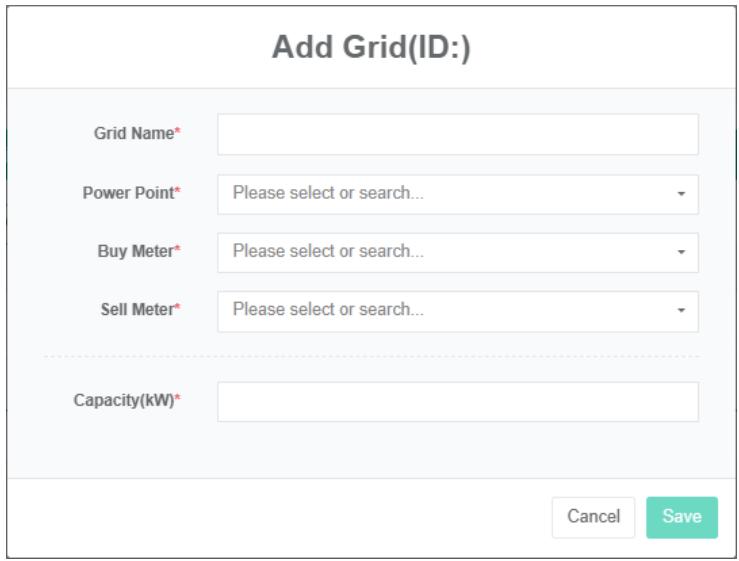
Edit The Grid:
- Click on the menu 'advanced settings'
- Click on the menu 'microgrid E'
- Click on the tab 'grid'
- In the 'please select a microgrid module click on the drop-down box to choose to view mcirogrid
- Click on 'modify' button in the list
- In the "Grid" Dialog box type grid 'name', 'capacity, choose' power data point', 'buy meter', 'sales meter.
- Click "Save" Button.
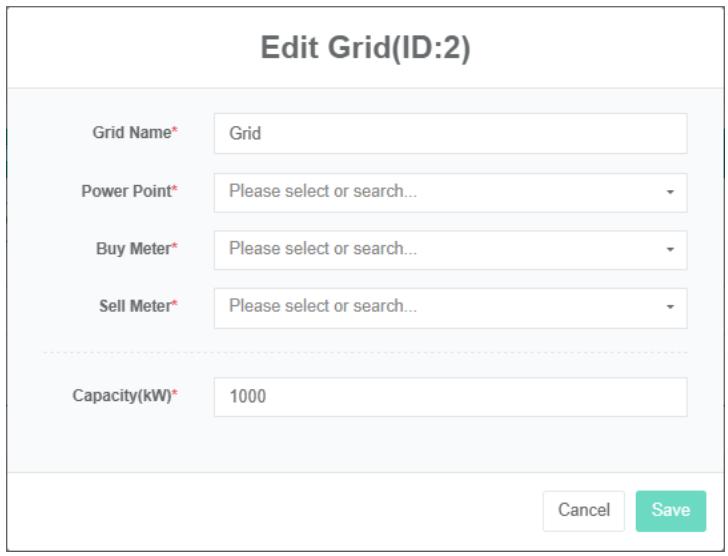
Delete The Grid:
- Click on the menu 'advanced settings'
- Click on the menu 'microgrid E'
- Click on the tab 'EV charger'
- Click the drop-down box in the 'please select microgrid' module to select the microgrid you want to view
- Click on the list 'delete' button
- In the "Delete" Dialog box click on the "Click" Delete "Button
25.7. Load
View Load:
-
Click on the menu 'advanced settings'
-
Click on the menu 'microgrid $Ⓔ$
-
Click on the tab 'load'
-
In the 'please select a microgrid module click on the drop-down box to choose to view mcirogrid

Add Load:
- Click on the menu 'advanced settings'
- Click on the menu 'microgrid $Ⓔ$
- Click on the tab "Load"
- In the 'please select a microgrid module click on the drop-down box to choose to view mcirogrid
- Click on the 'add load' button
- In the 'EV chargers' dialog box type in the name' load ', 'the rated power input, select' power data point', 'meter'.
- Click the 'save' button.
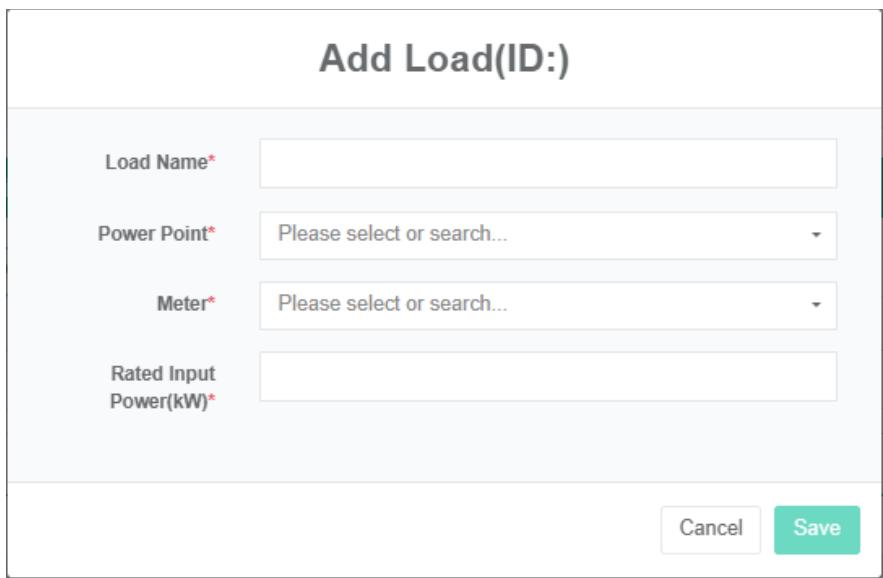
Edit The Ev Charger:
- Click on the menu 'advanced settings'
- Click on the menu 'microgrid $Ⓔ$
- Click on the tab "Load"
- In the 'please select a microgrid module click on the drop-down box to choose to view mcirogrid
- Click on 'modify' button in the list
- Enter 'load name', 'rated input power' in the 'load' dialog box, select 'power data point', 'meter'.
- Click "Save" Button.

Remove The Payload:
-
Click on the menu 'advanced settings'
-
Click on the menu 'microgrid $Ⓔ$
-
Click on the tab 'load'
-
In the 'please select a microgrid module click on the drop-down box to choose to view mcirogrid
-
Click on the list 'delete' button
-
In the "Delete" Dialog box click on the "Click" Delete "Button
- grid, load, heat pumps, generators, wind turbine operation and charge the same.
25.8. Bind Sensor
View Bind Sensor:
- Click on the menu 'advanced settings'
- Click on the menu 'microgrid $Ⓔ$
- Click on the tab 'bind sensor'
- In the 'please select a microgrid module click on the drop-down box to choose to view mcirogrid
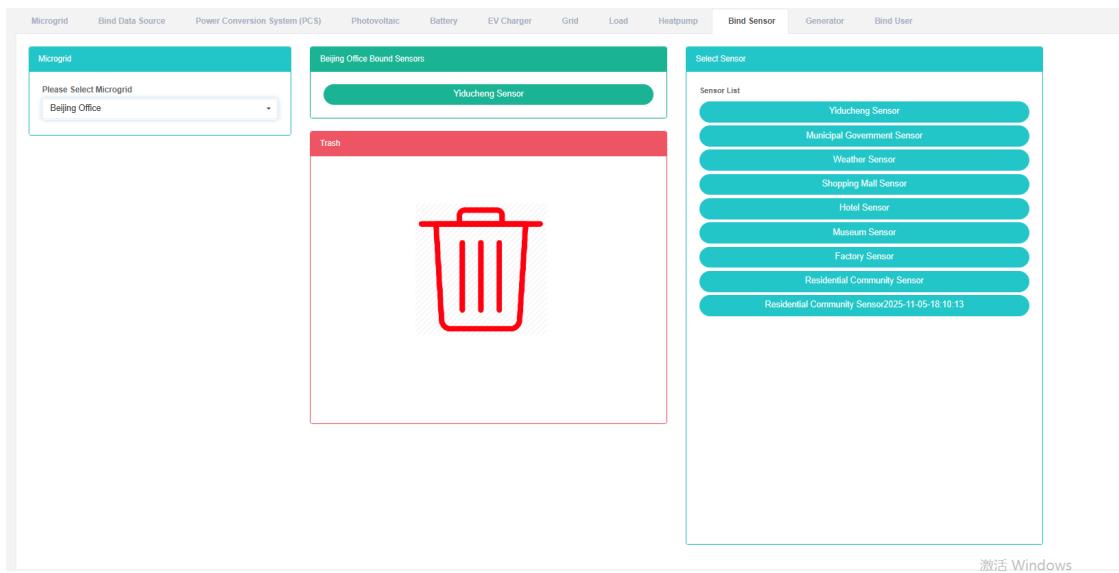
Bind Sensor:
-
Click on the menu 'advanced settings'
-
Click on the menu 'microgrid $Ⓔ$
-
Click on the tab 'bind sensor'
-
In the 'please select a microgrid module click on the drop-down box to choose to view mcirogrid
-
Click on the sensor' list of sensor module and drag and drop to the 'bind sensor module
-
Into a 'bind sensor module after release the left mouse button
-
A 'success' hint namely bind bind sensor
-
The same measurement data point into a "Wrong" Will light up to alert the same shopfloor
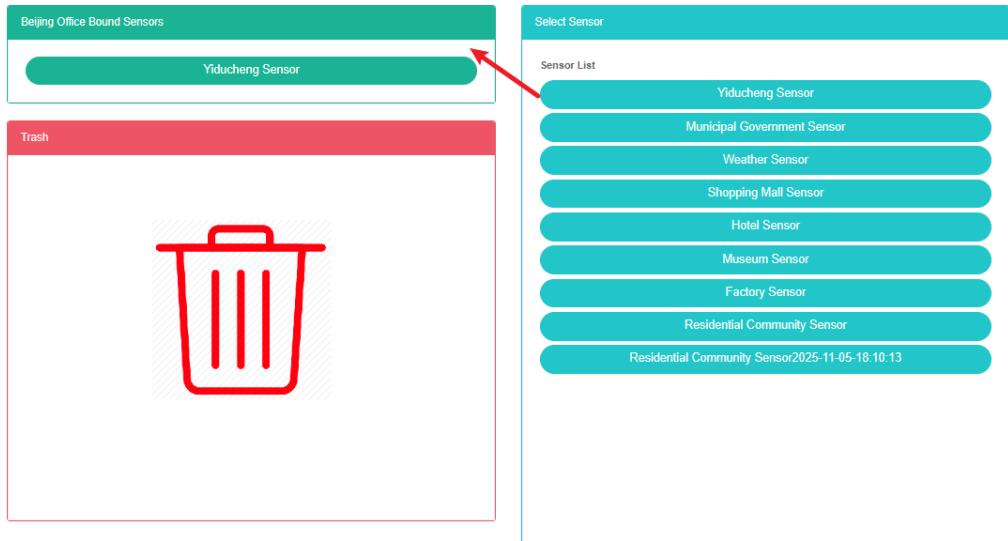
Unbind Sensor:
- Click on the menu 'advanced settings'
- Click on the menu 'microgrid $Ⓔ$
- Click on the tab 'bind sensor'
- In the 'please select a microgrid module click on the drop-down box to choose to view mcirogrid
- Click on the 'bind sensor module of sensor and drag and drop to the' barrel 'module
- Into the recycling bins' 'module after release the left mouse button
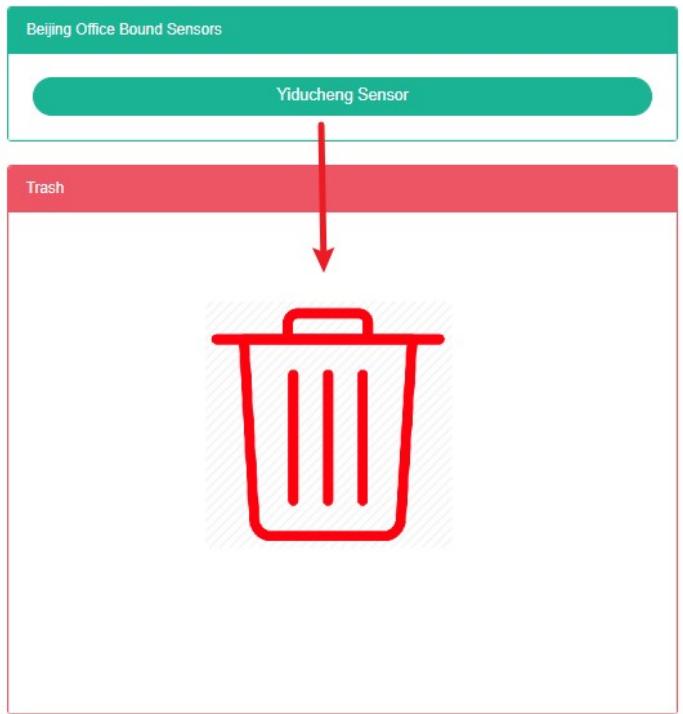
Bind user functionality and bind sensor is similar.
26. Virtual Power Plant
This system can meet the demand of enterprise of energy management system, through to the main energy consumption equipment, energy utilization status quo of energy-using units monitoring analysis, statistical analysis method, method of energy audit and energy balance method, etc on a regular basis to the enterprise energy consumption situation and the analysis cost, help enterprises to determine the index system of energy consumption and energy saving, mining and energy saving potential of energy saving measures.
26.1. Virtual Power Plant
View The Virtual Power Plant:
-
Click on the menu 'advanced settings'
-
Click on the menu 'virtual power plant $Ⓔ$
-
Click on the page table to sign "Virtual power plant"

Add Virtual Power Plant:
- Click on the menu 'advanced settings'
- Click on the menu 'virtual power plant $Ⓔ$
- Click on the tab "Virtual power plant"
- Click on the 'add virtual power plants' button
- In the 'add virtual power plants' dialog input name ', 'SVG', 'description', choose 'cost center,' equilibrium price data point.
- Click "Save" Button.
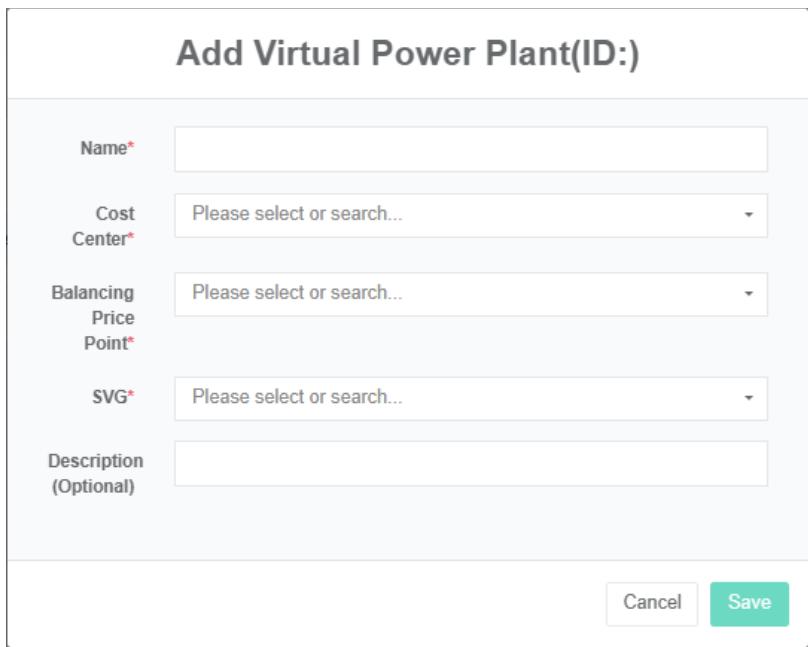
Edit The Virtual Power Plant:
- Click on the menu 'advanced settings'
- Click the menu "Virtual power plant $Ⓔ$
- Click on the tab "Virtual power plant"
- Click on 'modify' button in the list
- In the 'add virtual power plants' dialog input name ', 'SVG', 'description', choose 'cost center,' equilibrium price data point.
- Click "Save" Button.

Delete The Virtual Power Plant:
- Click on the menu 'advanced settings'
- Click the menu "Virtual power plant $Ⓔ$
- Click on the tab "Virtual power plant"
- Click on the list "Remove" Button
- In the "Delete" Dialog box click on the "Click" Delete "Button.
Import The Virtual Power Plant:
- Click on the menu 'advanced settings'
- Click on the menu 'virtual power plant $Ⓔ$
- Click on the tab "Virtual power plant"
- Click on the "Import" Button
- Enter the data into the dialog box
- Click 'import'
Export The Virtual Plant:
- Click on the menu 'advanced settings'
- Click on the menu 'virtual power plant $Ⓔ$
- Click on the tab "Virtual power plant"
- Click on the "Export" Button
Clone The Virtual Power Plant:
- Click on the menu 'advanced settings'
- Click the menu "Virtual power plant $Ⓔ$
- Click on the tab 'virtual power plant'
- Click the 'clone' button
26.2. Bind Microgrid
View The Virtual Power Plant Bind Microgrid:
- Click on the menu 'advanced settings'
- Click the menu "Virtual power plant $Ⓔ$
- Click on the tab 'bind microgrid'
- Click in the "Please select a virtual power plant" Module dropdown box to choose to view the virtual power plant
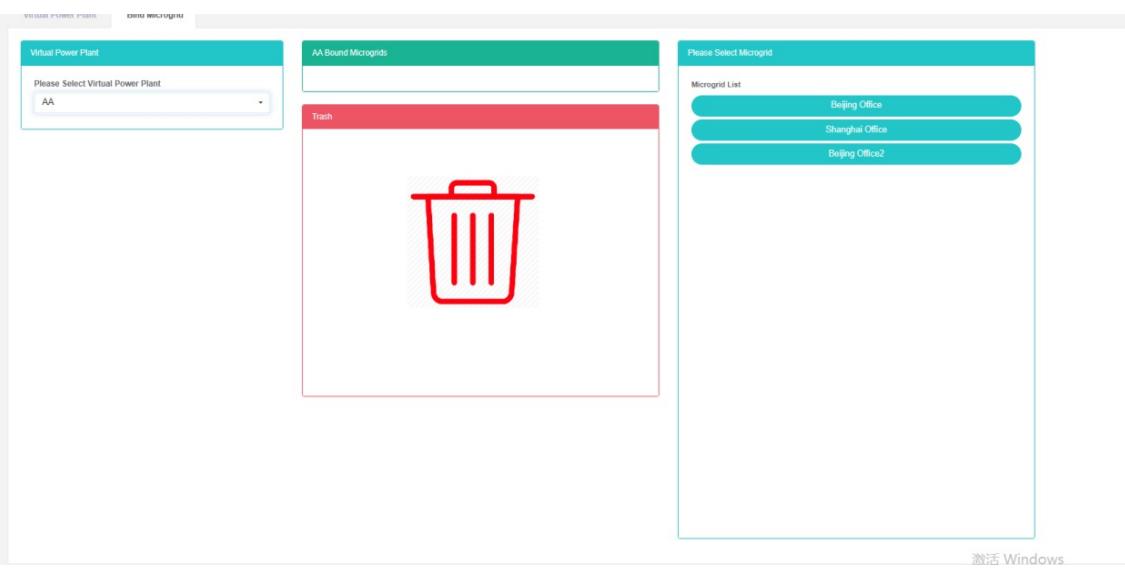
Bind Microgrid:
- Click on the menu 'advanced settings'
- Click the menu "Virtual power plant $Ⓔ$
- Click on the tab 'bind microgrid'
- Click in the "Please select a virtual power plant" Module dropdown box to choose to view the virtual power plant
- Click on the 'list of microgrid module in mcirogrid and drag and drop to the' bind microgrid module
- Release the left mouse button after dragging into the 'Bind microgrid' module
- A 'success' hint namely bind bind microgrid
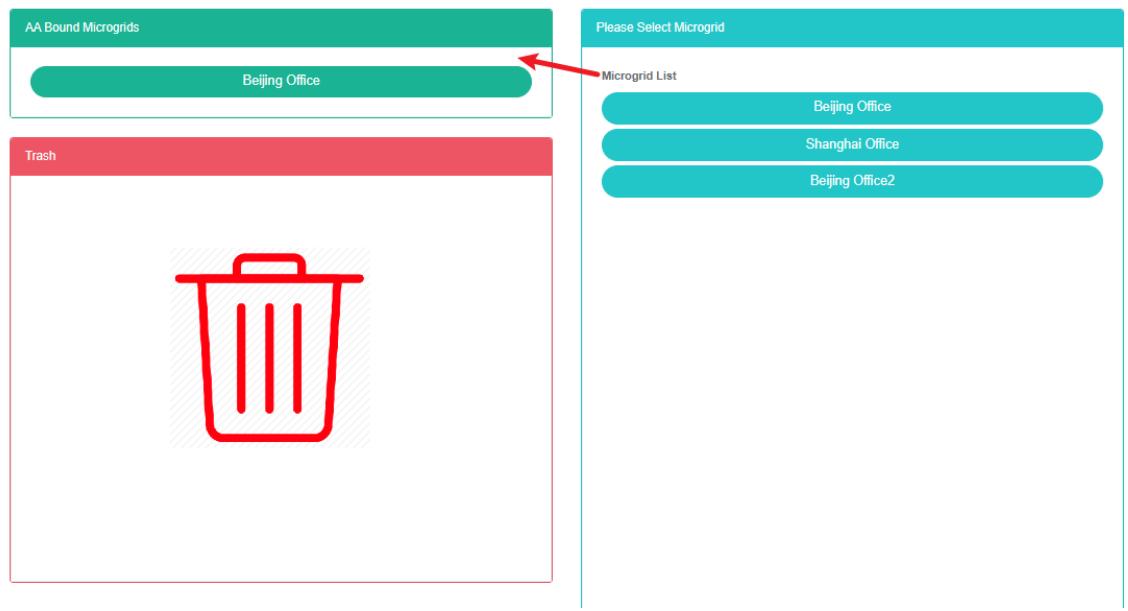
Unbind Microgrid:
- Click on the menu 'advanced settings'
- Click on the menu 'virtual power plant $Ⓔ$
- Click on the tab 'bind microgrid'
- Click on the drop-down box in the 'please select virtual power plant' module to select the virtual power plant you want to view
- Click on the 'bind microgrid module in mcirogrid and drag and drop to the' barrel 'module
- Into the recycling bins' 'module after release the left mouse button
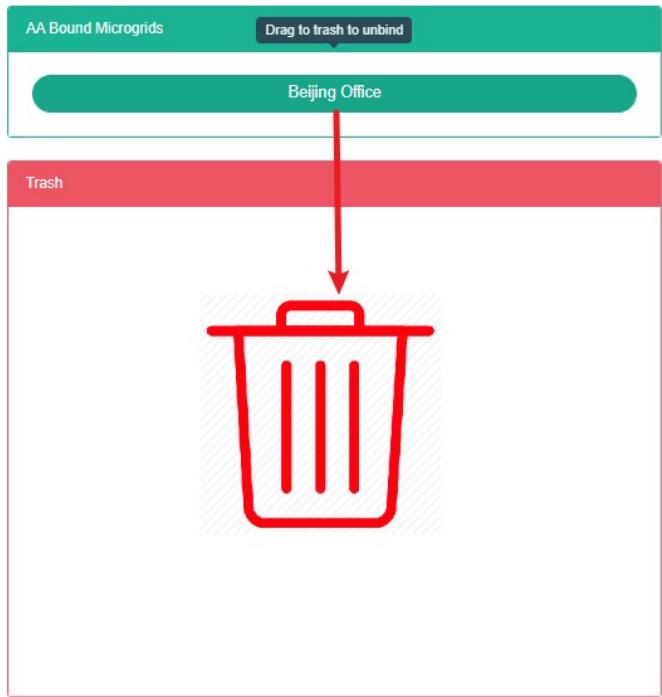
27. Energy Storage Container
27.1. Energy Storage Container
Check The Storage Container:
- Click on the menu 'advanced settings'
- Click on the menu 'energy storage container $Ⓔ$
- Click on the tab 'energy storage container'

Add Energy Storage Container:
- Click the menu "Senior"
- Click on the menu 'energy storage container $Ⓔ$
- Click on the tab 'energy storage container'
- Click on the 'add energy storage containers' button
- In the 'add energy storage containers' dialog input name', 'rated capacity, rated power, "Contact", "Cost center" And "Description"
- Click the "Save" Button
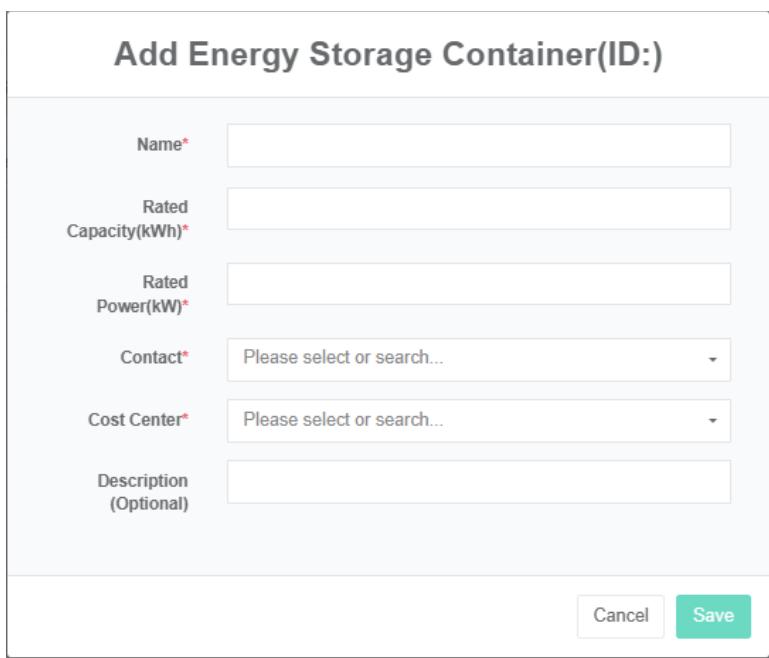
Edit Storage Container:
- Click the menu "Senior"
- Click on the menu 'energy storage container $Ⓔ$
- Click on the tab 'energy storage container'
- Click on the list 'modify' button
- In 'edit storage containers' dialog input name ', 'rated capacity, rated power, "Contacts", "Cost center", "SVG' and 'description'
- Click the "Save" Button
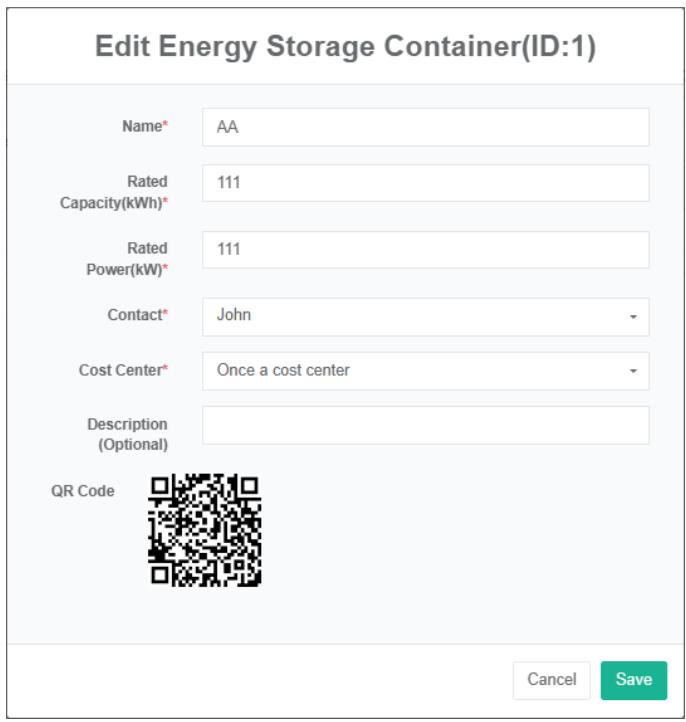
Delete Storage Container:
- Click on the menu 'advanced settings'
- Click on the menu 'energy storage container $Ⓔ$
- Click on the tab 'energy storage container'
- Click the 'delete' button
- Click the 'click' confirm delete 'button in the' confirm delete 'dialog box
27.2. Power Conversion System (Pcs)
Check The Power Conversion System:
-
Click on the menu 'advanced settings'
-
Click on the menu 'energy storage container $Ⓔ$
-
Click on the tab "Power conversion system (PCS)"
-
In the 'select storage container module click on the drop-down box to choose to view the storage container

Add Power Conversion System:
- Click on the menu 'advanced settings'
- Click on the menu 'energy storage container $Ⓔ$
- Click on the tab 'power conversion system (PCS)'
- Click the drop-down box in the 'please select storage container' module to select the storage container you want to view
- Click on "Add power conversion system (PCS)" Button
- In the 'add power conversion system (PCS) dialog input power conversion system (PCS) name,' running status data point', 'the rated output power, charging quantity data point today,' today put power data point' and 'total charge data point' and 'total discharge data point'
- Click "Save" Button.
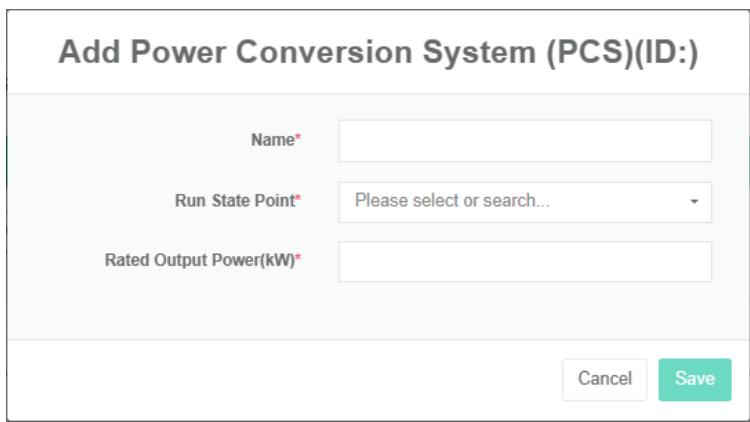
Edit The Power Conversion System:
- Click on the menu 'advanced settings'
- Click on the menu 'energy storage container $Ⓔ$
- Click on the tab "Power conversion system (PCS)"
- In the 'please select storage container module click on the dropdown box to choose to view the storage container
- Click on 'modify' button in the list
- In 'edit power conversion system (PCS) dialog input power conversion system (PCS) name,' running status data point', 'the rated output power, charging quantity data point today,' today put power data point' and 'total charge data point' and 'total discharge data point'
- Click "Save" Button.
Remove Power Conversion System:
- Click on 'advanced settings'
- Click on the menu 'energy storage container $Ⓔ$
- Click on the tab "Power conversion system (PCS)"
- In the 'please select storage container module click on the dropdown box to choose to view the storage container
- Click on the list "Remove" Button
- In the "Delete" Dialog box click on the "Click" Delete "Button
27.3. The Battery
Check The Battery:
-
Click on the menu 'advanced settings'
-
Click on the menu 'energy storage container $Ⓔ$
-
Click on the tab 'battery'
-
Click the drop-down box in the 'please select storage container' module to select the storage container you want to view

Add The Battery:
- Click on the menu 'advanced settings'
- Click on the menu 'energy storage container $Ⓔ$
- Click on the tab 'battery'
- In the 'please select storage container module click on the dropdown box to choose to view the storage container
- Click 'add' button battery
- In the 'add batteries' dialog box type in the name' battery', 'battery status data point' and select' soc data point', 'power data point', meter charging, discharge meter, rated capacity, rated power, 'nominal voltage
- Click "Save" Button.
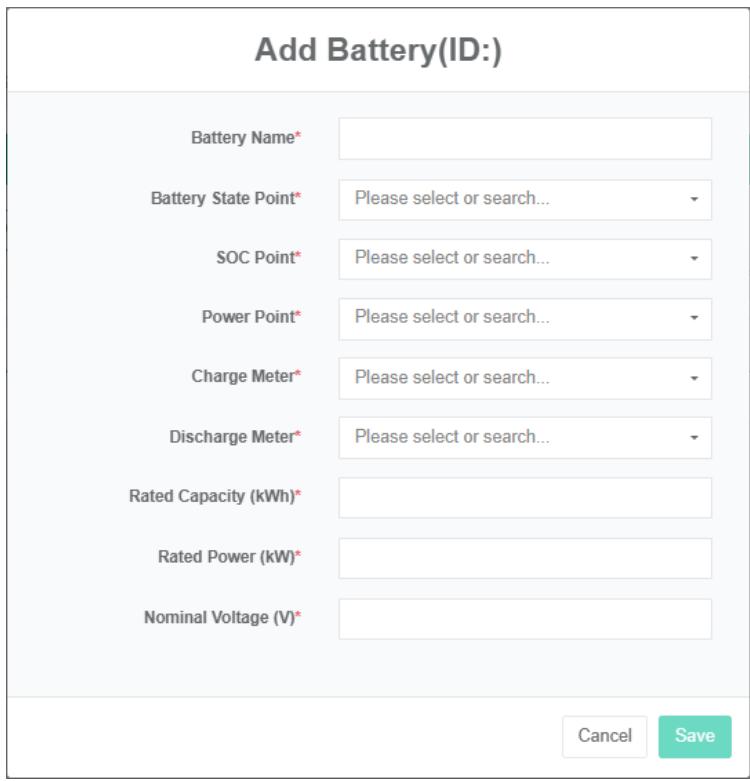
Edit The Battery:
- Click on the menu 'advanced settings'
- Click on the menu 'energy storage container $Ⓔ$
- Click on the tab 'battery'
- In the 'please select storage container module click on the dropdown box to choose to view the storage container
- Click on 'modify' button in the list
- In the 'edit batteries' dialog box type in the name' battery', 'battery status data point, choose' soc data point', 'power data point', meter charging, discharge meter, rated capacity, rated power, 'the nominal voltage.
- Click "Save" Button.
Remove The Battery:
- Click on 'advanced settings'
- Click on the menu 'energy storage container $Ⓔ$
- Click on the tab 'battery'
- In the 'please select storage container module click on the dropdown box to choose to view the storage container
- Click on the list "Remove" Button
- In the "Delete" Dialog box click on the "Click" Delete "Button
Grid, load, air conditioning, fire protection, dcdc, sts ,function is the same as the battery.
27.4. Scheduling Policy
Add Scheduling Policy:
- Click on the menu 'advanced settings'
- Click on the menu 'energy storage container $Ⓔ$
- Click on the tab 'scheduling policy'
- Select storage container
- Choose 'schedule start time', 'scheduling end time,' peak guping ', 'dispatching power'
- Click "Add"

27.5. Bind Command
View The Bind Of Command:
- Click on the menu 'advanced settings'
- Click on the menu 'energy storage container $Ⓔ$
- Click on the tab "Bind command"
- In the 'please select storage container module click on the dropdown box to choose to view the storage container
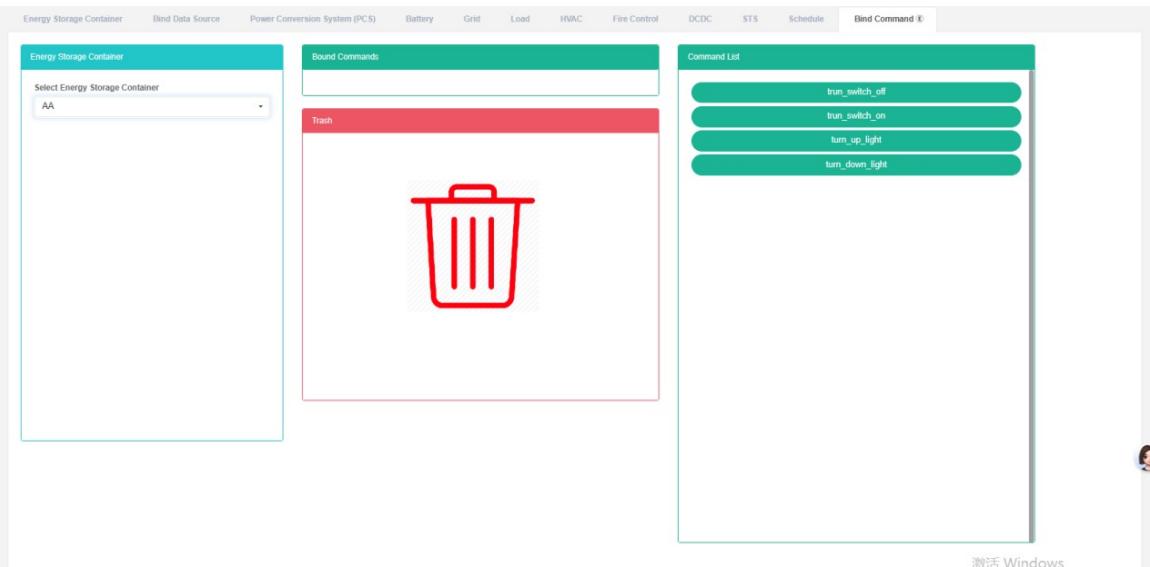
Bind Command:
- Click on the menu 'advanced settings'
- Click on the menu 'energy storage container $Ⓔ$
- Click on the tab "Bind command"
- In the 'please select storage container module click on the dropdown box to choose to view the storage container
- Click on the "Order list" The sensor module and drag and drop to the 'bind command module
- Into a 'bind sensor module after release the left mouse button
- A 'bind sensor success' prompt indicates a successful bind
- The same measurement data point into a "Wrong" Will light up to alert the same shopfloor
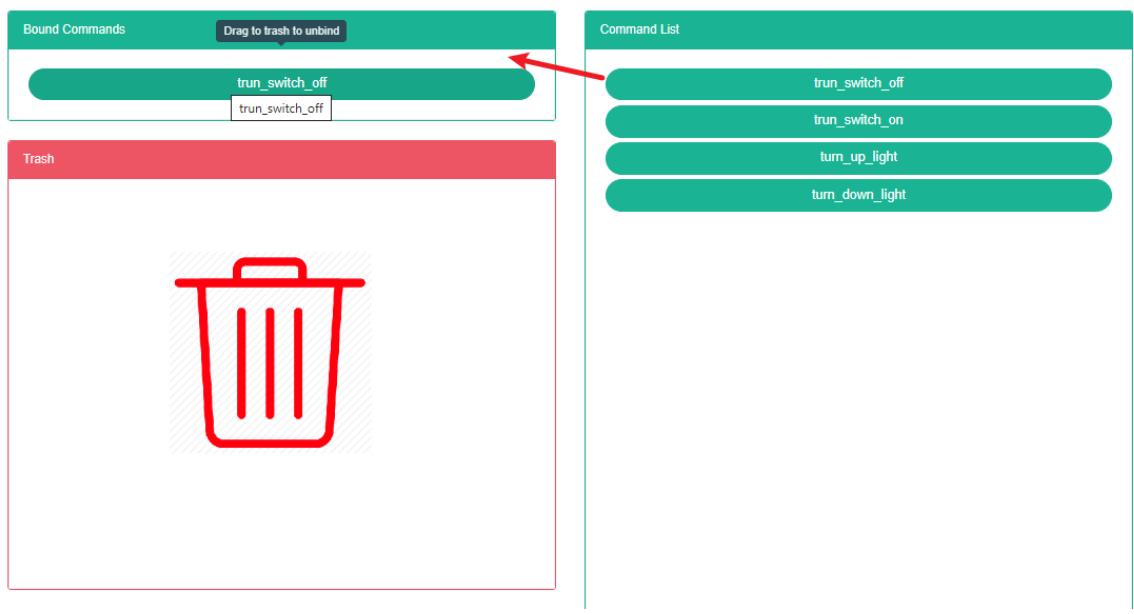
Unbind Command:
- Click on the menu 'advanced settings'
- Click on the menu 'energy storage container $Ⓔ$
- Click on the tab 'bind command'
- In the 'please select storage container module click on the dropdown box to choose to view the storage container
- Click on the 'bind command module of sensor and drag and drop to the' barrel 'module
- Release the left mouse button after dragging into the 'recycle bucket' module

- Energy Storage Power Station(E
28.1. Energy Storage Power Station
Check The Energy Storage Power Station:
- Click on the menu 'advanced settings'
- Click on the menu 'energy storage power station $Ⓔ$
- Click on the tab 'energy storage station'

Add Energy Storage Power Station:
-
Click on the menu 'advanced settings'
-
Click on the menu 'energy storage power station $Ⓔ$
-
Click on the tab 'energy storage power station
-
Click on the 'add energy storage power station' button
-
In the 'add energy storage power station dialog box input "Name", "Address", "Pick up coordinates', 'zip code', latitude, longitude, rated capacity, rated power, 'contacts', 'cost centers', 'SVG," Whether to show cost data ", "Stage" And "Description"
-
Click "Save" Button
Edit Energy Storage Power Station:
- Click on the menu 'advanced settings'
- Click on the menu 'energy storage power station $Ⓔ$
- Click on the tab 'energy storage power station
- Click "Edit" Button
- In 'edit energy storage power station "Dialog input" Name ", "Address", "Zip code", latitude, longitude, rated capacity, rated power,' contacts', 'cost centers', 'SVG, "Whether to show cost data", "Stage" And "Description"
- Click the 'save' button
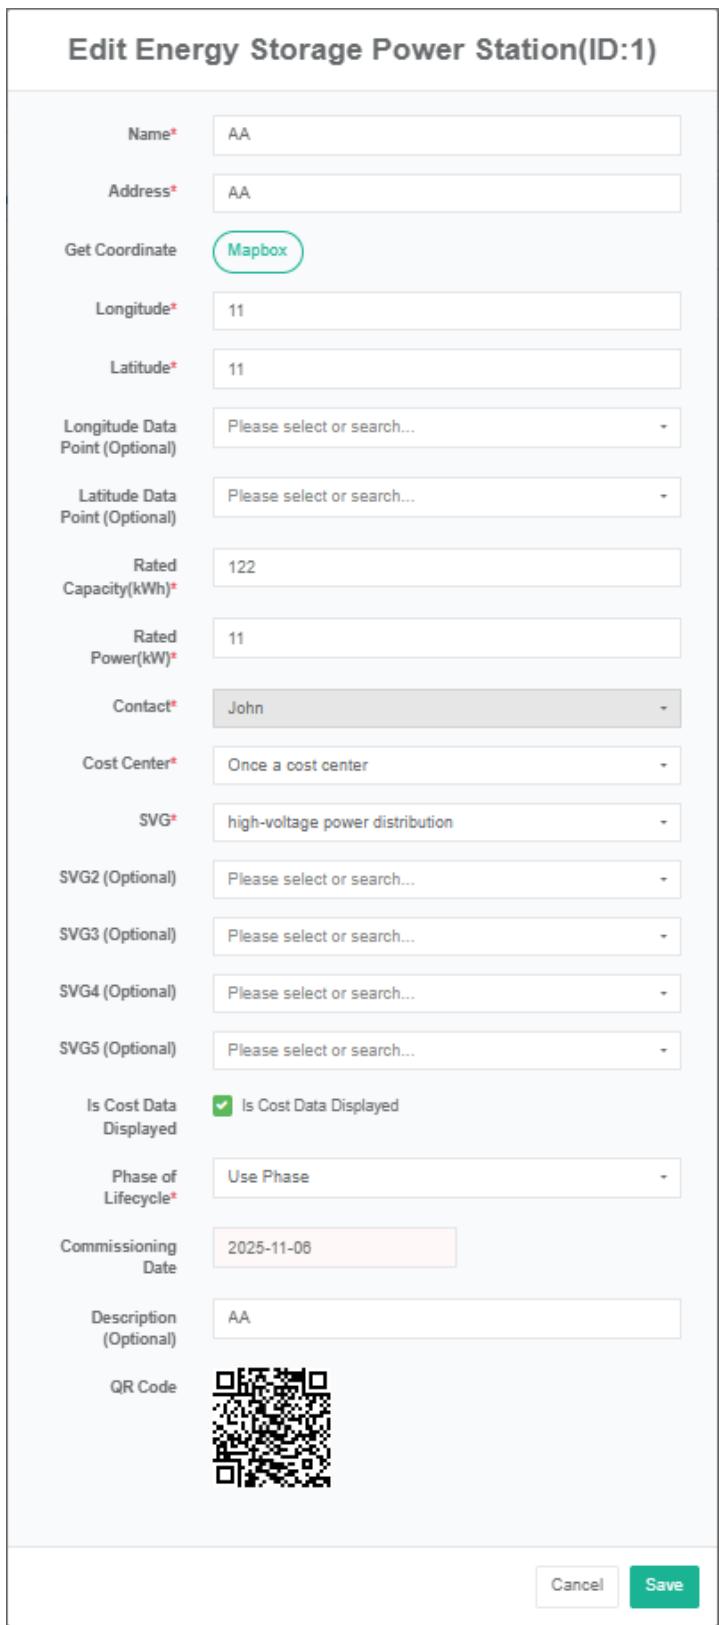
Delete The Energy Storage Power Station:
- Click on the menu 'advanced settings'
- Click on the menu 'energy storage power station $Ⓔ$
- Click on the tab 'energy storage power station
- Click on the list "Remove" Button
- In the "Delete" Dialog box click on the "Click" Delete "Button.
Import Energy Storage Power Station:
- Click on the menu 'advanced settings'
- Click on the menu 'energy storage power station $Ⓔ$
- Click on the tab 'energy storage power station
- Click "Import" Button
- The data input dialog
- Click 'import'
ExportEnergy Storage Power Station:
- Click on 'advanced settings'
- Click on the menu 'energy storage power station $Ⓔ$
- Click on the tab 'energy storage power station
- Click on the list of "Export" Button
Clone Energy Storage Power Station:
- Click on the menu 'advanced settings'
- Click on the menu 'energy storage power station $Ⓔ$
- Click on the tab 'energy storage power station
- Click on the list of "Clone" Button
28.2. Bind Energy Storage Container
Check The Bind Energy Storage Container:
- Click on the menu 'advanced settings'
- Click on the menu 'energy storage power station $Ⓔ$
- Click on the tab 'bind energy storage container'
- In the 'please select energy storage power station in the module click drop-down box to choose to view the storage container

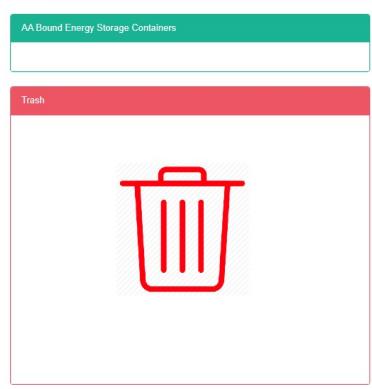
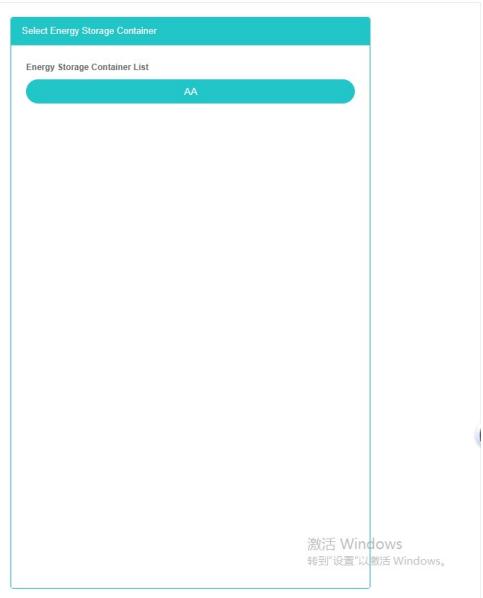
Bind Energy Storage Container:
-
Click on the menu 'advanced settings'
-
Click on the menu 'energy storage power station $Ⓔ$
-
Click on the tab 'bind energy storage container'
-
Click the drop-down box in the 'please select energy storage station' module to select the energy storage station you want to view
-
Click on the 'energy storage container list the sensor module and drag and drop to the bind energy storage container module
-
Into a 'bind energy storage container module after release the left mouse button
-
When the "Bind storage container successfully" Prompt appears, the bind is successful
-
The same measurement data point into a "Wrong" Will light up to alert the same shopfloor
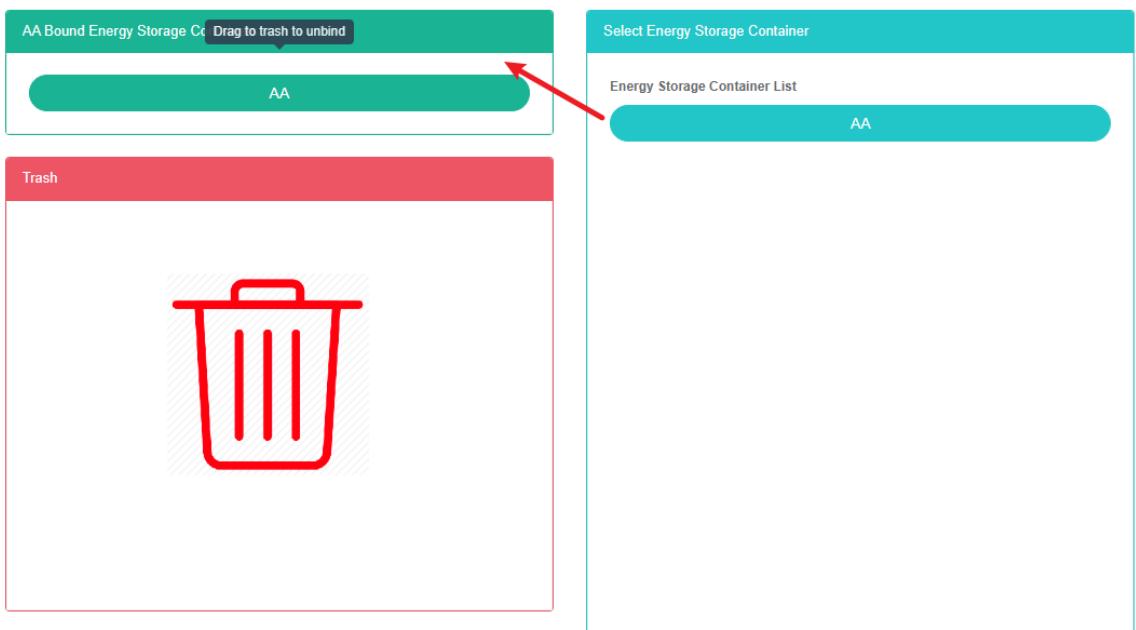
Ubind Energy Storage Container:
- Click on the menu 'advanced settings'
- Click on the menu 'energy storage power station $Ⓔ$
- Click on the tab 'bind energy storage container'
- In the 'please select energy storage power station module click on the drop-down box to choose to view the energy storage power station
- Click on the "Bind energy storage container module of sensor and drag and drop to the 'barrel' module
- Drag the recycle bucket module and release the left mouse button
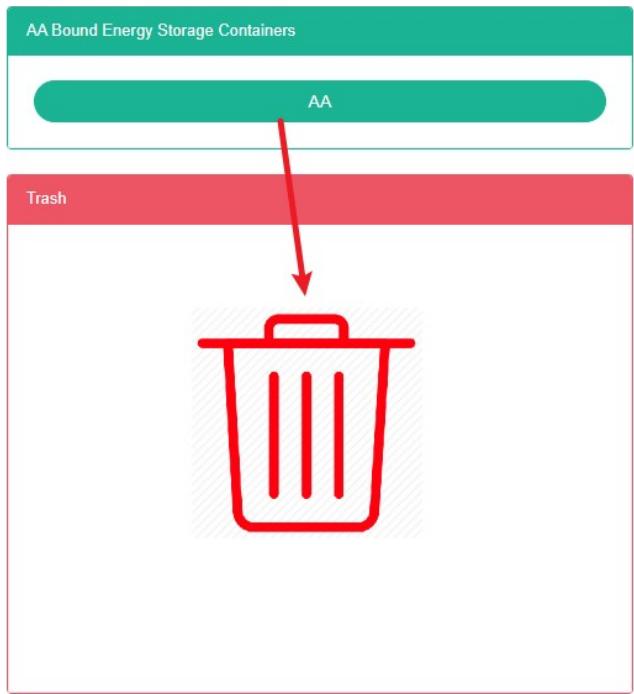
28.3. Bind The User
View Bind User:
- Click on the menu 'advanced settings'
- Click on the menu 'energy storage station $Ⓔ$
- Click on the tab 'bind energy storage user'
- Click the drop-down box in the 'please select energy storage station' module to select the energy storage station you want to view

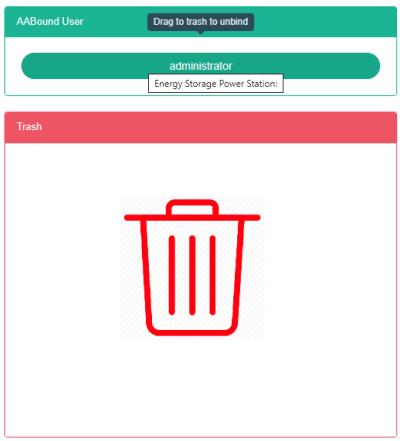

Bind User:
Click on the menu 'advanced settings'
- Click on the menu 'energy storage station $Ⓔ$
- Click on the tab 'bind user'
- In the 'please select energy storage power station module click on the drop-down box to choose to view the energy storage power station
- Click on "User list" The sensor module and drag and drop to the 'bind user module
- Into a 'bind user module after release the left mouse button
- If a 'bind user successful' prompt appears, the bind is successful
- The same measurement data point into a "Wrong" Will light up to alert the same shopfloor
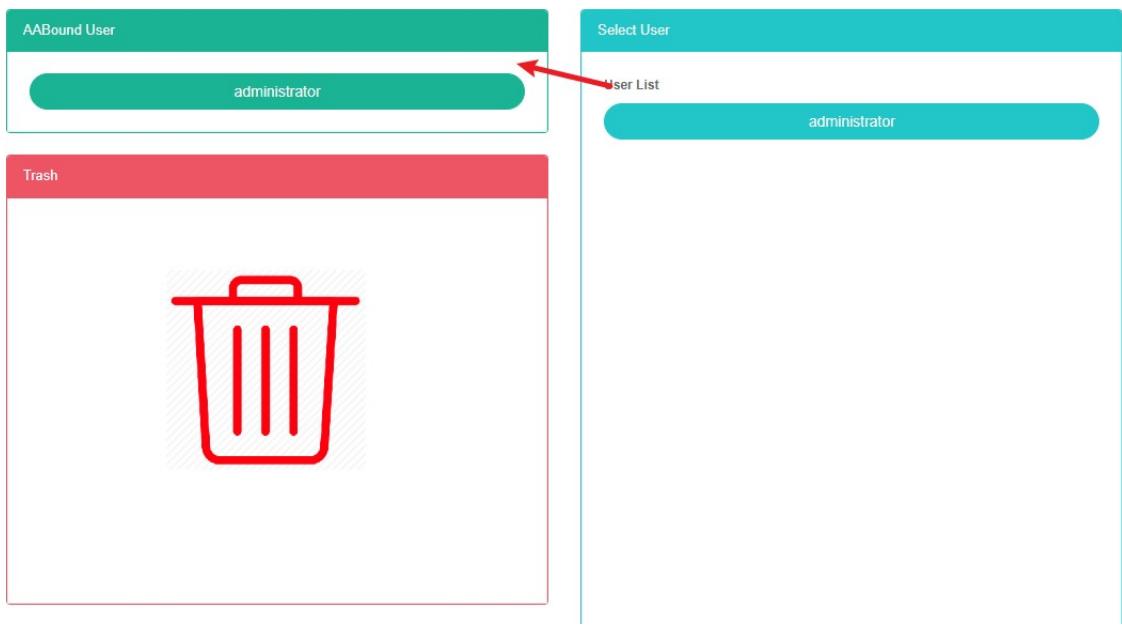
Unbind The User:
- Click on the menu 'advanced settings'
- Click on the menu 'energy storage power station $Ⓔ$
- Click on the tab 'bind user'
- In the 'please select energy storage power station module click on the dropdown box to choose to view the energy storage power station
- Click on the 'bind user module of sensor and drag and drop to the' barrel 'module
- Into the recycling bins' 'module after release the left mouse button
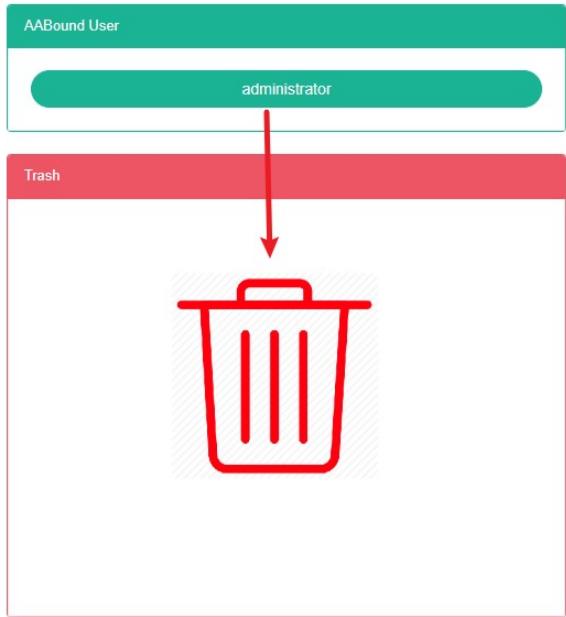
29. Photovoltaic Power Station
Check The Photovoltaic Power Station:
- Click the menu "System management"
- Click on the menu 'photovoltaic power station $Ⓔ$

Add Pv Power Station:
-
Click on the menu 'advanced settings'
-
Click on the menu 'photovoltaic power station $⑤$
-
Click on the 'add photovoltaic power station' button
-
In 'add photovoltaic power station dialog input' name ', 'power station code', 'address', 'pick up coordinates', latitude, longitude, rated capacity, rated power,' contacts', 'cost centers', SVG 'and' description 'choice "Whether to show cost data" And "Stage".
-
Click "Save" Button.
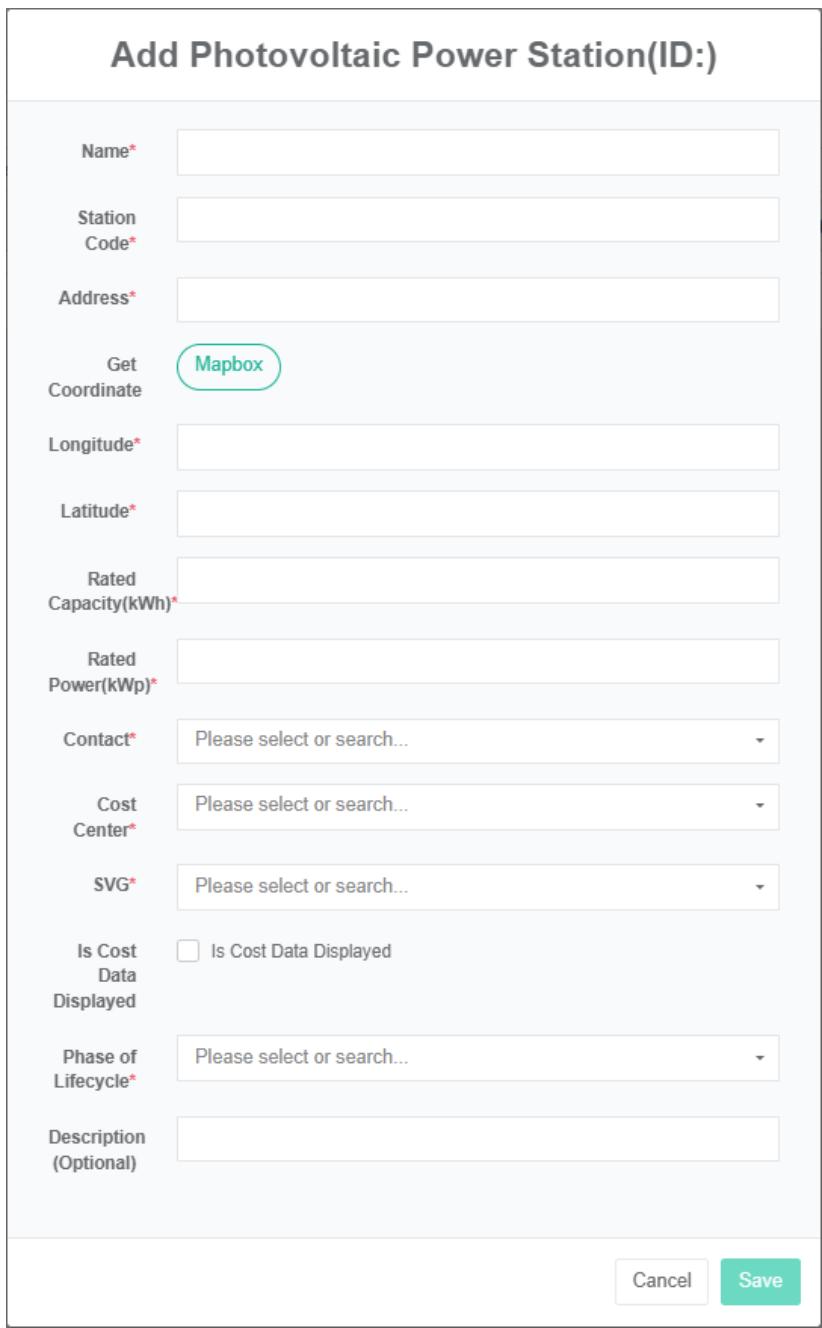
Edit The Photovoltaic Power Station:
- Click on the menu 'advanced settings'
- Click on the menu 'photovoltaic power station $Ⓔ$
- Click on 'modify' button in the list
- In the 'edit photovoltaic power station' dialog box input 'name', 'power station code, address, zip code, latitude, longitude, rated power, rated capacity, "Contacts", "Cost center", "SVG' and 'description'
- Click "Save" Button.
Delete The Photovoltaic Power Station:
- Click on the 'advanced settings' menu
- Click on the menu 'photovoltaic power station $Ⓔ$
- Click on the list 'delete' button
- Click the 'click' confirm delete 'button in the' confirm delete 'dialog box.
Import The Pv Plant:
- Click on the menu 'advanced settings'
- Click on the menu 'photovoltaic power station $Ⓔ$
- Click on the 'import' button
- Enter the data into the dialog box
- Click 'import'
Export The Pv Plant:
- Click on the menu 'advanced settings'
- Click on the menu 'photovoltaic power station $Ⓔ$
- Click on the 'export' button
To Clone The Pv Plant:
-
Click on the menu 'advanced settings'
-
Click on the menu 'photovoltaic power station $⑧$
-
Click the 'clone' button
29.1.Inverter
Check The Inverter:
- Click on the menu 'advanced settings'
- Click on the menu 'photovoltaic power station $Ⓔ$
- Click on the tab "Inverter"
- In the 'please select photovoltaic power station module click on the drop-down box to choose to view the photovoltaic power station

Add The Battery:
- Click on the menu 'advanced settings'
- Click on the menu 'photovoltaic power station $Ⓔ$
- Click on the tab "Inverter"
- In the 'please select photovoltaic power station module click on the drop-down box to choose to view the photovoltaic power station
- Click on the 'add inverter' button
- In the 'add inverter' dialog box input "Name", "Model", "Serial number".
- Click "Save" Button.
Edit The Inverter:
- Click on the menu 'advanced settings'
- Click on the menu 'photovoltaic power station $Ⓔ$
- Click on the tab "Inverter"
- In the 'please select photovoltaic power station module click on the drop-down box to choose to view the photovoltaic power station
- Click on 'modify' button in the list
- In 'edit inverter "Dialog input" Name ", "Model", "Serial number".
- Click "Save" Button.
Delete The Inverter:
- Click on the menu 'advanced settings'
- Click on the menu 'photovoltaic power station $Ⓔ$
- Click on the tab "Inverter"
- In the 'please select photovoltaic power station module click on the drop-down box to choose to view the photovoltaic power station
- Click on the list "Remove" Button
- Click the 'click' confirm delete 'button in the' confirm delete 'dialog box
Note: * power grid, the load operation process is consistent with the inverter.
29.2. Bind User
Check The Bind Of User:
-
Click on the menu 'advanced settings'
-
Click on the menu 'photovoltaic power station $Ⓔ$
-
Click on the tab 'bind user'
-
In the 'please select photovoltaic power station module click on the drop-down box to choose to view the photovoltaic power station
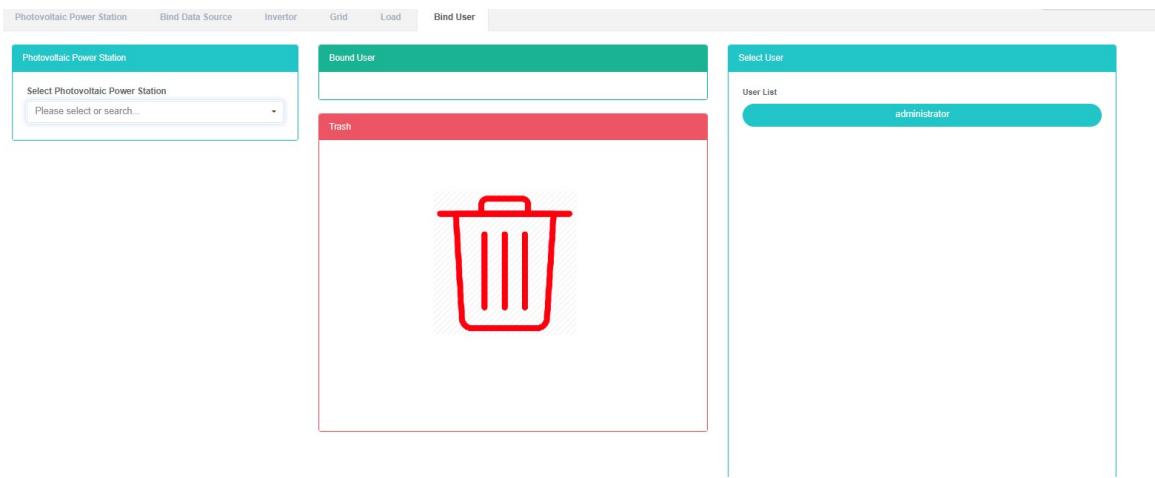
Bind User:
- Click on the menu 'advanced settings'
- Click on the menu 'photovoltaic power station $Ⓔ$
- Click on the tab 'bind user'
- In the 'please select photovoltaic power station module click on the drop-down box to choose to view the photovoltaic power station
- The user click on "User list" Module and drag and drop to the 'bind user module
- Release the left mouse button after dragging into the 'Bind user' module
- 'bind user success tips in which bind success
- The same measurement data point into a "Wrong" Will light up to alert the same shopfloor
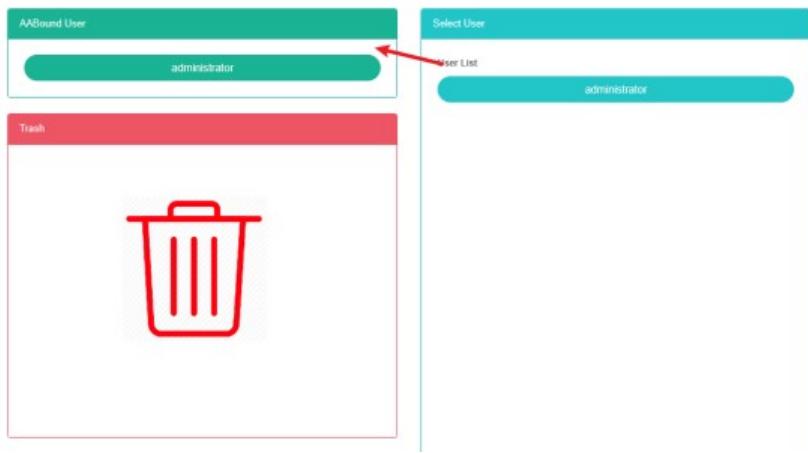
Unbind User:
- Click on the menu 'advanced settings'
- Click on the menu 'photovoltaic power station $Ⓔ$
- Click on the tab 'bind user'
- In the 'please select photovoltaic power station module click on the drop-down box to choose to view the photovoltaic power station
- Click on the 'bind user module of sensor and drag and drop to the' barrel 'module
- Into the recycling bins' 'module after release the left mouse button
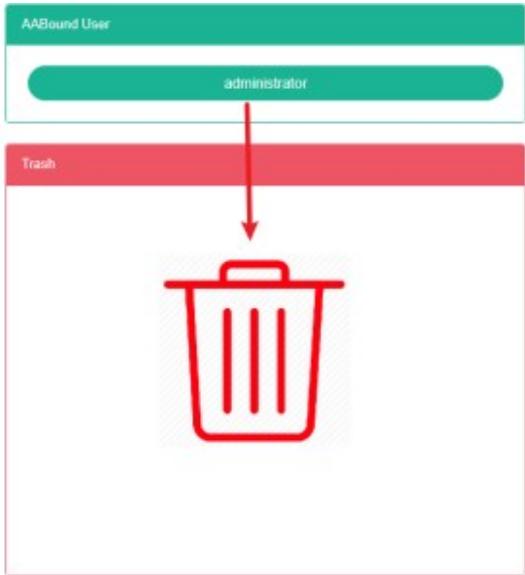
30. Wind Farm
Check The Wind:
- Click on the menu 'advanced settings'
- Click on the menu 'wind farm $Ⓔ$

Add The Wind:
- Click on the menu 'advanced settings'
- Click on the menu 'wind farm $Ⓔ$
- Click on the 'add wind farms' button
- In the 'add wind farms' dialog box input name ', 'address', latitude, longitude, rated power, "Contacts", "Cost center", "SVG 'and' description '
- Click "Save" Button.
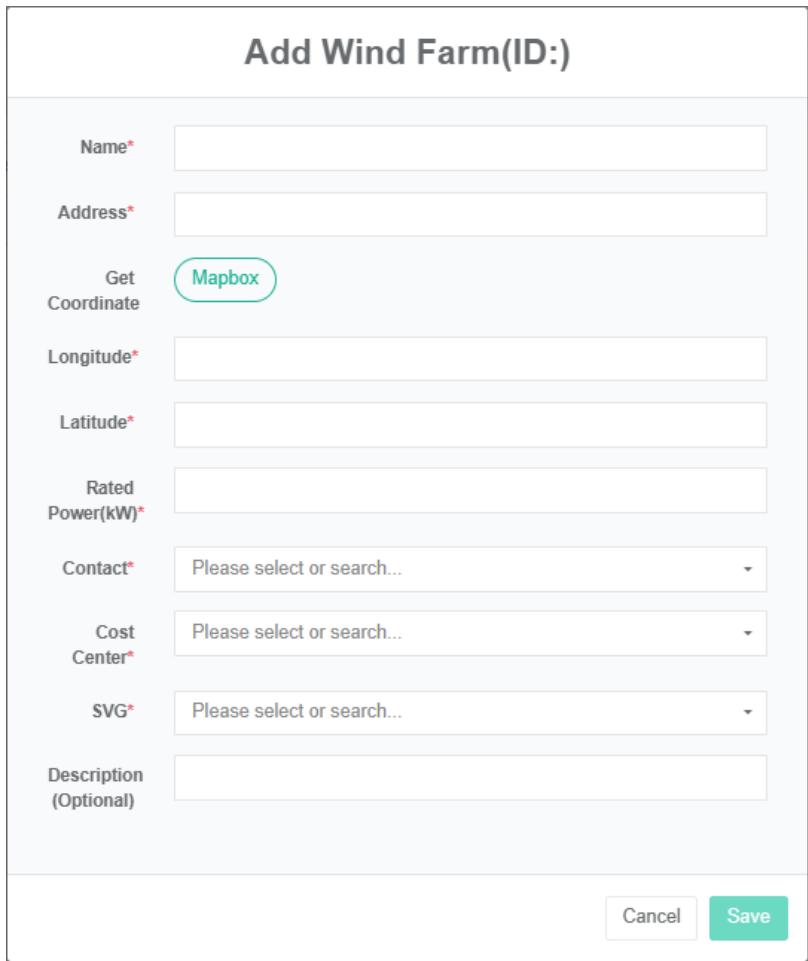
Edit Wind Farm:
- Click on the menu 'advanced settings'
- Click on the menu 'wind farm $Ⓔ$
- Click on 'modify' button in the list
- In the 'edit wind farms' dialog box input name', 'address', latitude, longitude, rated power, "Contacts", "Cost center", "SVG 'and' description '
- Click "Save" Button.
Delete The Wind:
- Click on the menu 'advanced settings'
- Click on the menu 'wind farm $Ⓔ$
- Click on the list "Remove" Button
- Click the 'click' button in the 'confirm delete' dialog box.
Import The Wind:
- Click on the menu 'advanced settings'
- Click on the menu 'wind farm $Ⓔ$
- Click on the "Import" Button
- Enter the data into the dialog box
- Click 'import'
Exportwind farm:
- Click on the menu 'advanced settings'
- Click on the menu 'wind farm $Ⓔ$
- Click on the "Export" Button
Clone Wind Farm:
- Click on the menu 'advanced settings'
- Click on the menu 'wind farm $Ⓔ$
- Click on 'clone' button
31.EmailServer
The mail server is the server used to send mail, and it is used here to configure its basic information.
Checking The Mail Server:
- Click on the e-mail 'advanced settings'
- Click on the e-mail 'mail server $Ⓔ$
- Click on the tab "Mail server"

Edit The Mail Server:
- Click on the e-mail 'advanced settings'
- Click on mail 'mail server $Ⓔ$
- Click on the tab "Mail server"
- Click "Edit" Button
- In the 'edit mailbox server dialog box input' server ', 'port', 'authentication is required, "User name", "Password" And "The sender address"
- Click the "Save" Button
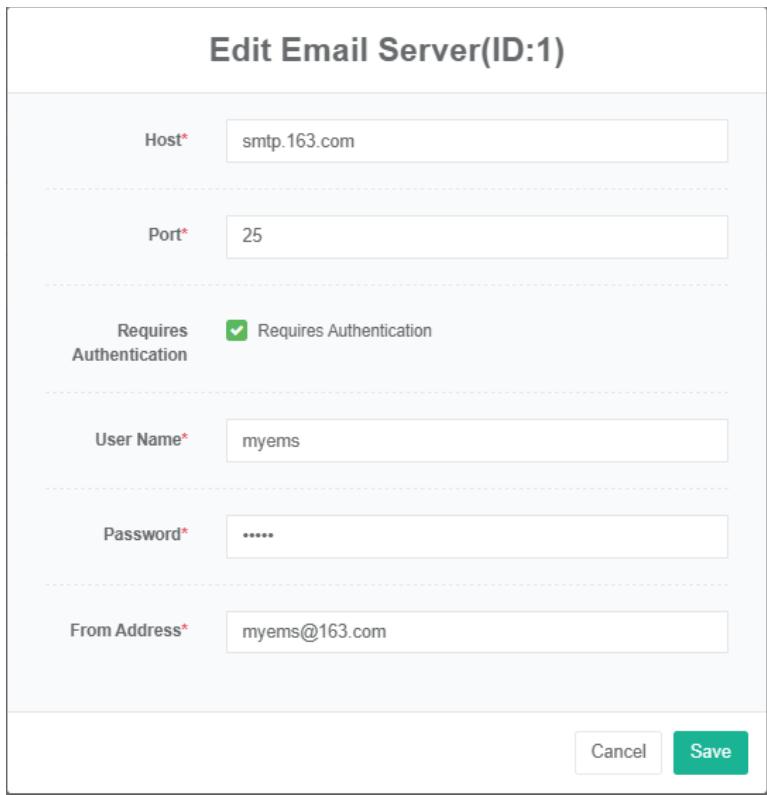
32. Advanced Report
Used to configure management advanced report.
Check The Advanced Report:
- Click on the menu 'advanced settings'
- Click on the menu 'advanced report $Ⓔ$

Add Advanced Report:
- Click on the menu 'advanced settings'
- Click on the menu 'advanced report $Ⓔ$
- Click on the 'add advanced report' button
- In 'to add advanced report dialog input "Name", "Expression", select "Enable switch,' next time running time" And "Run immediately
- Click "Save" Button.
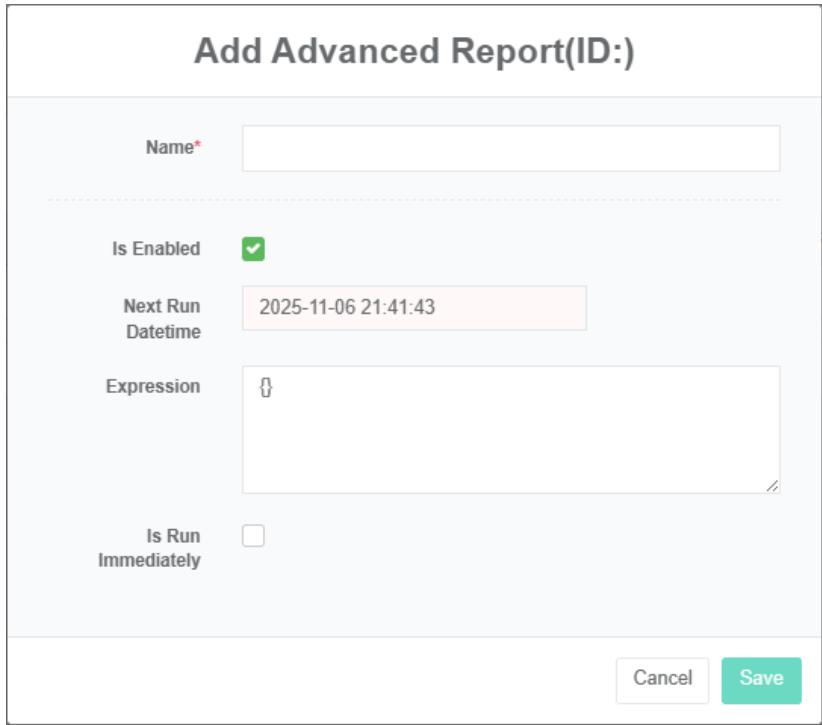
Edit Advanced Report:
- Click on the menu 'advanced settings'
- Click on the menu 'advanced report $Ⓔ$
- Click on the list 'modify' button
- In 'to add advanced report dialog input "Name", "Expression", select "Enable switch,' next time running time" And "Run immediately
- Click "Save" Button.
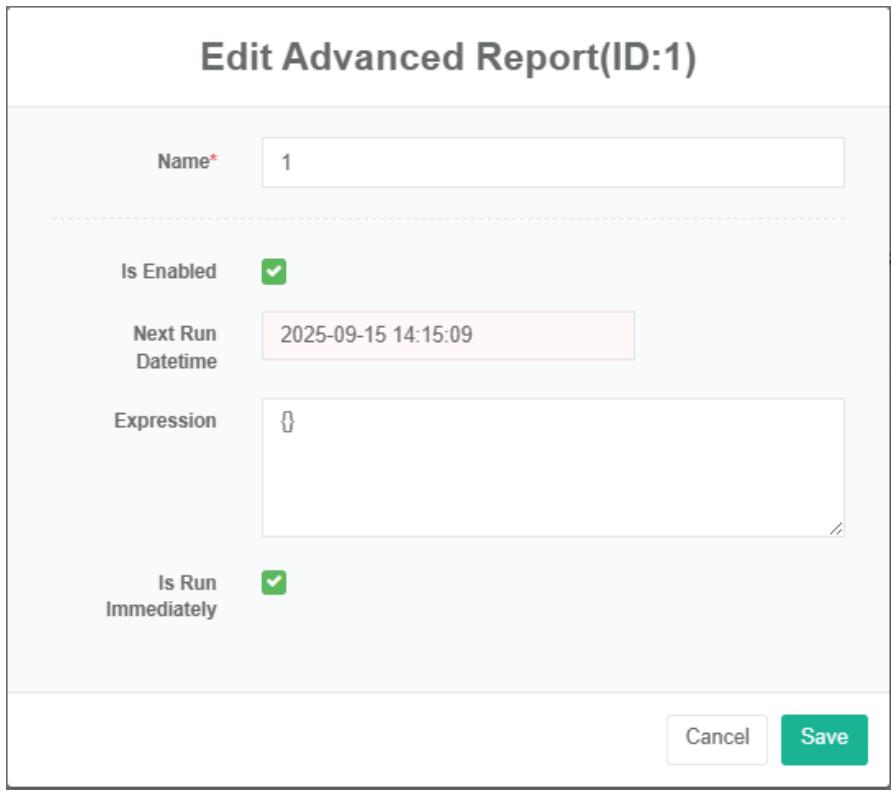
Delete The Advanced Report:
- Click on the menu 'advanced settings'
- Click on the menu 'advanced report $Ⓔ$
- Click on the list "Remove" Button
- Click the 'click' confirm delete 'button in the' confirm delete 'dialog box.
Import Advanced Report:
- Click on the menu 'advanced settings'
- Click on the menu 'advanced report $Ⓔ$
- Click on the "Import" Button
- Enter the data into the dialog box
- Click 'import'
ExportAdvanced Report:
- Click on the menu 'advanced settings'
- Click on the menu 'advanced report $Ⓔ$
- Click on the "export" button
Clone Advanced Report:
- Click on the menu 'advanced settings'
- Click on the menu 'advanced report $Ⓔ$
- Click on 'clone' button
33. Energy Plan File
Check The Energy Plan File:
- Click on the menu 'advanced settings'
- Click on the menu 'energy plan file'

Upload Energy Plan File:
- Click the menu "System management"
- Click on the menu 'data source management'
- Click on the tab 'data repair file'
- Click on the blue box and select file to upload
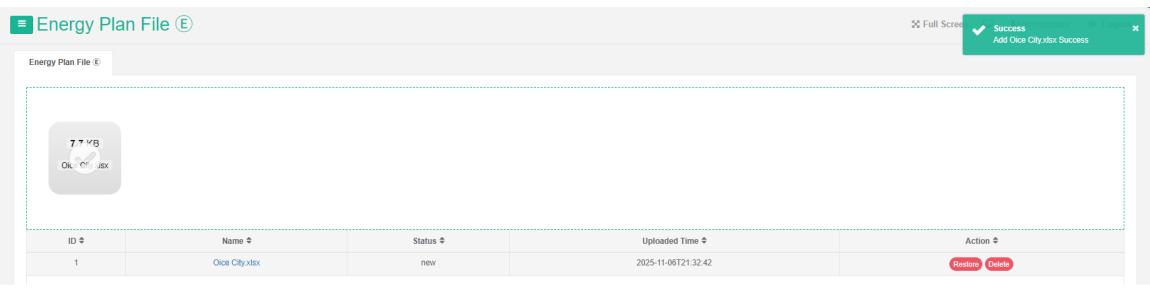
34. Fault Detection And Diagnosis (Fdd)
34.1. Rule Management
Provide full meter at the end of the starting value within a specified time range, values, and difference, uses data table show the way.
Supply all sensor within a specified time frame, the end value and difference of the initial value (or maximum, minimum, average), using data table show the way.
Check The Rule:
- Click on the menu 'rule'
- Click on the menu 'rule®'

Add Rule:
-
Click on the menu 'rule'
-
Click on the menu 'rule $Ⓔ$
-
Click on the 'add rule' button
-
In 'to add advanced report dialog input "Name", "Expression", select "Enable switch,' next time running time" And "Run immediately
-
Click "Save" Button.
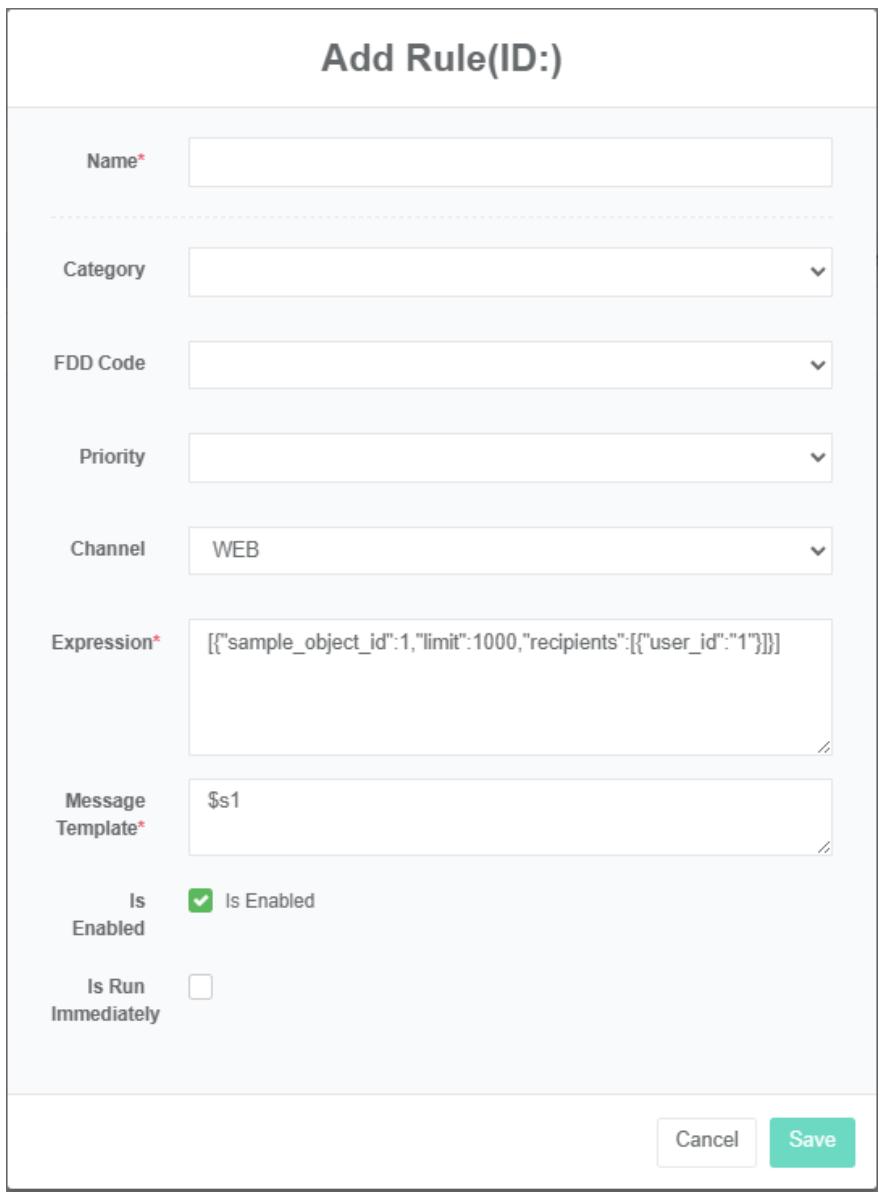
Edit Rule:
-
Click on the menu rule'
-
Click on the menu rule $\oplus$
-
Click on the list 'modify' button
-
In 'to add advanced report dialog input "Name", "Expression", select "Enable switch,' next time running time" And "Run immediately
-
Click "Save" Button.
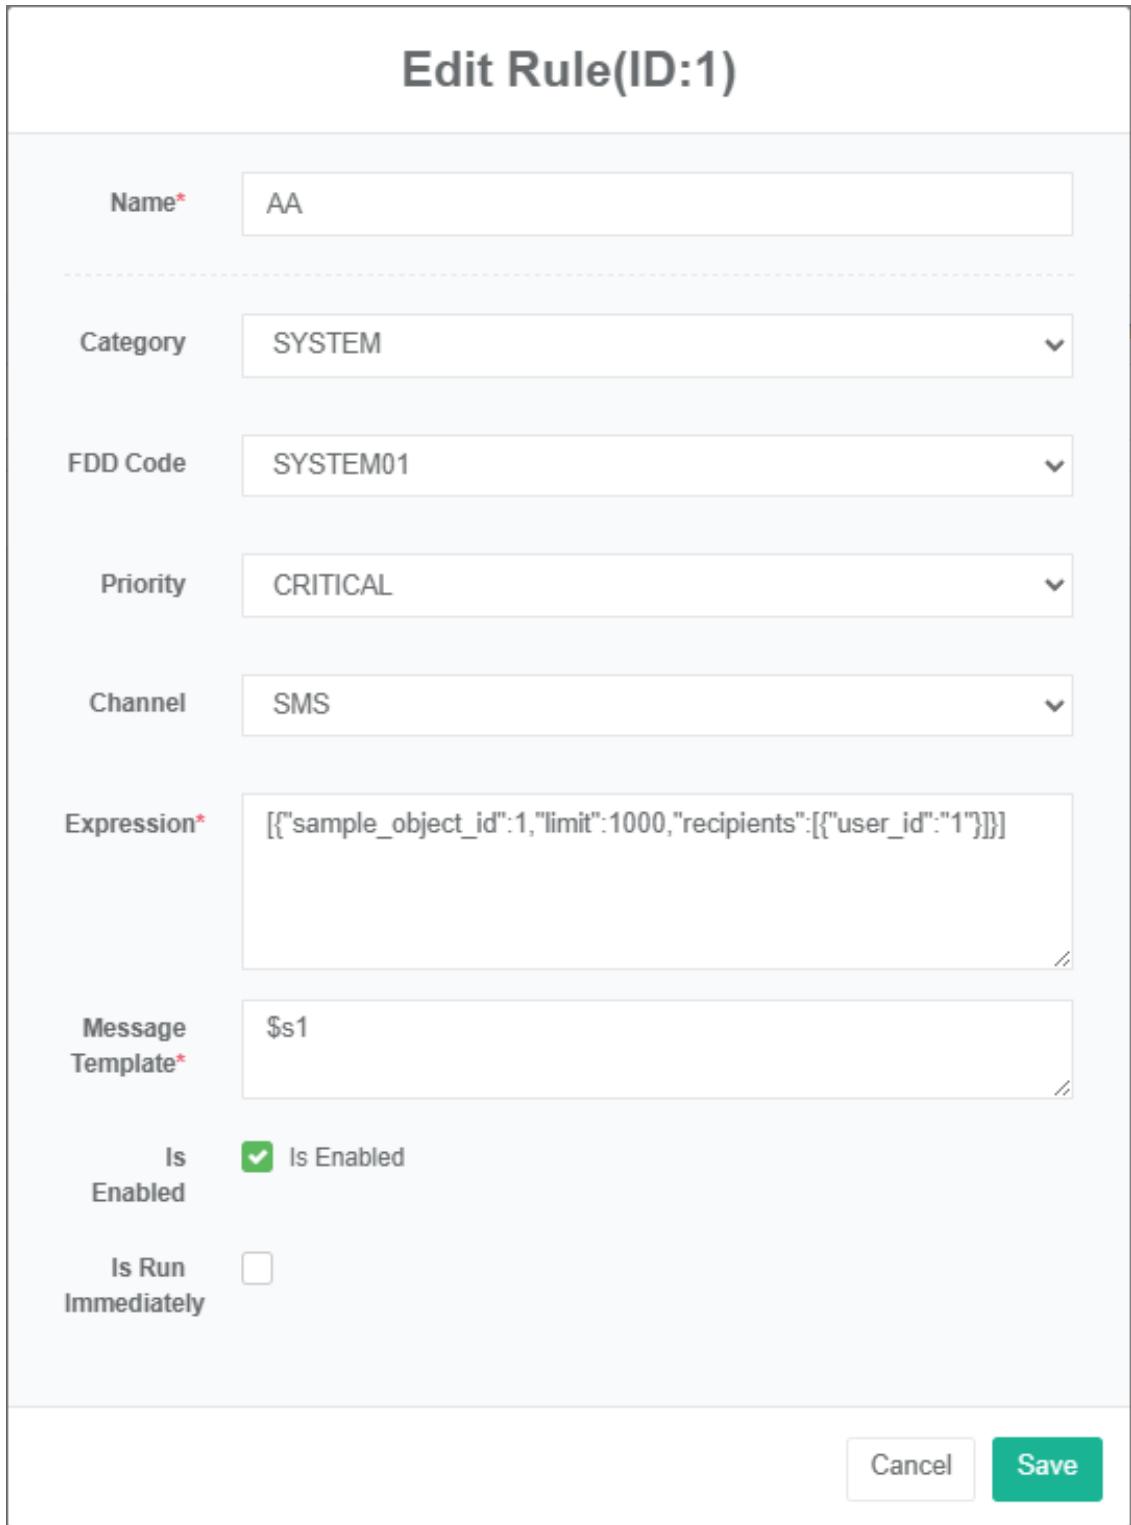
34.2. Sms Alarm
Provide full meter, virtual meter and offline meter within a specified time range and time unit of energy consumption and cost data, using histograms, line Figures and data table show the way.

34.3. Email Alarm
Provide full meter communication status and the last time online status, using data table show the way.
Provide all sensor communication status and the last time online status, using data table show the way.
34.4. Web Alarm
Provide real-time data and historical trend data of all parameter of all meters in the specified time range, and use the graph display method.
Provide all sensor within a specified time range all parameter of real-time data and historical trend data, using graphs show the way.
34.5. Wechat Alarm
Provide the network topology map of all equipment within the scope of the energy management system, including servers, gateways, controllers, meters and other hardware equipment with independent ip addresses, display the equipment name and ip address in the form of topology graphics, and display the equipment status in the form of a list.
Provide all equipment within the scope of the condition monitoring of energy management system services, including servers, gateways, controller, meter and other hardware equipment with independent ip address.
35. User And Privileges
35.1. User
Used to set the user information and assign user rights.
Check The User:
- Click the menu "User and privileges"
- Click the menu "User settings"
- Click on the tab "User list"

Add User:
- Click the menu "User and privileges"
- Click the menu "User settings"
- Click the 'add user' button
- In the add user dialog box, enter username, password, display name, email, administrator or not, privileges, account expiration date, and password expiration date.
- Click the 'save' button

Edit User Settings:
- Click the menu "User and privileges"
- Click on the menu 'user settings'
- Click on the tab 'user list'
- Click the 'modify' button
- Enter 'username', 'password', 'display name', 'email', 'administrator' and 'privileges' in the edit user 'dialog box
- Click the 'save' button

Security lock/unlock: Incorrect login password three times, automatically lock account; after the account is locked, the administrator can unlock the locked account before using it.
New User List:
New user register unaudited data, which can be queried in the user list after being audited in the operation.

35.2. Privileges
This is used to set user privileges and assign them in the user settings.
Check The Privileges Settings:
- Click on the menu 'user & privileges'
- Click on the menu 'privileges management'

Add Privileges :
- Click on the menu 'user & privileges'
- Click on the menu 'privileges settings management'
- Click the 'add privileges' button
- In the 'add privileges' dialog box, type 'name' and select a specific access privileges.
- Click the 'save' button
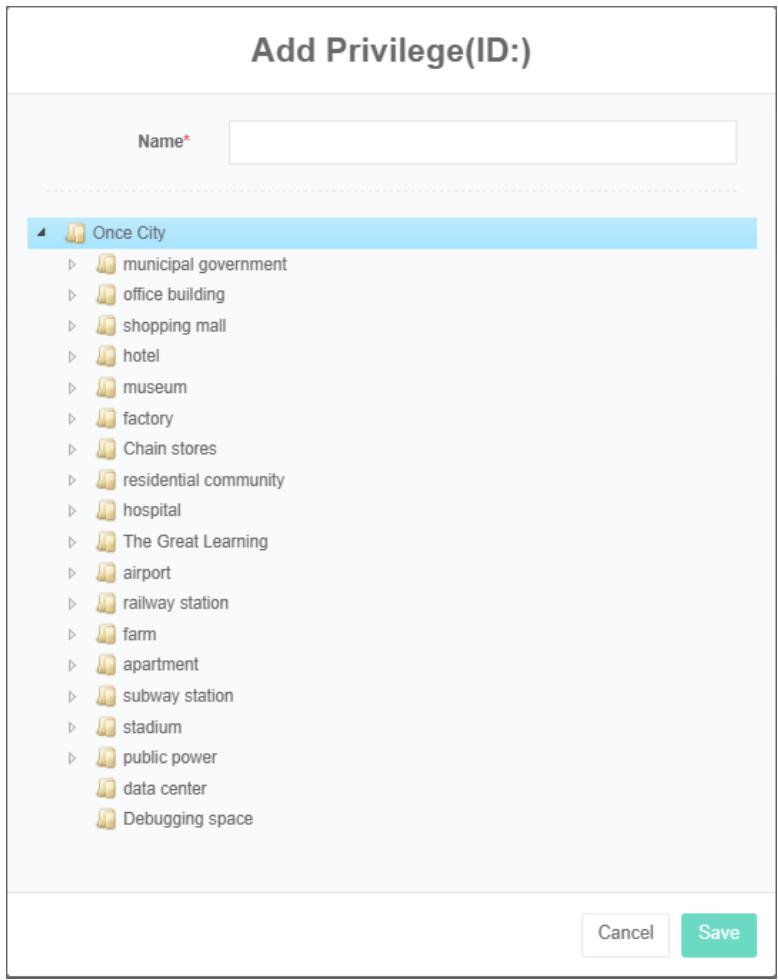
Edit Privileges :
- Click on the menu 'user & privileges'
- Click on the menu 'privileges settings management'
- Click on the tab 'privileges settings'
- Click the 'modify' button
- Enter 'name', 'energy category', 'tariff type', 'unit', 'start time' and 'end time' in the edit privileges dialog box
- Click the "Save" Button
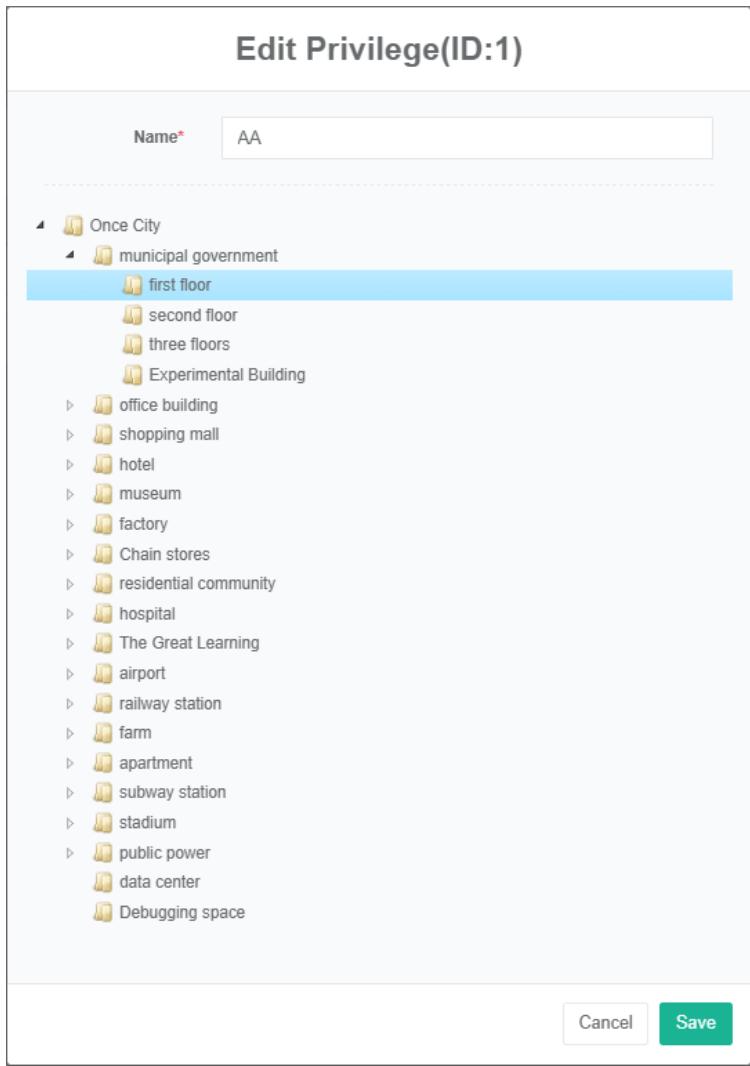
Delete Privileges:
- Click on the menu 'user & privileges'
- Click on the menu 'privileges settings management'
- Click on the tab 'privileges settings'
- Click the 'delete' button
- Click the 'click' confirm delete 'button in the' confirm delete 'dialog box
35.3. Api Key
Originally config api access token, instead of token access.
To View The Api Key:
- Click on the menu 'user & privileges'
- Click the menu "Api key management"

Add The Api Key:
- Click on the menu 'user & privileges'
- Click on the menu 'api key management'
- Click the 'add api key' button
- Type 'name', 'creation time' and 'expiration time'
- Click the 'save' button
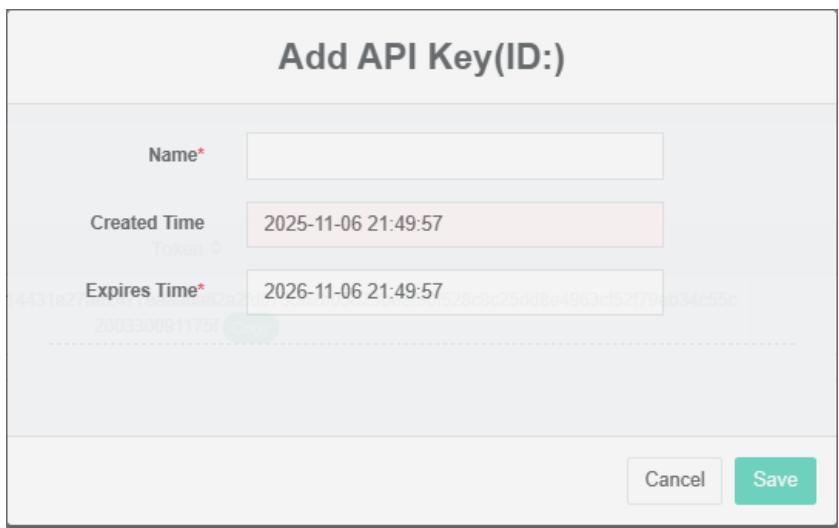
Change The Api Key:
- Click on the menu 'user & privileges'
- Click on the menu 'api key management'
- Click the 'modify' button on the list
- Edit the "Name" And "Failure time'
- Click the 'save' button
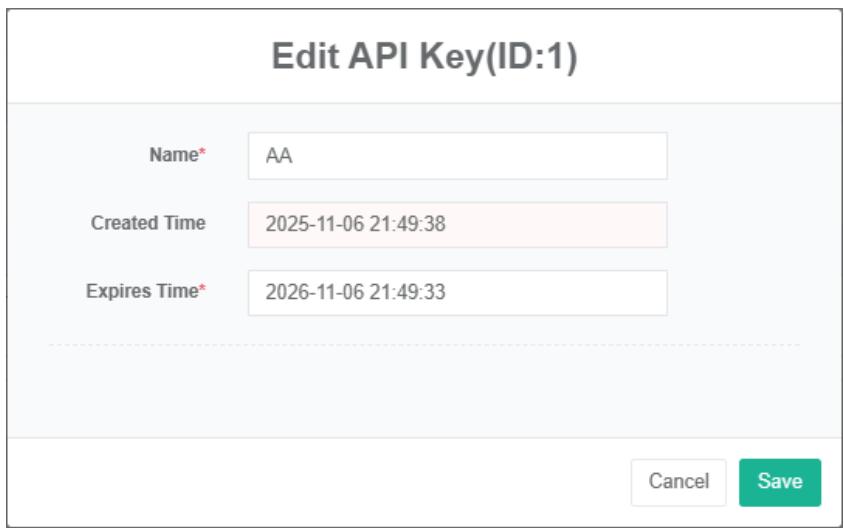
Delete The Api Key:
- Click on the menu 'user & privileges'
- Click on the menu 'api key management'
- Click the 'delete' button on the list